Saturday, January 28, 2017

Dust Deputy

More shop improvements. Until now, the table saw was connected to a very old and somewhat crappy Craftsman shop vacuum. It did a barely adequate job of dust collection and its joke of a filter clogged laughably quickly. Still, it is the only tool in the shop that had any kind of dust collection.

I recently purchased a small plastic cyclone separator (the Oneida, Dust Deputy) to turn it into a two-stage unit. The purpose of a cyclone is to separate out as much of the sawdust and wood chips from the air stream as possible before it gets to the filter. This makes for cleaner air, longer lasting filters and better air flow. However, converting it would take a little modification and a fair bit of fabrication.

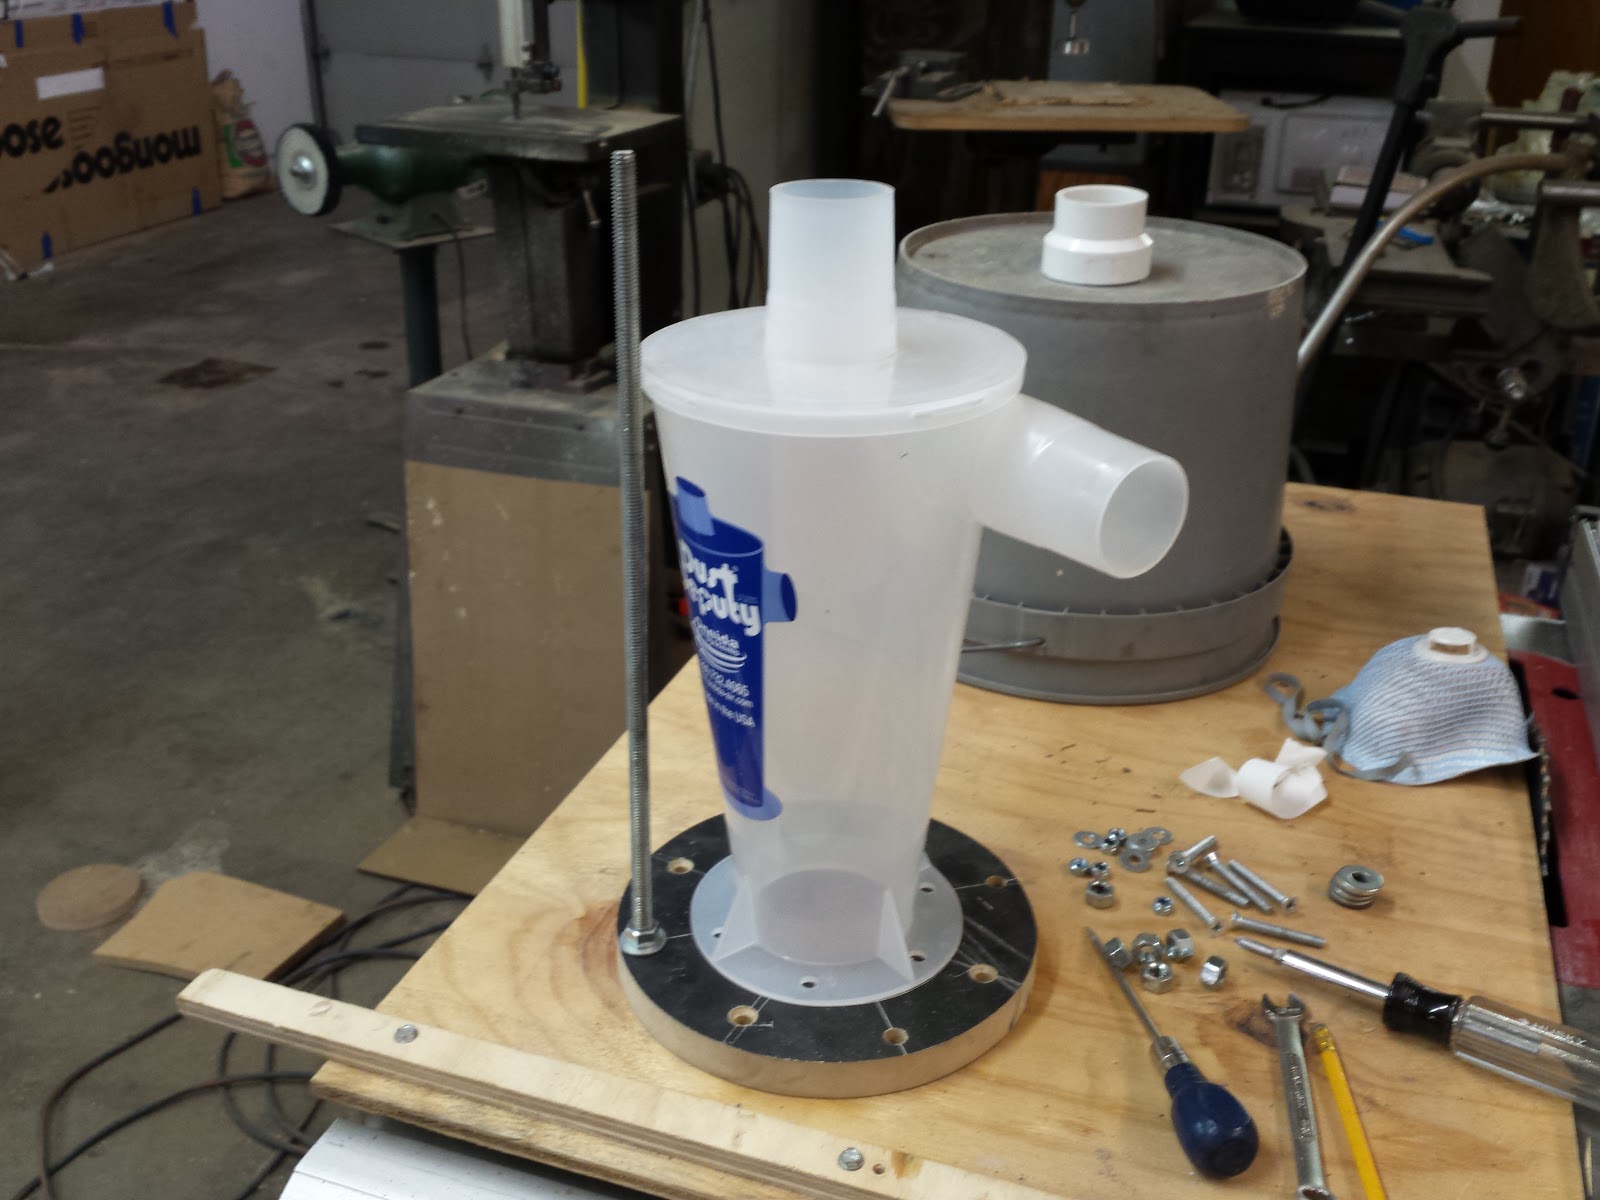
Unless you buy one of their rather expensive kits, the Dust Deputy does not come with any accessories, gaskets or hardware. What you get is a molded plastic cone with an air intake on the side and an air outlet at the top and a mounting flange at the bottom. That's it. A single piece of molded plastic, and it costs about $50. That means I will have to find my own way to connect it to my shop vacuum system.

I started by removing the motor from the lid of the main dust canister of my Craftsman vacuum. The lid fits the canister with an air tight seal, and it has a hole in the top (where the motor mounted) which is just about the right size for the Dust  Deputy's mounting flange. Unfortunately, it is not centered, and there are some other issues that prompt me to make my own flange out of MDF. My MDF flange attaches to the metal canister lid with four bolts and an EVA foam (2mm craft foam) gasket. The Dust Deputy attaches to the MDF flange with six bolts and another EVA foam gasket. I also had to plug up the old air intake hole in the metal lid with a piece of luan.

Next I turned toward the motor. I took the housing off the motor and removed the old crappy filter bag and cage. I planned to replace it with a high efficiency aftermarket filter for shop-vacs.

Since the motor used to mount directly to the canister lid, I would now need a new housing for the motor and filter. It doesn't need to be very big, because the bulk of the sawdust will go into the main canister out the bottom of the cyclone separator. Only a little very fine dust will make it to the filter and motor. A three gallon bucket with nice ridged walls (it will be under vacuum) and a lid will make a fine housing. This too required a flange to be fabricated, as the plastic bucket lid was far too flimsy. So I made a flange out of hard board on the top and a ring of MDF on the bottom and bolted them together, sandwiching the bucket lid in between. The hardboard was screwed into the motor mounting holes and also the MDF ring grips the bottom of the motor, around the impeller and acts as a backstop for the filter.

I got lucky in so far as the bottom of the bucket had a little ring molded into it at the center, which fit just perfectly into a PVC reducer coupling. The other end of the coupling fit perfectly onto the Dust Deputy's air outlet. I cut out the bottom of the bucket in the center of the ring and fit the coupler between the bucket and cyclone. I could have just cut the hole and pushed the cyclone's air outlet pipe directly in it, but I was worried about getting an airtight fit.

At this point, with the motor wired back up, the system was functional, but the whole affair was wobbly and top heavy. It needed more support. Still, I took this opportunity to do a test. I sucked up a mess of sawdust with it to see how much dust got past the cyclone, and to make sure the system was airtight.

As you can see from the pictures above, nearly all the sawdust ended up in the main canister under the cyclone, and only a small amount of very fine dust ended up in the bucket or on the filter. Even this short test generated a significant amount of static electricity from friction between the sawdust and the cyclone. In the near future, I will need to add a ground wire to the system to prevent static buildup.

I disassembled the unit and set about making a support structure. This support structure was made from 3/8" threaded rod, four sticks of it, each about 16" long. They would bolt through the lower flange where the cyclone mounts to the canister lid, and again through an upper flange that the bucket will sit on, taking a significant portion of the weight of the bucket and motor off of the cyclone itself, and providing a wider, more stable base.

And that's it! A working two-stage cyclone separator shop vacuum. Aside from that one test, I have yet to put it to use ( just finished it a couple of days ago). It will likely get re-attached to the table saw, and may end up doing some general shop cleaning, until I get my big centralized dust collection system installed. Then it will get used like a regular shop vac, as the table saw, and most of the other machines, will get connected to the centralized system. But that could be quite a while yet before that system is installed.
 It is still a bit tall and ungainly, but that is the price you pay for efficient dust collection.

Pointy Pendulums

A couple of weeks ago I made another batch of hardwood pendulums on the lathe. This time, I used the scroll chuck, so I was able to get them to end in a nice sharp point (which is something I can't really do with a drive spur and live center).


I also started using some more exotic wood species than I had in the past. Now I am using walnut, jatoba, sapele, soft maple, and black ebony. Oh, and I finally got them down to a more reasonable size.

Monday, January 9, 2017

DIY Drum Sander v1

I like watching YouTube videos that show how to make your own jigs, and even full fledged tools, for wood working. I don't have a large collection of woodworking tools, and I can't afford to buy everything that I want, so I find myself dreaming of making some of the things I want, and these videos make me think that I can.

One of the tools I covet is a drum sander. I certainly can't afford to buy a drum sander, so I considered trying to make one. I had grand ambitions, and even selected some plans to purchase to start my project, and bought a couple of the critical components. And I was almost ready to get started when I stumbled across another video that featured a much simpler solution. So simple in fact, that I wanted to smack myself for not thinking of it myself.

So here is my first attempt at building a drum sander.

I intend to use my ShopSmith Mark V as the power and the frame for the sander. So I need to build a drum and a deck which will become accessories for the ShopSmith.

I started with the drum. I like the idea proffered by Stumpy Nubs of using interchangeable drums rather than trying to peal the paper off of one drum to change the grit. So I made a drum out of very cheap and easy to use PVC pipe. I'm pretty sure I used 2 inch (inner diameter) pipe. I also made sure I used the kind with the thick walls, so that the pipe would be nice and stiff.

I turned two wooden plugs on the lathe that would fit into the ends of the PVC pipe.

One end would have a piece of metal rod sticking out the center of it. This rod would be gripped by my Jacobs Chuck on my ShopSmith, which would power the sander.

 The other end would have a small divot in the center, and would sit on the live center of my tail stock

 The fit of these plugs was VERY snug. Still, I used a small screw to make sure it didn't spin or come loose. I had to countersink the screw head to make sure the surface of the drum stayed nice and even and smooth.

 I bought a long 80 grit sanding belt on clearance for $1.75. I cut the belt and wrapped it around the pipe and held it in place with electrical tape. When I was happy with the fit, I unwrapped half of it and attached it to the pvc with spray adhesive. Then I wrapped it back up with tape to make sure it stayed put, and then I did the same to the other half, from the other end. Once glued, I wrapped it all tightly with electrical tape until the glue was good and set.

Next came the deck. I set a piece of 3/4 inch plywood on the ShopSmith to get my size and spacing.

 I used a series of stacked wooden blocks and a pivot screw to create friction locks that would mount the deck to the way-tubes of the ShopSmith.
 This is a fairly simple setup. The blocks are stacked to the thickness of the way-tubes. Then the top block is attached with a screw on one end so that it can pivot on that screw and swing out under the way-tube, locking onto it.

 With the main deck now locked onto the way-tubes, I could start working on the tilting top deck. This would be attached to the main deck with a couple of heavy hinges at the front edge.

When in use, the top deck would be raised up close to the drum. The work piece would be slid along the top deck, under the drum, and fed through by hand (very carefully). The distance between the drum and the top deck would determine the thickness of the work piece, working sort of like a thickness planer.

 To set and hold that distance, I used posts made from 5/8 inch threaded rod, and a nut. The nut sets the height by determining the length of the rod from the top deck to the main deck. The excess rod pokes down through a hole in the main deck. 

 The top of the rod rests in a little pocket on the underside of the top deck. It is made from hardwood (oak) and reinforced with a metal washer, so the rod doesn't wear away at the top deck. In these pictures you see me using two rods. I thought this would give me greater stability, but it just made it impossible to adjust the deck height evenly, so I later switched to just one rod set in the center.

 Here is the finished sander. It is crude, and may need some refining, but it does function. I need to make some adjustments to get the top deck to rest perfectly parallel to the drum, so it sands perfectly evenly all the way across. I think that will involve putting some thin shims under one of the hinges, but I haven't got that far yet.

 I also think I'm going to double up the material on the top deck to make it stiffer. I thought 3/4 inch plywood would be stiff enough, but with only one support in the center, I am now getting a little bit of flex across its width. That might also be caused by some play in the hinges, though they are about as tight as I could hope for. Maybe I should replace them with a length of piano hinge. I will update when I get it all tweaked.

Tuesday, January 3, 2017

Rose Quartz and Jatoba Wand

Just a quick pic of my latest wand. It is a short wand, made of Jatoba wood (Brazilian Cherry) with a polished Rose Quartz point at the tip.

I was originally trying to make a full sized wand, like my usual (around 16 inches or so long), but I had an issue during the turning. The wood blank split on me just as I was finishing up the handle. I managed to salvage the handle , which will become a 2-part wand, and this was the left over part, which would have become the shaft. I decided to salvage the broken piece and make it into a smaller wand. Later, I added the quartz tip.

Jatoba wood is very beautiful, but seems a bit brittle and splintery. It seems to crack easily. I will have to keep that in mind when using it in the future.