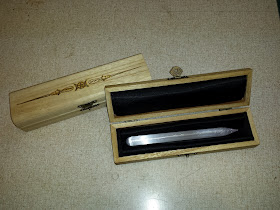
This is a 7x2 inch wooden box that I have sanded and laser engraved with a design on the lid, which I had selected specifically to use in conjunction with some 6" selenite wands which I carry in my shop.
After engraving, I sealed the box with two or three coats of de-waxed shellac. Then I set about trying to install a foam and cloth lining to cradle the rather fragile selenite wand.
The foam part of the lining came together very quickly. I used 2mm craft foam and positioned it in such a way that the springiness of the foam would create a soft cradle for the wand on the bottom of the box, and also a pad on the underside of the lid would apply gentle pressure to keep the wand from moving around.
The bottom foam piece was cut extra wide and the edges and center folded down to make an M shape. The sides of the box will hold the edges in place. In order to keep the center down, I glued it down to a scrap piece of chipboard that would run along the bottom under the foam.
The short ends of the box also needed some padding to protect the tips of the wand, so I cut two pieces of 2mm foam (two for each end) to tuck into the end of the box. I had to trim the M piece a little to make room for the end padding.
BTW, pay no attention to the fact that the colors of the foam change in some of these pictures. I lined more than one box and had at least one failed attempt and I just used whatever color foam I had laying around. I knew I would be covering it with cloth anyway. Each picture may not be from the same box or stage of the project.
The cushion on the lid was just a simple piece of 2mm craft foam cut a little wide so that it would bow out a little bit from the lid. This will offer some gentle pressure to keep the wand from moving around when the lid is closed.
The foam part came together quickly, but the cloth part was a pain in the ass. I ruined at least one set of foam parts experimenting with how I was going to cover it with cloth. I originally intended to use velvet, but I thought satin would be easier to work with because it is thinner, and I knew I would be tucking the excess cloth behind the edges of the foam. Sorry, it's hard to see much detail of the cloth work because it is black.
The lid was the easier of the two sides, but even that took two tries to get an acceptable, if not perfect result. The satin cloth is spray glued to the craft foam and the ends are turned under and also tacked with spray glue. The short ends were kept a little sloppy so that the excess cloth would hide the small gap created by the bowing of the foam.
Pro tip: don't use super glue with craft foam and satin cloth. It soaks through the cloth very quickly, bonds to your fingers instantly, and dries very slowly on the foam.
The bottom side was even more problematic. At least two failed attempts were made trying to cover this assembly with cloth. Again, I used spray glue to tack down the satin to the craft foam. I had to wrap the little end pads in satin separately and just tuck them in on the ends. I tried to cover them at the same time as the main piece but that didn't work out well. Even just covering the main piece had a lot of little issues that had to be worked out. Tucking things in here, folding things under there, making sure not to impede the design of the M shape of the foam. Difficult to explain, but take my word for it. There were issues.
Anyway, it all got worked out satisfactorily. The lining wasn't quit as nice or as easy to make as I had wanted it to be, but the end product is quit a bit better than the cheap pre-fab wooden box I started with. This will up the value of the selenite wands considerably.


No comments:
Post a Comment