After securing the antiqued leather straps to the cover, I removed the masking tape place holders and glued the painted resin bosses and centerpiece in place. These were made the same way as my other projects, with cast resin finished with acrylic paint and some gold rub-n-buff.
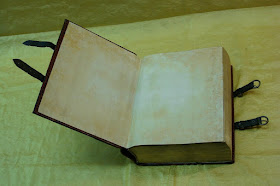
Once all the cover attachments were in place and dry, I "cased in" the text block, meaning I glued the pages into the cover. In order to come anywhere close to matching the coloration of the natural pages, I had to custom paint the end papers. In addition to my usual coffee and tea dying treatment, I also used a foam roller and some "antique varnish" acrylic paint to add some "foxing" to the edges of the paper. The paper I started with had a very light lavender color to it. I don't remember now why I thought that would make a good base color to start with, but I remember thinking that it would.
This was the first time I had attempted anything like this technique, and I had mixed feelings about the results. I made extra sheets in case something went wrong during the paste up. I picked the two that matched the closest when it came time to use them. On their own, I don't think they look bad, but they didn't really match the natural aging on the rest of the dictionary's pages. However, they were convincing enough to use, and they matched the general color closely enough that if someone were flipping through the pages, there wouldn't be a terribly noticeable difference.
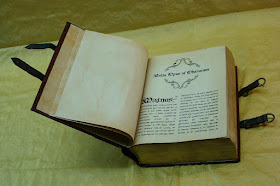
I used the same "antique varnish" paint to add foxing to the inserted pages as well, but with a much lighter hand. I laid out the interior pages in two columns, and used an Old English typeface font with justification. The text itself was lifted from latin liturgical texts (I have no idea what they say). A few pieces of line art were thrown in to break up the text. Their placement was strictly based on visual astetics. The line art was a mixture of actual medieval woodcuts, available on the internet, and drawings I had made for my Necronomicon Pages.
Additionally, there were several full color images that the clients wanted me to incorporate. I featured these as full page plates set aside from the text. The color images had to be printed after the aging of the paper because my printer does not have waterproof colored ink. As mentioned previously, these pages were "tipped in" to the existing text block by running a thin line of glue along the gutter edge, thus gluing it to the page in front of it.
With the interior custom pages tipped in, the text block cased in, and the cover embellishments all in place, the Tome was nearly finished. At this point it looked very much like many of the prop tomes I have made over the past few years. But this time I was going to try something different. This time I was going to add the finishing touch that would really sell this as an ancient tome of evil. Grime.
I started out subtlety, as this was the first time I had tried this and wasn't entirely sure how it would work. I used a black acrylic paint (which dries flat) and a dry brush and gently stabbed at the creases and crevices where I thought dirt and grime would accumulate. Also, I added the flat black to the edges and areas where I thought the object would get the most wear. In the pic above, you can just see the darkening around the edges of the leather straps and along the head and tail of the spine.
I continued this process around each side, applying grime around the edges of all the straps, bosses and the centerpiece, and also along the edges. I worked slowly, building up in layers, as actual grime would. I even took a towel and wiped off some of the paint I had added after each application. I wiped the cover as if I were cleaning it, to simulate how the large flat areas would not have as much grim build-up, because of normal handling and the occasional cleaning. I continued until I was satisfied that the book looked truly ancient and used. This simple thing might not seem like much to most people, but it represents a turning point in the realism of my prop work.
With the addition of the grime, the Tome was finished. So, here are about a zillion glamor shots of the finished piece. As you can probably tell, I was pretty proud of it.
I have one more final installment to this series of posts, which will include pictures of the set as a whole. If you are just tuning in, make sure you check out my previous posts of the other items in this set. The links are below.
See also:
The Black Duke - the Diary (part 1)
The Black Duke - the Diary (part 2)
The Black Duke - the Box (part 1)
The Black Duke - the Box (part 2)
The Black Duke - the Box (part 3)
The Black Duke - the Tome (part 1)
The Black Duke - the Set (fini)


No comments:
Post a Comment