Showing posts with label Steampunk. Show all posts

Friday, May 12, 2017

Book of Shadows Signage v3.0 (part 1)

This project has been a long time coming. I started work on it about a year ago, and I intended to publish a post about it when the project was finished, but now I'm thinking that because it is a big project with multiple parts, and also because there is some concern whether or not it will ever get installed, maybe I should piece it out into a couple of posts, and start publishing them now.

My store, Book of Shadows in Canton Ohio, had its 20 year anniversary in 2016. It should have been a time of celebration and there should have been a big expansion and much ado, but because of personal stuff, it kind of came and went with barely a mention. One of the things that I had planned to do for the anniversary, was to make a new marquee sign to put on the facade, a really nice one. Since this location opened, it has had two marquee signs, both made by myself. Last spring we had a big storm and it damaged the current sign. The wood was starting to rot pretty badly due to weather exposure, and about a fifth of it got ripped down by the wind.

The building is about 20 feet wide, and the marquee is about six or so feet tall. Both of the previous signs were made from two full 4'x8' sheets of plywood (or paneling). The new sign will be a little smaller. It will be made from a single 4'x8' sheet of plywood that is centered, and flanking it will be two decorative scroll-work pieces and two large wall mounted carriage lantern style sconces.

The current aesthetic theme of the shop is sort of a Victorian parlor, with a few goth and steampunk touches. The color pallet is dark red and black, with a lot of brass and stained woodwork. The new sign is going to be raised black lettering, with red edges, on a sandalwood/beige background, with copper trim. The decorative scroll-work pieces flanking the sign will be black edged and clad in copper, and the sconces are brass.

Step number one in a project like this, after determining your scale and design, is to work up a scale image of your lettering, printed out on a grid, so it can be transferred to the full scale material. I chose a font and made a scale vector drawing of the full size sign, and scaled the lettering to fit on the sign the way I wanted it. Then I superimposed a grid over the image at what would represent 6 inch squares at full size, and printed it out for reference.

Next I drew a grid on my sheet of plywood, with six inch squares, using a straight edge. These are going to be raised letters, so they are going to get cut out of the plywood, and placed onto another background board. The grid is a common method of scaling images to be transferred. Using a grid makes it easier to free-hand the lettering, because you only have to concentrate on one square at a time, and it gives you reference lines to keep you on track. Just make sure that where an image's outline crosses a grid square line at a certain place on the paper, the same outline crosses in the same spot on the same square on the scaled up version you are drawing, and everything should turn out looking pretty close to the original. Using this method helps to make up for my lack of natural artistic ability.

Where there were letters of the same size that matched (like the two O's in BOOK), I only had to draw one of them with the grid. For the second one, I could just trace the first one after it was cut out. This cuts down on my chances for error, lessens a very tedious and stressful part of the job, and helps make similar letters look more alike.

After the letters were drawn on the plywood, I cut each of them out with a jig saw and/or the band saw. Then I traced any that needed repeated, and cut those out as well. The letters were of a scrolly gothic font, so cutting them out was a bit of a challenge.

Once all the pieces were cut out, I gave each of them a primer coat of exterior grade latex house paint (white). I hung each letter on a peg board in my father's workshop while the paint was drying. After the primer coat was dry, I used red spray paint to color the edges.

The faces of each letter were painted with black exterior grade house paint. Then, each was given a couple of coats of spar urethane to weather seal it. I'm making an effort to seal this sign against the weather as much as I can, in the hopes that it will not rot out the way the current one did. Though to be fair, that one did last for quite a few years.

While the letters were still loose, I traced them onto some chip board, just in case I needed to recreate them at the same scale for any reason. I wouldn't have to draw them over again. I will keep these sheets of chipboard for reference for a few years. If it turns out I don't need them for anything, I can always reuse the chipboard for something else.

While I was working on the letters I was also preparing the background board. I rounded the corners of another sheet of plywood and gave it several coats of a sandalwood/beige colored house paint. The back side that will be up against the wall got several coats of an odd maroon color, just to use up some old paint that would otherwise have no use, and because it will never be seen.

In an effort to spice things up and as a tie-in to the steampunk style, I wanted to add some real copper trim to the background board. I have tried metal leaf paint in the past, and it did not hold up to the weather, and it is very hard to capture the look of metal with acrylic paints. I have a roll of copper foil that I got on sale at the hardware a while back. It is meant to be used as a termite barrier, and it has an adhesive backing on it. But my past experience has taught me that the adhesive is unreliable, so I will have to strip it off and use another kind of adhesive to attach the foil to the background board.

Peeling the vinyl backing paper off of the copper foil was a nightmare. In small sections it is not so bad, but trying to pull it off of several feet at a time, sucked. I had to clamp the foil to the table, and pull the backing paper off while gripping it with pliers. The adhesive sticks to the backing paper quite strongly. It's a shame that it looses its grip over time when stuck to anything else.

I used Goo Gone and a putty knife to help loosen the adhesive while peeling the baking off. That helped. Then I had to use the Goo Gone to take off the rest of the adhesive from the back of the foil.

Once the foil was free from its backing and adhesive, I cut it into strips to be wrapped around the edge of the background board. In order to wrap around the rounded corners of the background board, I had to cut darts into the foil. 

The adhesive that I used to apply it to the background board needed to be flexible, very strong and waterproof. At first I tried caulking, but I had a hard time getting it to stay in place. It didn't have enough initial tack. I also thought it might peel from the non-porous surface of the copper foil after it was dry. So, I got a couple of tubes of E-6000. I have had good results with it in the past and it fits all my requirements. 

In order to keep the foil pressed tightly to the background board while the glue was drying, I used furring strips and many many spring clamps. I worked in sections, maybe four feet or so at a time. I tried to be mindful of how the joints overlapped. I treated it like metal flashing, always pointing the seam downward, to allow water to run off and not work its way into the seam or under the foil. I also made sure the edges of the plywood had several coats of spar urethane applied before the foil went on.

That will do it for part 1. More to come on this project. Stay tuned.

See Also:
Book of Shadows Signage v3.0 (part 2)
Book of Shadows Signage v3.0 (part 3)
Book of Shadows Signage v3.0 (part 4)


.
.
.
.

Saturday, February 23, 2013

Brass Goggles Mk I

Well, it's been a long time coming, but I have finally finished my Steampunk Brass Goggles Mk I. These were the first pair of steampunk goggles I attempted. I stopped production on them part way through because I wasn't happy with where they were headed and began working on the Mk II and Mk III models, which I finished and sold a long time ago. I eventually went back to the Mk I and finished it as part of my Aethernauts LARP project, which also spawned the Steampunk Phonograph, the Steampunk Diving Helmet and Bicorn Hat (among other things), which has oddly enough become the second most viewed post on this blog. Weird.

The Mk I was finished in the summer of 2011. It has since also been sold. Lets have a look at its construction. It began as a simple pair of green plastic welding goggles. The first thing to do was to disassemble them and sand and paint the parts with gold spray paint (my best approximation of brass at the time). Once painted, they were liberally decorated with greebles. Here you can see one of the eye cups, painted and with a greebles made from a piece of thin copper tubing, some hex nuts and half of a snap closure.
I basically just started piecing together little bits of things from my junk drawer to see what would fit together. All the pieces were epoxied onto the plastic goggle frames.
Here are the lens retaining rings, also painted, with more greebles. These were made from more copper tubing, the other half of the snap closure, more hex nuts, some brass thumbtack heads and a couple of wire coil jewelry beads. As you can see from the photos, the paint job was pretty spotty. I also had trouble getting the epoxy to hold firm under stress. I eventually started drilling into the plastic  to help set the pieces.
Around the eye cups I wanted to put leather trim. I had never attempted this before, but I had see it done on other pieces around the internet, mostly by drilling a lot of holes around the rim and sewing the leather onto the eye cups. I didn't have the patience for that. So I cut a strip of leather to go around each eye cup, dampened it a little with some watered down white glue, and stretched it around the edge, holding it in place with binder clips until it dried.
Once dry, it came off easily and held its shape. When I was ready to trim it and attach it permanently, I used a stronger glue.
The distinguishing feature of these goggles was the temple light. I first got the idea of having a small light of this style protruding from the rim and shining parallel with the lenses by a pair of goggles I saw in an Invader Zim cartoon. I thought it was an interesting visual element that looked very futuristic. I found a small clip on flash light at Walgreens that would be perfect for something like this. I have since seen this same flashlight used similarly on many projects around the internet, including my own MRX Designs prototype model FF-01 hand operated focused fluidic hydrolizing vector discharge personal defense apparatus but at the time it was new and hadn't been overused.
 I disassembled the flashlight, and painted it gold (brass). I also added a little piece of red cellophane to the lens and some copper foil tape (used in soldering stained glass windows) to the body to give it a more interesting color scheme.
I cut off the stem at the desired length and angle and applied it to the goggle eye cup with epoxy. I fitted a hex nut around the base of the stem to give me more of a surface to epoxy to. In future applications, I will also drill out the stem and put in a metal pin or small screw from the back side to help give the connection strength.
Here is basically where I left them for several years. You can see a couple more greebles; a wire coil, a tube of leather with a piece of wire wrapped around it to cover the ball-chain bridge. I abandoned them partly because I didn't have the parts I needed to finish the strap. Also, I wasn't that thrilled with they way they turned out, so I just set them aside until I could come up with a way to rescue the design. That never really happened. When the Aethernauts project came up, I needed a couple of pairs of goggles very quickly, and didn't much care how they looked, so I hurriedly finished these off with a leather strap and some acrylic lenses.
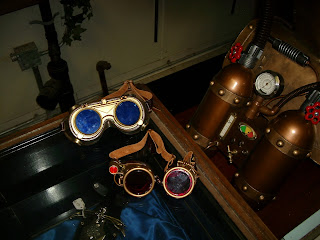
Here you can see them sitting beside the Mk IV, which are so slipshod and crappy they don't deserve their own post.
Both the MK I and Mk IV were sold in my shop after the LARP. As I am adding more Steampunk elements as well as Gothic Victorian elements to the shop's aesthetic, I will probably be making more goggles soon. Hopefully I have learned something from these early efforts.

Sunday, November 25, 2012

Steampunk Diving (Space) Helmet Full Costume

Woo Hoo! Got another one in before the end of the year! I had a long weekend this week, due to the holiday, so I thought I would catch up on a little blogging. My continued apologies for the scantness of my posts this past year. Much working, not much time for anything else.

OK, So we had finished with the Steampunk Diving-Space Helmet and used it at the LARP for which it was created, but we are not quite done yet. No, a prop this good has to see more use than that, so the following Halloween (2011) I decided to wear it to go trick-or-treating with my daughter. It was likely going to be our last time at this family tradition, as she is grown up now. But just a helmet would never due for trick-or-treating. I had to have a full costume. And I only had about three days to make it.

A year or two ago, when I was first looking up reference material for my helmet build, I came across someone's diving helmet project that was used for a short movie. In that movie, the helmet was used in conjunction with a workman's jumpsuit, some gloves, weighted boots and a weighted belt to give the appearance of a deep sea diver. I can't remember where I found it, or I would link it. For my full costume, I decided to borrow heavily from that costume design, but add in a few more steampunk elements.


What we have here is; the helmet, a work shirt, work pants, leather work gloves, customized leather work boots, customized, knee pads, a customized utility belt, a custom made specimen containment bin, and a custom made gauntlet control box. I worked on all of these (except the helmet) simultaneously to get them all finished within about three days.
 

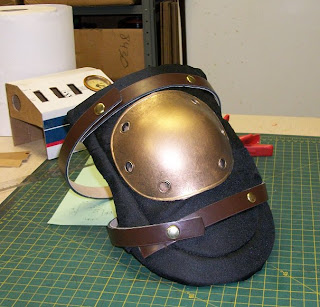
Lets start with a look at one of the simplest of the custom pieces, the knee pads. I started with a standard set of cheap work knee pads with plastic cups and elastic straps. The cups were grey plastic so I knew right away I would need to paint those brass in the same fashion as the helmet. Starting with gold spray paint and finishing with a little black acrylic wash to antique it.


Then the elastic and velcro straps had to be replaced. I cut them off and replaced them with brown faux leather straps that I made from a cheap belt. The belt was wide with two rows of holes. I just slit it down the middle and made two thin straps with one row of ready made holes each. Then I riveted the straps to the knee pads and added a brass snap that matched the rivets for closure A snap was easier than putting on buckles. I ended up using the ends with the holes for something else.


Another of the simple custom pieces was the utility belt. It started out as a U.S. Army surplus canvas web belt. The olive drab color wasn't going to work for my steampunk look, so I soaked it in a bucket of brown RIT fabric dye. Then I dry brushed the buckle with gold acrylic paint to give it an antique brass look. And then I touched up all the little steel grommets with a gold paint pen to make them look like brass too.


 I knew I would be hanging my containment cylinder from the utility belt via a large brass snap hook, but I needed more stuff to hang off of it. Some years ago I had bought a toy voice changer for a giant cthulhu costume project that never was completed (...someday!). Having used the helmet at Origins I knew that it muffled one's voice substantially, so I thought I might try using the voice changer as an amplifier so people could hear me with the helmet on. I could put the microphone inside the helmet, and wear the speaker on my belt. Originally I considered wearing it on my chest, but that didn't work out right. I did practically nothing to modify the voice changer except to paint it brass with a quick dry brush of gold acrylic paint. I would have gotten fancier with modding the case, but time was an issue.

 So, containment canister on the right and voice box on the left, that still left me needing something in the back of the utility belt. I thought about the storm trooper costumed from Star Wars, and how they had some kind of canister on the back of their belt (I think that's where Luke got the cable he used to swing across the room with Leia in Episode IV). A canister should be fairly easy and quick to make, and didn't need to have any particular function other than to take up space and look utilitarian. So I took a cardboard mailing tube, capped the ends, added a cardboard panel with rivets for texture, painted it brass, and added a couple of pieces of scrap leather belt as trim for more texture. I attached it to the belt with some metal wire through the grommets. Simple and quick.


The boots were also fairly easy. From the costume I was referencing, it looked like they had just taken some cardboard and made caps for the toes and heels to look like weights which they attached to a pair of work boots. That simple gaff is what got me started on the whole idea of doing a complete costume. I started by selecting a pair of work boots that were in not to bad of shape. Then I made paper templates to decide on a design and dimensions for my toe and heel caps.


The heel cap was very simple. A cardboard rectangle that would wrap around on three sides, clip off the corner at the ankle, and add some extra panels to give it depth and texture. 


The toe was a bit more complicated due to the more complex shape, but the same basic principle.


 Then it was just a simple matter of detailing with some paint and faux rivet heads and attaching them to the boots with some brass tacks pounded in through the cardboard and into the sides of the sole of the boot.


 Now for the more complicated parts of the build, the containment canister and the control gauntlet. Early on, I thought it would be cool to have a cutome made steampunk trick-or-treat bag that went with my costume. So I looked around for something that would work for me. What I found was a smallish metal trash can with an automatic lid, the kind where you step on a lever and the lid pops open.


This was about the right size, and not too terrible of a price, so I splurged and bought it thinking that with this as a base, I would hardly have to make any modifications besides cosmetic ones. The first thing I did was look around for other pieces that would fit with the canister to give it texture and steam-ify it. One of the first things I found was the casing to a broken fan that seemed to fit perfectly on the bottom.


 Before attaching the fan casing, I added an led tap light underneath it (which I could reach to activate from the inside of the canister) so that some light would show through the holes and vents in the bottom dome.

I had considered making cut out panels with lights on the sides of the canister too, but that would be difficult and time consuming, so I opted to make non-cut out panels on the sides of the canister, again, to give it texture. These I made out of chipboard. I made just the outlines of the panels, and I made them wide enough that I could add rivet heads as well. I sketched out my design on the side of the canister with a pencil, leaving room to add a copper pipe design element.


Gluing the chipboard on the curved surface was a little tricky, and the masking tape I used to hold it down while it dried tore off some of the surface layer of the chipboard in places, making for an ugly texture, but I didn't have time to re-do it, and it would be dark and hardly noticeable at any distance anyway.

With the bottom domed out, I would want something similar on the top, to I found a plastic bowl, on top of which I mounted a garden hose valve handle (because valve handles are steam-y). Then I added copious amounts of cast resin rivet heads. Because again, texture and steam-y.


Because I was in such a hurry to finish, I added most of the design elements with hot glue, a medium which I loath to use due to its tendency to pop off at the most inopportune times. This is a decision which would haunt me come show time, as by the end of the two hours of trick-or-treating, I had lost about a half dozen rivets and the bowl and valve assembly from the lid. Oh well, it was only meant to be used for one night.

Next came gold spray paint, black acrylic wash antiquing, and a copper pipe assembly to add some more color and break up the outline of the canister.


I was able to operate the automatic lid by squeezing the foot peddle with my hand while the canister hung from my belt. I did, however, forget to turn on the tap light in the base while we were trick-or-treating.

Now for the last and most complicated part of the build, the control gauntlet. As with many of my recent builds, I started with a cardboard mock-up, testing the size and shape for fit and deciding what elements I wanted to incorporate. Piecing together found bits to see what would work well together and what would fit together without too much modification.


The design elements I chose were; a row of lights on top made from colored glass stones surrounded with brass rings to simulate bezels and lit from underneath by the guts of an led tap light, a row of three switches on the face which would light up (these are automotive switches from back in the days when I was into tricking out the dashboard of my car), an analog clock on the face (because it already had a copper colored bezel, was the right size, and because clocks are steam-y), a wrap around hose with a flashlight at the end, and not pictured in the mock up but present in the final piece are a pipe assembly with a laser pointer at the end (running parallel to the flashlight-hose), and leather straps for mounting to the forearm.

Wow, that has to be one of the longest sentences I have ever written.

 With time constraints being what they were, I considered just painting the cardboard mock-up and not wiring any of the electronics, but I knew that I would never be happy with that. So I starting recreating the body of the control box in wood paneling. I already had a piece of wood paneling that was stained and nicely aged. It is thin enough that you can cut it with a razor knife, with a little effort.


The hose-flashlight assembly was a simple matter of cutting the hose to the right length to wrap around the back side of the gauntlet, painting it, and jamming an led flashlight in the end (which fit perfectly). I took the switch off the back of the flashlight and moved the battery pack to the underside of the gauntlet. I ran wire leads down the hose from the led terminals to the battery pack and to one of the switches on the face of the control box.


I did basically the same thing with a cheap laser pointer. I had one left over from my Steampunk Phonograph project which I had already torn apart and cut open. I ran leads from the working end of the laser pointer (removing the switch and batteries) down a pvc pipe assembly I painted to look like brass, and into the body of the control box. There it was connected to another of the three control switches and the battery pack. For more power and ease of connectivity, I dispensed with the battery pack of the flashlight and replaced it with a four cell AA battery pack from Radio Shack. The voltage difference would, at most, shorten the lifespan of the flashlight and laser pointer, but it was only intended to work for one night, so not a problem.


 The pvc-laser pointer assembly was mounted on the back side of the control box, just above and parallel to the hose-flashlight assembly.


I tore apart an led tap light and mounted it under the top row of glass stones, so that they would light up (all at once, because that was much simpler). I attached this to the third switch on the face of the control box.


Finally I added custom cut leather straps for mounting the gauntlet to one's forearm. The placement of the straps turned out not to be optimal.. I used brass D rings riveted to the sides of the box and ran the straps through them, but this arrangement had too much slop in it. If I were to do it over, or ever wear it again, I would make some modifications to the straps.


Here is the whole wiring mess inside the control box. It was sloppy and I did have some issues with switches not working come show time (the top row of lights), but it all worked when it was tested in the workshop. Something must have come loose in transit.


Here is the finished control gauntlet.


 And here is the finished costume.


This was kind of a long post, but since I have only managed to get out a few posts this past year, I thought you guys deserved the full monty.

If the elements of this build seem a little below par for my usual work, bear in mind that it was very hastily thrown together. Corners were definitely cut. I had a lot to do to create a complete costume and only a few days to make it. And it only had to survive for one night (about three hours). So, yes, not quite as quality as I would have liked, but it served its purpose. It was a big hit with the neighborhood. Adults and kids alike did much gawking and picture taking. Despite one set of lights not working, one set of lights being forgotten, and the top of my canister falling off, oh, and of course not being able to see most of the time due to the portholes fogging up, all in all a very good night.

 See Also:
Steampunk Diving (Space) Helmet (pt.1) WIP
Steampunk Diving (Space) Helmet (pt.2)
Steampunk Diving (Space) Helmet (pt.3)
Steampunk Diving (Space) Helmet (pt.4)
Steampunk Diving (Space) Helmet (pt.5)