Showing posts with label Stone. Show all posts

Thursday, October 4, 2018

A Good Day

Today was a good day.
I can't say that very often. But for some reason, everything just seemed to go well today. I got some good news, I got a new toy, and I got FREE STUFF! And who doesn't love free stuff?

OK, so Good News; My neighbor, with whom I have been having trouble these past few weeks, is being evicted. Yeah! No more screaming matches, no more police visits, no more stealing my electricity, no more taking things out of my yard, no more trash piled up beside my house. Ding dong, the witch is dead!
Seriously, these people are scum.


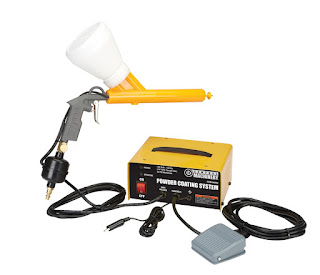
New Toy; Today I picked up a powder coating kit from Harbor Freight. I've been wanting one for a while, and today I finally pulled the trigger and bought one. I plan to use it to coat pen barrels for custom feather quill pens. I'm sure I'll find other uses for it as well.


Free Item #1; I got this lovely 20"x22"x1.5" slab of quartz counter top material, which I intend to use as a surface plate. I had been using a rather thin piece of tempered glass to do the "scary sharp" sharpening method, but it has a little flex in it. Then, I bought a 12" square granite floor tile to use as a surface plate, but it was a little smaller than I wanted. So today, I stopped by a local place that makes granite counter tops and I asked them if they had any cut offs that would work as a surface plate in a workshop, and they just handed me this nice piece of quartz! I was willing to pay for it, but they just gave it to me. It is nice and big and heavy, and has a VERY smooth surface. My dial gauge can only measure to within one thousandth of an inch, but the surface is well within that tolerance. I am totally tickled about my new surface plate, and sadly, I have no one to tell about it, so that's the main reason for this post ;)
 This is going to work great for a project I am starting. I am refurbishing all my old hand planes. I have already started and the first one came out really nice.


Free Item #2; I got a phone call on Saturday from my local post office. Apparently I had a package that had been sitting there waiting for me to pick it up and I didn't know about it. It had been sitting there for the past four months! They were just about to send it back, but one of the nice employees there decided to look up my number and call me before that happened.
This is a box of Thibra. I had never heard of it before, but it is apparently a thermoplastic, like Worbla or Wonderflex. The nice people at Thibra just decided to send me some of their product to try out (no doubt instigated by this blog). Oddly, the package was addressed to "Herr Doktor", but then under that it said MRX Designs and my PO box address. Herr Doktor is a very talented maker in the steampunk community, who used to operate a blog, but it hasn't been updated in years. I don't know if they thought I was him, or they got us confused, or why his name would be on the box, but I'm gonna keep it anyway. I wrote the company a thank you note. Sorry that it is four months late.


So, a good day. Well, a good couple of days, actually. My hand plane that I refurbished the other day came out really well. Oh, and the other day I went down to the Amish lumber store and found a nice big piece of Ipe in the bargain bin for $5. I guess even a blind squirrel finds a nut once in a while.


.

Wednesday, July 26, 2017

Runes, runes, runes.

Runes are another form of divination, which draws its roots from ancient Norse tradition. The runes have a long and interesting history, so if you are interested in divination, or Norse mythology, or history, or if you just have some time to kill, I recommend you do some reading on them.

I've made several sets of runes in the past, but never documented them. My recent interest in wood turning has introduced me to more exotic wood than I had ever previously worked with, and thought that they wood make for some lovely run sets.

 Above is a set made from black walnut. Below, is a set made from cedar.

 I also made sets from purple heart, genuine mahogany, and some random hardwood chits I got from the craft store. These are not glamour shots by any stretch of the imagination. They are just pics I snapped as an afterthought while I was making them.
Here is a little better picture of them in the case at the store, alongside some stone rune sets that are commercially produced.

And speaking of stone rune sets, I also made a couple of sets from river rock. I made several river rock sets, with different colored inking, but aside from the color of the symbol, they look pretty much the same, so just the one pic should suffice.

 All of the above runes were engraved with a dremel tool, and then inked. The stone sets were inked with acrylic paint. The wood sets were inked with a sharpie marker (except the cedar set, which I did not ink) and then finished with three coats of tung oil.

But one of my favorite sets was neither engraved nor inked.  They are printed.
I have a set of tarot cards that I sell at the store, which has the meanings of the cards printed right on the face, so beginners can learn them without having to look them up in a book every time. So I thought, why not do that with runes too?

So, some years ago, I did a layout on the computer with all of the runes, their names, their translation, and their divinitory meanings. I sized them to fit onto wooden chits (about 2 inches square) that I found at the craft store. The chits were stained black with wood stain. The runes were printed out on a laser printer and stained brown with coffee/tea to give them an aged appearance. Then I used a water tearing technique to separate the runes and give them a deckled edge.
Then I glued the paper to the wooden tile and gave both sides two coats of semi-gloss oil based polyurethane.

This is the same effect that I used for my pendulum boards, and that I will use on my some-day-to-be ouija board (though not the Ouija board previously featured). If you attempt to replicate this finish, it is important to note that you must use oil based polyurethane. The water based polycrylic will not soak into and darken the paper, giving it an aged and warm hue. Instead it will make the surface look plastic and cheap.
I don't know if I am the first person to make beginner runes like these, but I have never seen them anywhere. I'm rather proud of them, and think they would make a great tool for learning the runes.

As I progress with my wood turning and wood working, I now have more exotic woods to choose from, so I'll almost certainly be making more wooden rune sets in the near future.
.

Tuesday, January 3, 2017

Rose Quartz and Jatoba Wand

Just a quick pic of my latest wand. It is a short wand, made of Jatoba wood (Brazilian Cherry) with a polished Rose Quartz point at the tip.

I was originally trying to make a full sized wand, like my usual (around 16 inches or so long), but I had an issue during the turning. The wood blank split on me just as I was finishing up the handle. I managed to salvage the handle , which will become a 2-part wand, and this was the left over part, which would have become the shaft. I decided to salvage the broken piece and make it into a smaller wand. Later, I added the quartz tip.

Jatoba wood is very beautiful, but seems a bit brittle and splintery. It seems to crack easily. I will have to keep that in mind when using it in the future.

Saturday, December 19, 2009

Statuary

A couple of months ago, I picked up some old encyclopedias at a thrift store. While I was there, I also bought a crappy plastic mold kit for making "green man" faces out of cement. I guess people use them to decorate their gardens. Anyway, pagans like green man sculptures and it was only $5 so I thought if I make one casting and sell it for $5, it will have paid for itself.

I set aside the cement that came in the kit and decided to test the mold with plaster instead. I mixed Plaster of Paris (hereafter referred to as PoP) with dental plaster, which is much more expensive but about 20 times stronger. The first casting I made came out very badly, as the plaster started to set up before I got it all into the mold. I decided to let it cure anyway and use it as a test piece. After I finished painting it, I actually like it better than the one that came out "good". It looks like an ancient piece of stonework, ravaged by time and the elements.

This kind of got me into a plaster casting mode. I started looking around the shop for other things I could make plaster castings of. I selected two "sun" plaques and started making latex rubber molds of them, but that effort was stalled when I ran out of rubber. The local craft store usually caries it, but they have been out of stock for a month or more. Then my sales clerk brought in a collection of candle molds for me to try out. She has about a dozen different molds, some rubber some plastic. I tried out five of them so far. Here are some of the results.

I again used a combination of PoP and dental plaster (Excalibur brand). I had to touch up some surface air holes and the Bast and Goddess molds left a lot of flash that needed to be cleaned up and smoothed out. Then I used a clear sealer on them before painting. I gave each a base coat of black acrylic paint, followed by a rough coat of blackened bronze metallic paint (intentionally missing some spots). Then I used a spray on matte sealer followed by highlights dry brushed with blond bronze metallic paint. I used the sealer before the highlight coat because my first attempt started to pull the bronze and base coats off when I dry brushed. I think the finish looks even more realistic than my usual "antique bronze" finish that I use. The main difference being that I normally mix the blackened and the blond bronze for my mid coat and use gold acrylic and rub-n-buff for the highlights. This method, of using the blond bronze for the highlights, seems to give a more muted finish that seems more realistic to me.

I liked the way these came out so well that I decided to sell them for $25 each in my shop. I think that is still a pretty good price as statuary seems to be pretty expensive. This past summer we had ceramic god and goddess statues that were consignment pieces. They were very plain and wobbled on their bases something terrible. I didn't think much of them at all. Our consignors wanted $45 each for them and they both sold. If these sell well, I will definitely be making more of them.

Friday, October 30, 2009

Miniature Wands

Just a quick post before bed.
At the shop, we sell a lot of kits that we put together from raw materials and odds and ends. One of the favorites is our mini-altar kits. Most of the time I will hand finish a box with that in mind. I will also pull together some miniature sized altar tools; a little athame, a mini-chalice, a small pentacle, a tiny bell, and a miniature wand. They are great for traveling, or for people with small apartments, or unsympathetic house-mates.

Here are a few of the mini-wands I made for travel altar kits. Each is only about six inches long. They are made from hardwood dowels, sanded and finished with stain. A glass sphere is epoxied to one end, and an amethyst point is epoxied to the other. Each is trimmed with copper foil tape, and one one of them I tried to solder over the foil, but I didn't like the way it turned out, so I didn't do it on all of them. The glass spheres had to be ground down with the dremel to make a flat spot, so it would sit nicely on the end of the shaft.

The shafts are each decorated differently. I use a combination of brads and wire, and whatever else I can find that would look decent. It's hard to keep coming up with different styles, so many of them look a lot alike.

Thursday, February 26, 2009

White Marble Altar Tile

I make a lot of altar tiles. I make a lot of things in general with pentagrams on them. Pagans like pentagrams. Pentagrams are something that you don't find a lot of in mainstream shops. You could take just about any kind of product, slap a pentagram on it, and sell it in a metaphysical shop. Not that I'd do that ;)

This is a 12in. x 12in. piece of nicely marbled polished white Italian marble. Some years ago I began experimenting with acid etching techniques. My first attempts were pitiable. I used bees wax to coat the design on the marble face, then cut the design with a razor knife. Wow, was that unnecessarily difficult! Years later it dawned on me to use vinyl contact paper (shelf paper) for the masking. Now I can do much more intricate designs with far less effort. I use the same technique as I did on my Etched Glass Goblets, except that instead of the etching paste, I use hydrochloric acid.

You can find hydrochloric acid in the hardware store under the name Muratic Acid. It is used for cleaning pools and concrete garage floors and the like. I do it over a utility sink so that the acid doesn't get on the floor. Also, I'll need the water to rinse the tile when I'm done. The first couple of times I tried this, I just about knocked myself out with the fumes. Using hydrochloric acid on marble releases noxious chlorine gas, so I HIGHLY recommend doing it outdoors. It also releases some hydrogen gas, so don't smoke while etching and don't do it near an open flame. Eventually I rigged up a fan and a duct pipe to draw off the fumes. If you have any open soars on your hands, I'd recommend using rubber gloves. Nitrile gloves are best. Eye protection is a pretty good idea too. You really don't want to splash acid into your eyes.

In addition to etching the design, sometimes I tint the etched areas as well. This one is tinted with an iridescent yellow-green to make it stand out from the background. The masking usually doesn't survive the acid and rinsing, so I usually make another one for the tinting. I just put a new piece of vinyl on top (after removing the old one and cleaning up the surface of any remaining glue) and trace around the design with the razor knife. Then I put a light coat of spray adhesive on the exposed marble, and brush it with powdered pigments. Then I top coat it with a matte spray and remove the mask.

I always sign and date the bottom of these. Then I apply a pad to the bottom, usually felt or that soft foam stuff they make kids crafts with. That way it won't scratch the table.

Friday, February 20, 2009

Sandstone Altar Tile

When I changed the batteries in my camera the other day, I decided to go around my shop and take pictures of things I had made so I could post them, so over the next few days, You'll be seeing a few of my more commercial (read as, mundane) creations, but it illustrated some of the media I work experiment with. .

Here is a little something I made to sell in my shop. It is a sandstone altar tile with engraved pentagram and ivy motif. The sandstone piece is 6in. square, and about 1 1/2 in. high. It is beveled (smaller at the base, and widening at the crown) and is slightly concave on top. I think it was supposed to be some sort of candle holder originally. I picked it up on clearance, and thought I could do something with it.

I drew the pentagram and the ivy design by hand sing a pencil. Then I went over it with a diamond burr on my Dremel tool. It took several hours to complete (I wasn't really in a rush), and just about wore out the burr. It was labor intensive and time consuming enough that I don't plan to make any more like this, even though I have two or three more sandstone blanks. I have a short attention span, and bore easily. That's why many of my projects take months, or years to complete. I start on them, then get bored and set them aside, leaving them half finished. This one was right at the edge of what I can do in one sitting.

Sunday, January 25, 2009

Stone Elder Sign Disks

This was my first foray into carving and also my first foray into mold making and casting. I started off by hand carving an Elder Sign (the Chaosium version) in relief, into a block of paraffin wax. Not such a bad job for my first time, if I do say so myself. Then I coated the wax carving with layers of liquid latex. This took forever! If I put the latex on too thick it would take days to dry. Of course too thin wouldn't make a usable mold. I had to build up about 7 layers to get a durable mold. Later I learned a trick for building up the bulk of the mold with fewer layers. After putting on the first two layers (getting a nice complete coating on the original) I soaked pieces of paper towel in the latex and used it to build up the later layers.

After the mold was made, I used portland cement, sometimes colored with a little black grout mix, to cast my Elder Sign. Then I would paint it with a black wash (acrylic paint thinned with water) to deepen the color, and then a wash of bright green to give it a nice moldy patina.

I also ventured out into other designs. I made a nice "Eye of Azathoth", a "Star Squid", and a "Seal of Cthigla", all my own creations. Each is about 4 inches in diameter. They look very old and authentic and have a nice stone like feel to them. I have sold a few on eBay, and they are available as prizes from Rogue Cthulhu. Once the original is carved (which for me is a very long process), and the mold is made, they are very fast and easy to cast. They make nice soap molds too!