Showing posts with label Pagan. Show all posts

Monday, February 3, 2025

Vine Knife

This is a mass-market dagger that I bought from a distributor. It originally had a hideous American flag and bald eagle motif painted on the handle and sheath. I sanded the handle and sheath clean of their factory finish and used a dremel tool to carve a vine pattern into both sides of the handle. I had wanted to do something similar to the sheath, but I couldn't think of a suitable design. This knife sat in a drawer, unfinished, for over ten years, before I decided I just needed to be rid of it. So, I painted the handle and sheath white and fixed a silver pentagram applique to the sheath. My hopes for the sheath had been much higher, but I was suffering some sort of creative block and could not think of what I wanted to do with it, so I decided to just be done with it. Perfect is the enemy of finished. 


Monday, January 20, 2025

Planchettes v2.0

 This is another post of a small batch of items that was made for sale at my store before it closed. I was hoping to create a line of planchettes that I could cut out completely on the laser cutter, and that would require less hand finishing than the solid wooden planchettes that I had previously made. Unfortunately, they still required more hand finishing than I had hoped, and I was unhappy with the quality of the final product. I only made one batch of them, and while they did sell, I considered this a failed product experiment.

 
Top
Bottom
 
These were cut from multiple layers of 3mm plywood, instead of solid wood like my previous planchettes. The intention was to create stock design parts (uppers and lowers) that could be mixed and matched. Between sanding painting and gluing the layers together, there was no significant labor savings, and IMO the product was inferior to the solid wood planchettes or the solid wood with laser engraving planchettes.


Monday, November 25, 2024

Light My Fire


     One of the projects I made to sell at the store, shortly before it closed, was a line of candles with a variety of artwork on them. The candles themselves are not ones I made. I bought them at a discount store, mostly with the intention of melting them down, as they cost less than an equivalent weight of raw wax at the time. For many years I had the idea of making custom pillar candles with some sort of decorative applique, but I was envisioning more of a 3d applique. However, after several years of failing to come up with anything on that front, I decided to try just painting a design on some pillar candles.

     The first one of these I made was done with a vinyl stencil, cut on my new Silhouette Cameo 4, and then painted, but I only made one of those. It was a time consuming and tedious process. Then I thought to try a water slide decal, printed on a laser printer. This was much, much faster and also allowed for a much higher level of detail in the image. I ended up making 50 or more of these in about a dozen different designs. I thought they turned out rather well. This isn't much of a blog worthy project, but it was meant to be a fast turnaround high margin product, not art.


Monday, November 11, 2024

Who You Gonna' Call?


     Here we have a small wood end table, painted black that I picked up from a discount store for about $20. Like many other such items that I buy for the store with the intention of modifying and reselling, it sat in the back room for several years untouched. Finally it got bumped up to the front of the line, mostly because it took up too much space and I needed it out of the back room. 

     As I was more interested in clearing it out of storage than I was with creating something wonderful, at first I copped out and just slapped a pentagram on it to try to sell it and get my money back out of it (and the space it was taking up in my workroom). I stenciled and painted a gold pentagram in the center and put it out on the floor to sell, but even then, it didn't look finished. It stayed on the sales floor for about a week before inspiration struck and I knew what I had to do to finish this piece. I needed to make it into an ouija board. 

     I had long intended to start making spirit boards to pair with my planchettes that I was making and which were selling decently well. But I never managed to find the time to do the layout work to get started onn the project. The only spirit board I had ever attempted ended up getting stalled at around the 70% complete mark back in 1993 (and still remains unfinished to this day). I measured the table top and the pentagram and went into my vector image software to create a layout for the spirit board top. Normally I would use masking tape or make a paper template and cut the stencil by hand for something like this, but this time, I decided to use my newest toy, the Silhouette Cameo 4 vinyl cutter. After laying out the image design in Inkscape, I broke it down into sections small enough to cut out on my vinyl cutter and used it to cut the mask.  Once the mask was cut, the sections had to be properly positioned and transferred to the table top. The positioning was a bit tricky, but fortunately the vinyl masking is fairly forgiving. Then it was a fairly simple matter to paint and remove the stencil.

     This is the first spirit board that I ever completed and one of the last items I made for the store before it closed.

Friday, June 10, 2022

Totally Cherry

         It has been more than two years since I have made something- like, actually made something, not just modified or laser etched it, but actually crafted it with my hands from scratch. The Rogue Cthulhu dice boxes were probably the last thing I really made. 

        Not gonna lie, things have been rough. Rogue Cthulhu has been retired. My gaming days have come to an end. Book of Shadows, my store, has been shut down. The building was badly vandalized and it did not make economic sense to make the repairs needed to stay open. My mental health continues to struggle. I can go weeks without leaving the house or even getting dressed. So, at this stage, for me to make something is a major achievement. But, I sold a rune set on Etsy today, and I think that gave me a little spark of energy. 

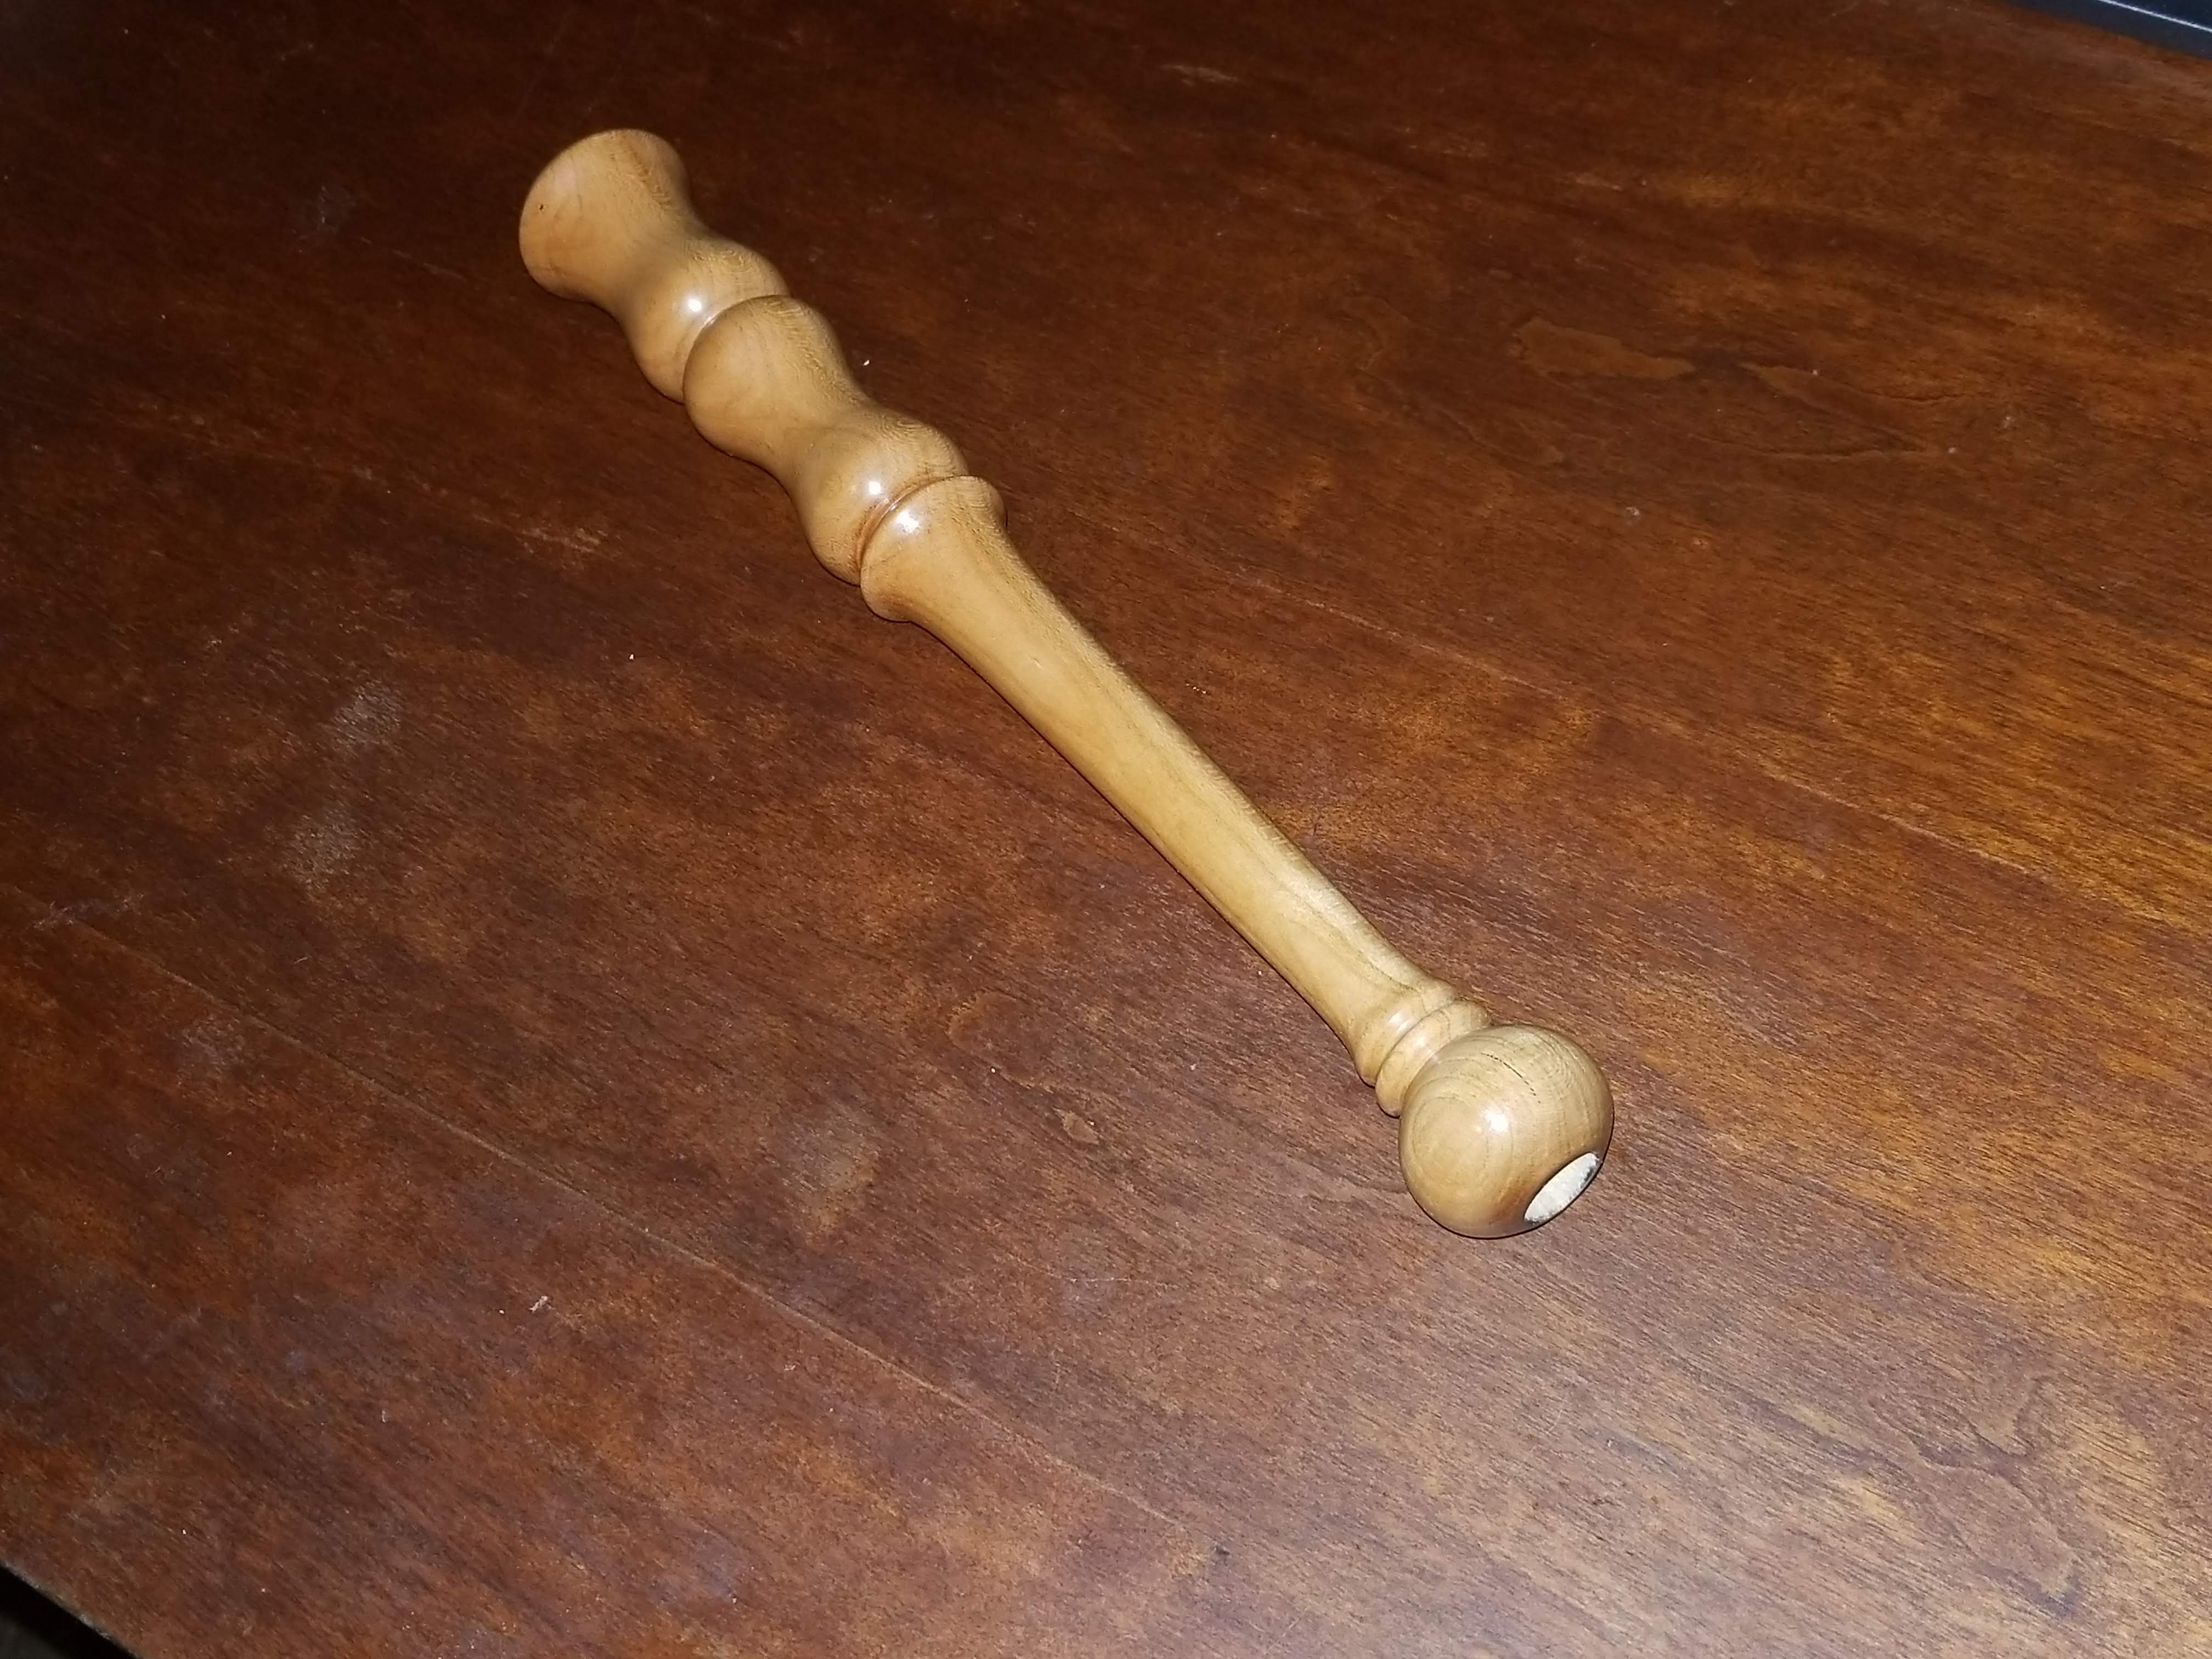
        It's not quite finished yet, but it's close. This is a hand turned wand made from locally sourced cherry wood that I seasoned and milled myself. There is going to be a crystal point embedded into the tip (where the hole is), but other than that, it is done. I was a little surprised that the piece came together with little difficulty. This is probably the first time I have touched my lathe in three years. It isn't perfect, but considering how out of practice I am, it's pretty good.


        I love this batch of wood. The color is very pleasing. Even the sapwood is nice. I've got quite a bit of it, so I expect I'll be doing a lot of projects in cherry in the future. Now that the store is closed, I'm going to have to focus more on online sales in order to have any income. My needs are small, but I've been bleeding money for the past two years, so it's either make internet sales, or get a straight job, and I'm a little too old and jaded for that! 

        I have a couple more wands that I started years ago, and got them to about this same point and never finished them. I think I'll try to make a couple more, and then add the tips to all of them at once and post them in a batch. I was just so excited to have accomplished something in the workshop that I had to post it, finished or not. 

 P.S. I'm not dead yet. 

Friday, July 19, 2019

Walnut and Maple Mitered Boxes with Poplar Interior v1.0

I've been itching to make some more boxes. I really liked the way my pencil top boxes with ebony splines came out. With the exception of the lids. Those were hard to fit properly. They ended up being a little too sloppy for my liking. So, I decided to try a different style of lid.

I also wanted to use some of the thin hardwood boards that I bought for my laser, because, well, they didn't need planed to thickness and because I had a large collection of them that was getting a bit out of hand. However, the thin boards were not thick enough to cut a rabbet or a dado into, so the top and bottom would need another way to attach. I always wanted to try the kind of box that has a second layer of wood that lines the interior, so that's what I went for. Usually those kinds of boxes have the interior panels stick up above the rim and the lid fits down over the lip created by the interior wall. This is how you make boxes that start off closed on the top and bottom, then you cut through the side to separate the top from the rest of the box. These boxes would not be like that. Instead, the interior wall would be shorter than the exterior sides of the box, and allow the bottom of the lid to set down inside. You'll see what I mean.

Walnut is my favorite wood (one of), so that's what I wanted to make the sides from. Walnut boards for my laser cost about $2 each, and poplar boards cost less than $1 each, so I decided to make the interior walls, the lid bottom, and box bottom out of poplar.

I cut side pieces from walnut, about 2.5" tall and 4.5" long. I cut enough to make five boxes. I planned to use box joints for the outer walls, and then precisely fitted butt joints on the interior walls. Unfortunately, I ran into a little trouble with my box joint jig. It didn't want to cooperate. And though I had made box joint boxes with this jig before, today it was not happening. I ruined the ends of two (luckily only two) of the walnut boards before quitting in disgust and ordering an INCRA I-Box jig on Amazon. But that was going to take a week to arrive, and I didn't want to wait that long, so the next day I went back into the workshop and tried something else.

I decided to miter the corners, like I did with the pencil top box. But because these boards were much thinner, I was going to need a more delicate method of mitering the edges than the table saw. I was going to need a hand plane shooting board with a 45 degree "donkey-ear" attachment. 

Unfortunately, do to the aggravating previous day, I wasn't in much of a mood to take pictures during the creation of the shooting board or the "donkey-ear". And frankly, it came together very fast and there isn't much too it. Suffice to say, it turned out rather well and seems to work pretty good. Might need some tweaking to make it more square, but it was good enough. Now I could use a hand plane to put very precise 45 degree miters on the ends of all the walnut boards.
 

I lined up the boards end to end, outer faces facing up, and made sure they were square against a straight edge. Then I put masking tape at each of the joints. The masking tape will serve as a clamp to hold all the sides tightly in place as the glue dries.

Then I flipped the boards over, exposing the mitered edges, and applied glue.

Once the glue was applied, I folded up the sides and stuck another piece of tape on the last edge to hold it in a box shape. I made a quick jig out of some scrap wood to hold the box sides square while the glue dried. My jig could hold two boxes square at a time. They only needed to be in it until the glue started to set up.

Next, I cut pieces of poplar to serve as the bottom of the box and for the interior walls of the box. I dialed in the size of each piece using the shooting board. But this time, I didn't use the "donkey-ear". The interior pieces have 90 degree flat ends and are fitted tightly in place with a butt joint.

The poplar interior walls are shorter than the exterior walls to create a rabbet on the bottom edge for the bottom panel, and a slightly larger rabbet at the top edge to accommodate the lid. After being dry fitted, I glued the interior walls to the walnut sides, and also put glue along the ends of the poplar boards to butt joint them together. This will reinforce the miter joint of the thin walnut exterior walls, since they won't be reinforced with splines.

The very first box I made got the bottom panel glued in at the same time as the sides, but I quickly realized this was a mistake. If I leave the bottom panel until last, it will be easier to position the interior lid panel when gluing it to the lid. Making sure that the lid fits on properly is very important to this design. So for the other boxes, I just used scrap pieces of poplar as spacers when gluing in the interior walls. The bottom would be added later.

The lids I cut out of maple, the same thickness as the other boards (approx. 0.180" thick). But these I cut out on the laser, and added a different design to each one. On some of them, I gave a quick coat of spray paint before I took off the masking tape from the laser process. This gave a nice dark color to the burned areas.

I made the lids just very slightly larger than the box perimeter. I figured it would be hard to get everything to fit perfectly, and a slight overhang (less than a millimeter) would be preferable to being undersized.

Oh. BTW, one of the boxes came out rectangular instead of square, because I decided to use the two boards that I had messed up with the box joint jig. I just cut off the bad end and mitered them a little shorter. No big deal. If I hadn't, I would have not only wasted the two messed up boards, but the other two sides as well, because I had the perfect number of cut pieces to make five boxes.

I cut poplar pieces for the lid interior, pretty much the exact same size as the box bottom, and dialed in the best fit I could with the shooting board (at 90 degrees). Then I used the box to help me line up the interior lid panel on the underside of the lid to get the best fit. I glued the poplar panel to the underside of the maple lid and held it down with weights. This was a mistake. It needed stronger and more even clamping pressure. Some of the panels started to curl as the glue dried. I fixed this by adding more glue to the widening joint at the edges and clamping all around with spring clamps.

I sanded all the exterior sides, with the random orbital sander, to 220 grit. The box bottoms needed more attention, as some of them were a little proud of the box sides and needed to be sanded flush. Then I put the first coat of finish on them; 1/3 BLO, 1/3 Poly (oil based), 1/3 mineral spirits. I let this soak in for about 15 minutes and then wiped off the excess. After letting them dry for 24 hours, I came back and sanded the sides lightly with a 220 sanding sponge.

I like the look of an oil rub finish, but there is a trap you can fall into. I call it the "2 coats or 10" trap. Your first two coats of an oil finish (like BLO or tung oil) will completely soak in and give you a matte oil finish. But if you want something with more gloss, you have to do more coats. Well, the next few coats will start to build up a more satin or gloss finish, but it will be patchy, because the wood absorbs the oil more in some areas. To get enough build up on the entire surface with no patchiness, you end up doing ten or more coats and waiting a day between each. That's a lot of tedious finishing time.

This time, I wanted to avoid that trap, but I still wanted more gloss than one or two oil coats can give. So, for the second coat, I tried a new finish that is popular with guitar and gun stock makers. It's called Tru-Oil. You just coat the surface and rub it in until it is all evenly coated and mostly absorbed, and let it dry for 24 hours. Re-coat as desired. It is an oil finish, that also builds up a varnish film finish as you apply coats. One coat of my BLO mixture and one coat of Tru-Oil gave me a satin finish that was not patchy. It could have probably benefited from another coat of Tru-Oil, but this looked good enough. I didn't put the Tru-Oil on the interior of the box. The BLO treatment would be good enough for that.

While I was waiting for the finish to dry, I decided to make a little card detailing when the item was made and from what materials. Sometimes I forget what kinds of wood I used on which projects, and it is always helpful when selling an item to be able to tell the customer what woods were used. So, I made a little card that will stay with the box, and remind the customer as well. I am going to try to do something like this to all my projects in the future.

I added my logo to the bottom of the box. I have a sheet of them printed out that I stained with tea some time ago. When I need one I use the water tearing technique to separate one from the sheet and glue it to the item with pva glue.

Lastly, I put some self adhesive cork pads on the bottom corners to serve as feet, in case the bottom of the box isn't perfectly flat.

And now, some glamour shots.


Sunday, June 30, 2019

Planchettes-A-Plenty

A few months back, I made two batches of wooden planchettes in an effort to use up some scrap wood. The first batch was only about four or five planchettes, with open holes. The second batch was maybe a dozen planchettes, about half of which got glass viewers inserted into the holes. Then I got kinda burnt out on making them, so I put the project aside and tried to sell the ones I had made, both in my Etsy store and in my shop.

Well, it took several months, but the Etsy store finally started gaining traction. I sold about ten or so planchettes through the Etsy store, and stock was starting to get pretty low, so I knew I would have to make another batch. Well... I think I may have over done it a bit.


This, my friends, is a stack of Ninety Four planchettes being rough cut from a variety of milled planks. Ninety - Four. And that is after I put one large sapele board back on the wood pile, and set aside two large planks from the stack I had milled for the project. I have no idea why I am making so many. It honestly didn't seem like it was going to be that many when I was picking out the wood for the project. I had to order more glass cabochons, and I still don't have enough. I'm going to have to order more still!

I think I may have to start thinking about making a line of ouija boards just to have any hopes of selling this many panchettes.


Saturday, June 8, 2019

1.5" Candle Holder

At my shop, we sell a line of pre-made spell candles that are 1.5" in diameter. These candles are hand made (not by me) and the bases are not perfectly flat. The odd diameter and the imperfect bottom make finding a holder for them a little challenging. To combat that problem, I have custom made some quick wooden block style holders designed especially for these candles.

The cat's name is Luna ;)

The holder is just a square block of solid walnut with rounded over edges and two holes drilled in it. I made the prototype batch of six holders in about an hour (not counting finish drying time).


I got walnut from the scrap bin at my favorite hardwood dealer. I just measured the width of the board and set a stop block to that same width to cut the blocks off at the chop saw. Then I found the center of the top and the front face. I used a 1.5" forstner bit to drill a hole in the top to accept the candle, and a 1-3/8" forstner bit to drill a shallow hole in the front face to accept a maple inlay cut on the laser (1.38" diameter, 0.18" thickness). The top and side edges were eased over with a 1/8" round over bit at the router table.


As it turns out, the little aluminum cups that tea lights come in fit perfectly into the top hole, and so that will protect the wood from the burning candle. Hopefully. Never leave a candle burning unattended, kids. Especially in a WOODEN candle holder!

The finishing was a bit of a hodge-podge. I started out using danish oil, but I didn't want to wait for multiple coats to dry, so after the first coat I switched to shellac. But even after two coats of shellac (and sanding in between) they didn't have a nice shine, so I then gave them a quick spray of clear lacquer from a rattle can. Maybe with the next batch I'll try just one or two coats of polyurethane.

UPDATE::
So, these are just some production notes, mostly for my own benefit.

After finishing the prototype batch of six candle holders, I started a production run of about sixty. I had a small stack of walnut boards of the same dimension, so I decided to use them all up and make a big batch so I wouldn't need to make more for a while. Sixty is just a bit too much to work on in one batch. I found myself very tired and bored by the end of each step. Forty would have been a more managable batch size.

In the prototype batch, I only rounded the edges of the top and sides. In the production run I also rounded the bottom edges and around the top hole where the candle fits in. My router bit is starting to get dull, and I should have spent more time hand sanding these rounded over parts. They tend to snag the cloth when I am doing finishing.

One mistake I made that didn't become apparent until after the fact, was the order of operations. I drilled the top and face holes in the block before routing the edges, just like in the prototype batch. I discovered that the router bit wanted to dip into the front face hole, especially when rounding the bottom edge, which caused a noticeable divot in the edge. I should have marked the centers for the holes first (and definitely use an awl to make a divot for the drill bit to follow), then routed the edges, then drilled the holes, and then go back to the router to round over the edge of the top hole.

The sides were sanded to 500 grit on the disk sander. then I tried a new approach to finishing. I mixed 1/3 BLO, 1/3 oil based polyurethane and 1/3 mineral spirits. I dunked each part into a bath of the mixture and let it drip dry a few seconds before setting it out on a piece of cardboard. After about 15 minutes (about halfway through the batch) I wiped off the excess finish with a shop towel and set them to dry. Do NOT use the shop rags, they leave lint like crazy. Use paper towels or a blue shop towel.

After letting the finish cure for 24 hours,  lightly sanded each face by dragging it two or three times over a piece of 1000 grit sandpaper on a flat surface. Not really sure if this step helped.

Then I repeated the oil bath finish a second time. I did not repeat the sanding after this second coat. I could have left them here. They looked nice, but had a satin finish. I wanted more gloss, so I decided to do a few coats of wipe-on poly. I probably should have just left them as-is, or maybe done one coat of spray top coat. After two coats of wipe-on poly, the finish was patchy. I'm hoping a third coat will be the end of it. [some of them were good after the third coat. some could have used one more, but I just polished them all with paste wax and made an end of it.]


Thursday, May 23, 2019

YouTube Famous

Hey everybody. I'm YouTube Famous now! Lol.
All joking aside, I am very grateful to beloved YouTube woodworking content creator, Matt Cremona, for featuring one of my projects on his channel. About six months or so ago, I sent him some pictures of my Tarot Box project. At the end of his weekly shop update videos, he features several viewer projects. As he has over 250 thousand subscribers, you can guess that the queue for the viewer projects is pretty long.


The segment with my photos starts around 10:50 into the video, but I recommend you watch the whole thing, especially if you are into woodworking. Matt is a very popular YouTube woodworker, and his videos are very entertaining. I have been following his channel for over a year now, and I am never disappointed.


Friday, March 15, 2019

Laser Etched Mirror Altar Tiles

I think I posted already about the first one of these I made, and since these were done on the laser, there really isn't much to say about this project, so I'll just post a picture of the final pieces.


These are 8" beveled mirror trivets (candle holders?) purchased from Walmart. I used to make quite a few of these into customized altar tiles with acid paste etching, but using the laser I can get a much more complex image with much less work. The only down side is, the surface finish of the laser etched area is quite rough, unlike using the acid paste. But I could never get this kind of detail with a hand cut stencil, so it's a trade off.