I've been making rune sets with my new laser cutter/engraver. Most of them have turned out pretty good, but there has been a learning curve.
I wanted to experiment a little bit with using some material to inlay the runes. The laser can cut the runes nice and deep, and it just seemed natural to fill that groove with something, like epoxy or polyurethane resin, or polymer clay; something that would sand smooth and make for a good inlay.
My first attempt was using brass powder mixed with polyurethane resin. This didn't work out so well. My ratio of powdered metal to resin was way off, and it didn't fill the runes as smoothly as I had hoped. It did work, but there were a few air bubbles, and it just looked like an ugly color of resin, not like brass inlay, which is what I wanted. Sorry, no pictures of this first experiment.
My second attempt was to try polymer clay (sculpey). This worked a little better, on the inlay part at least, but there were still a lot of logistical issues that made this experiment more or less a failure.
One of the harder things to get perfect with this laser cutter is registration. There is a lot of parallax distortion in the central camera. This makes it hard to line things up, like centering a rune symbol on the cut out piece of wood. The farther away from the center of the camera's field of view, the worse the error becomes. This has become a large part of the difficulty I have had with making these runes.
Because it is easier to sand and finish a plank of wood than it is to sand and finish 25 little pieces of wood, it is logical that I try to cut the runes into the plank, and then do the inlay before cutting them out. But this runs into the parallax problem. If I cut them at the same time I engrave them, the processes are relative to each other, and so they will come out fine. But if I try to engrave them, and then put them back in to cut them out later, they will never line up right again. It seems like they should, but they won't.
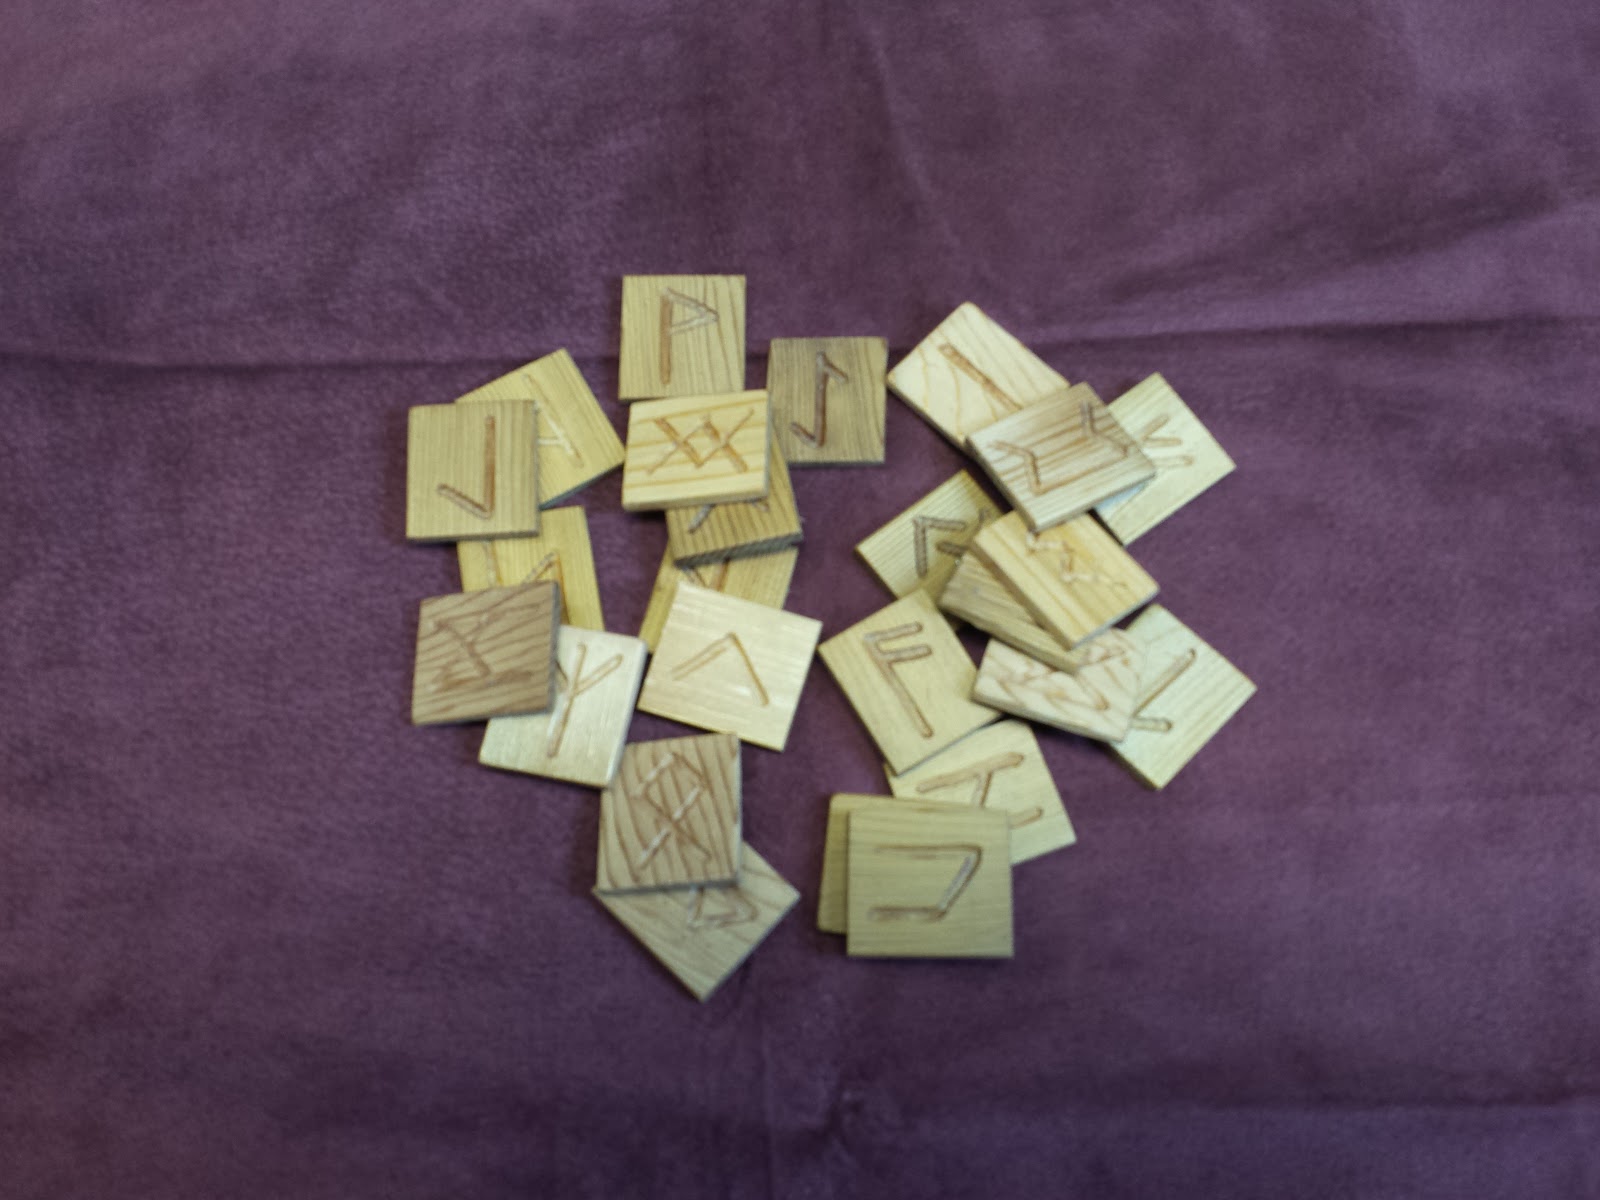
Anyways... I re-sawed an oak 2x4, that a friend gave me, into planks. One was about 3/16" thick and two more were about 3/8" thick. I laid out the runes in Inkskape and engraved them with my Glowforge laser cutter. I didn't cut the pieces out, as I normally would. I just engraved the runes and left them a solid plank. Then I sat down and started filling the runes with ploymer clay.
I made sure to fill the engravings completely, and let the clay mound up a bit. Then I baked it according to the instructions on the package. Then I sanded the tops smooth, getting rid of all the mounded up clay and revealing the shape of the rune.
I had watched a few videos on this technique, and they all suggested treating the clay with CA glue after it is baked and sanded. This helps to harden the clay, and it fills in any tiny cracks or gaps between the wood and the clay. Then, of course, it has to be sanded flat again.
I figured it would be easier to apply finish while the board was whole rather than to apply it to 25 little pieces, so I gave the plank a couple coats of tung oil. This turned out to not really be as good of an idea as it first appeared. Pretty pointless really, as this finish will end up being ruined/sanded off in future steps.


OK, so here comes the tricky part. In a perfect world I could just put the planks back into the laser, apply the same settings as when I engraved the runes, everything would line up perfectly, and now I could just cut the outlines to separate the pieces, right? Right. Never going to happen. I played with the settings for about 10 minutes trying to dial them in as close as I could get them, so that the image on screen overlaid the runes already engraved on the wood. Could not get them to match up for the life of me. Mind you, this is the same file that was used to engrave them in the first place. Nothing has changed. Still, I could not get them to line up perfectly. And this is on the thicker planks that stayed nice and flat. The thinner plank curled up like a potato chip when it got baked.
So I got them as close as I could, and decided to just score the outline and use that as a guide and cut them out on the band saw. The thicker planks would have been a bit hard to cut through on the laser anyway. It has limits.
The score lines were OK on some of the runes, and way off on others. No good. I couldn't even use them as guides. I ended up sanding them off. Then I tried another idea. I would use the file to cut out a template on card stock. I could then trace around where the cuts should be with a pencil after lining up the template manually.
This... sort of worked. Not really. The template wasn't perfectly spaced either (though I can think of no logical reason why it wouldn't be). And tracing around the holes was very difficult because the gaps between them were extremely thin. So I tried another trick that has served me well in the past, spray paint. A light dusting of spray paint over the template would give me a good visual guide to follow on the band saw.The results were, well... less than I had hoped for.
The paint didn't give me very crisp lines, so on the last plank, I decided to just grid off the runes with a ruler and a pencil. It could hardly be worse than what I was already dealing with.
I cut out all the pieces on the band saw, and cleaned them up and rounded over the corners on the disk sander. I also had to sand off the spray paint, which made the tung oil I had put on basically worthless. The spacing was abysmal. About 1/3 of the runes are not centered. The sizes of the chits are inconsistent, as are the shape. Overall, I give them a grade of D for quality. Total crap. But I have too much time invested in them to just throw them away (which is what I want to do), so I'll probably sell them super cheap just to recoup some of the sunk labor costs. I slathered them in lemon oil (old english) and called them done.
Total crap.