
OK, So we had finished with the Steampunk Diving-Space Helmet and used it at the LARP for which it was created, but we are not quite done yet. No, a prop this good has to see more use than that, so the following Halloween (2011) I decided to wear it to go trick-or-treating with my daughter. It was likely going to be our last time at this family tradition, as she is grown up now. But just a helmet would never due for trick-or-treating. I had to have a full costume. And I only had about three days to make it.
A year or two ago, when I was first looking up reference material for my helmet build, I came across someone's diving helmet project that was used for a short movie. In that movie, the helmet was used in conjunction with a workman's jumpsuit, some gloves, weighted boots and a weighted belt to give the appearance of a deep sea diver. I can't remember where I found it, or I would link it. For my full costume, I decided to borrow heavily from that costume design, but add in a few more steampunk elements.

What we have here is; the helmet, a work shirt, work pants, leather work gloves, customized leather work boots, customized, knee pads, a customized utility belt, a custom made specimen containment bin, and a custom made gauntlet control box. I worked on all of these (except the helmet) simultaneously to get them all finished within about three days.
Lets start with a look at one of the simplest of the custom pieces, the knee pads. I started with a standard set of cheap work knee pads with plastic cups and elastic straps. The cups were grey plastic so I knew right away I would need to paint those brass in the same fashion as the helmet. Starting with gold spray paint and finishing with a little black acrylic wash to antique it.


Then the elastic and velcro straps had to be replaced. I cut them off and replaced them with brown faux leather straps that I made from a cheap belt. The belt was wide with two rows of holes. I just slit it down the middle and made two thin straps with one row of ready made holes each. Then I riveted the straps to the knee pads and added a brass snap that matched the rivets for closure A snap was easier than putting on buckles. I ended up using the ends with the holes for something else.


Another of the simple custom pieces was the utility belt. It started out as a U.S. Army surplus canvas web belt. The olive drab color wasn't going to work for my steampunk look, so I soaked it in a bucket of brown RIT fabric dye. Then I dry brushed the buckle with gold acrylic paint to give it an antique brass look. And then I touched up all the little steel grommets with a gold paint pen to make them look like brass too.


I knew I would be hanging my containment cylinder from the utility belt via a large brass snap hook, but I needed more stuff to hang off of it. Some years ago I had bought a toy voice changer for a giant cthulhu costume project that never was completed (...someday!). Having used the helmet at Origins I knew that it muffled one's voice substantially, so I thought I might try using the voice changer as an amplifier so people could hear me with the helmet on. I could put the microphone inside the helmet, and wear the speaker on my belt. Originally I considered wearing it on my chest, but that didn't work out right. I did practically nothing to modify the voice changer except to paint it brass with a quick dry brush of gold acrylic paint. I would have gotten fancier with modding the case, but time was an issue.

So, containment canister on the right and voice box on the left, that still left me needing something in the back of the utility belt. I thought about the storm trooper costumed from Star Wars, and how they had some kind of canister on the back of their belt (I think that's where Luke got the cable he used to swing across the room with Leia in Episode IV). A canister should be fairly easy and quick to make, and didn't need to have any particular function other than to take up space and look utilitarian. So I took a cardboard mailing tube, capped the ends, added a cardboard panel with rivets for texture, painted it brass, and added a couple of pieces of scrap leather belt as trim for more texture. I attached it to the belt with some metal wire through the grommets. Simple and quick.

The boots were also fairly easy. From the costume I was referencing, it looked like they had just taken some cardboard and made caps for the toes and heels to look like weights which they attached to a pair of work boots. That simple gaff is what got me started on the whole idea of doing a complete costume. I started by selecting a pair of work boots that were in not to bad of shape. Then I made paper templates to decide on a design and dimensions for my toe and heel caps.


The heel cap was very simple. A cardboard rectangle that would wrap around on three sides, clip off the corner at the ankle, and add some extra panels to give it depth and texture.

The toe was a bit more complicated due to the more complex shape, but the same basic principle.


Then it was just a simple matter of detailing with some paint and faux rivet heads and attaching them to the boots with some brass tacks pounded in through the cardboard and into the sides of the sole of the boot.


Now for the more complicated parts of the build, the containment canister and the control gauntlet. Early on, I thought it would be cool to have a cutome made steampunk trick-or-treat bag that went with my costume. So I looked around for something that would work for me. What I found was a smallish metal trash can with an automatic lid, the kind where you step on a lever and the lid pops open.

This was about the right size, and not too terrible of a price, so I splurged and bought it thinking that with this as a base, I would hardly have to make any modifications besides cosmetic ones. The first thing I did was look around for other pieces that would fit with the canister to give it texture and steam-ify it. One of the first things I found was the casing to a broken fan that seemed to fit perfectly on the bottom.

Before attaching the fan casing, I added an led tap light underneath it (which I could reach to activate from the inside of the canister) so that some light would show through the holes and vents in the bottom dome.
I had considered making cut out panels with lights on the sides of the canister too, but that would be difficult and time consuming, so I opted to make non-cut out panels on the sides of the canister, again, to give it texture. These I made out of chipboard. I made just the outlines of the panels, and I made them wide enough that I could add rivet heads as well. I sketched out my design on the side of the canister with a pencil, leaving room to add a copper pipe design element.

Gluing the chipboard on the curved surface was a little tricky, and the masking tape I used to hold it down while it dried tore off some of the surface layer of the chipboard in places, making for an ugly texture, but I didn't have time to re-do it, and it would be dark and hardly noticeable at any distance anyway.
With the bottom domed out, I would want something similar on the top, to I found a plastic bowl, on top of which I mounted a garden hose valve handle (because valve handles are steam-y). Then I added copious amounts of cast resin rivet heads. Because again, texture and steam-y.


Because I was in such a hurry to finish, I added most of the design elements with hot glue, a medium which I loath to use due to its tendency to pop off at the most inopportune times. This is a decision which would haunt me come show time, as by the end of the two hours of trick-or-treating, I had lost about a half dozen rivets and the bowl and valve assembly from the lid. Oh well, it was only meant to be used for one night.
Next came gold spray paint, black acrylic wash antiquing, and a copper pipe assembly to add some more color and break up the outline of the canister.


I was able to operate the automatic lid by squeezing the foot peddle with my hand while the canister hung from my belt. I did, however, forget to turn on the tap light in the base while we were trick-or-treating.
Now for the last and most complicated part of the build, the control gauntlet. As with many of my recent builds, I started with a cardboard mock-up, testing the size and shape for fit and deciding what elements I wanted to incorporate. Piecing together found bits to see what would work well together and what would fit together without too much modification.


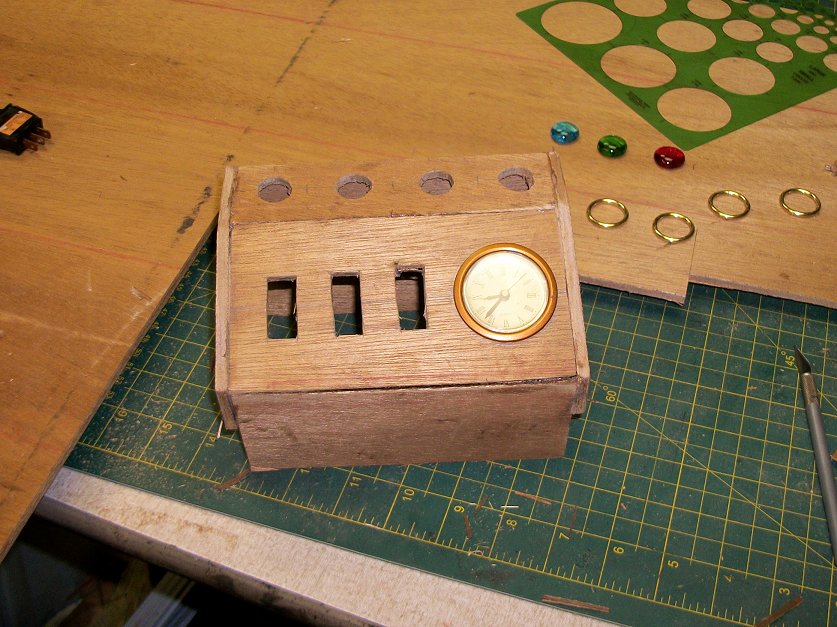
The design elements I chose were; a row of lights on top made from colored glass stones surrounded with brass rings to simulate bezels and lit from underneath by the guts of an led tap light, a row of three switches on the face which would light up (these are automotive switches from back in the days when I was into tricking out the dashboard of my car), an analog clock on the face (because it already had a copper colored bezel, was the right size, and because clocks are steam-y), a wrap around hose with a flashlight at the end, and not pictured in the mock up but present in the final piece are a pipe assembly with a laser pointer at the end (running parallel to the flashlight-hose), and leather straps for mounting to the forearm.
Wow, that has to be one of the longest sentences I have ever written.
With time constraints being what they were, I considered just painting the cardboard mock-up and not wiring any of the electronics, but I knew that I would never be happy with that. So I starting recreating the body of the control box in wood paneling. I already had a piece of wood paneling that was stained and nicely aged. It is thin enough that you can cut it with a razor knife, with a little effort.

The hose-flashlight assembly was a simple matter of cutting the hose to the right length to wrap around the back side of the gauntlet, painting it, and jamming an led flashlight in the end (which fit perfectly). I took the switch off the back of the flashlight and moved the battery pack to the underside of the gauntlet. I ran wire leads down the hose from the led terminals to the battery pack and to one of the switches on the face of the control box.


I did basically the same thing with a cheap laser pointer. I had one left over from my Steampunk Phonograph project which I had already torn apart and cut open. I ran leads from the working end of the laser pointer (removing the switch and batteries) down a pvc pipe assembly I painted to look like brass, and into the body of the control box. There it was connected to another of the three control switches and the battery pack. For more power and ease of connectivity, I dispensed with the battery pack of the flashlight and replaced it with a four cell AA battery pack from Radio Shack. The voltage difference would, at most, shorten the lifespan of the flashlight and laser pointer, but it was only intended to work for one night, so not a problem.


The pvc-laser pointer assembly was mounted on the back side of the control box, just above and parallel to the hose-flashlight assembly.


I tore apart an led tap light and mounted it under the top row of glass stones, so that they would light up (all at once, because that was much simpler). I attached this to the third switch on the face of the control box.

Finally I added custom cut leather straps for mounting the gauntlet to one's forearm. The placement of the straps turned out not to be optimal.. I used brass D rings riveted to the sides of the box and ran the straps through them, but this arrangement had too much slop in it. If I were to do it over, or ever wear it again, I would make some modifications to the straps.

Here is the whole wiring mess inside the control box. It was sloppy and I did have some issues with switches not working come show time (the top row of lights), but it all worked when it was tested in the workshop. Something must have come loose in transit.

Here is the finished control gauntlet.


And here is the finished costume.


This was kind of a long post, but since I have only managed to get out a few posts this past year, I thought you guys deserved the full monty.
If the elements of this build seem a little below par for my usual work, bear in mind that it was very hastily thrown together. Corners were definitely cut. I had a lot to do to create a complete costume and only a few days to make it. And it only had to survive for one night (about three hours). So, yes, not quite as quality as I would have liked, but it served its purpose. It was a big hit with the neighborhood. Adults and kids alike did much gawking and picture taking. Despite one set of lights not working, one set of lights being forgotten, and the top of my canister falling off, oh, and of course not being able to see most of the time due to the portholes fogging up, all in all a very good night.
See Also:
Steampunk Diving (Space) Helmet (pt.1) WIP
Steampunk Diving (Space) Helmet (pt.2)
Steampunk Diving (Space) Helmet (pt.3)
Steampunk Diving (Space) Helmet (pt.4)
Steampunk Diving (Space) Helmet (pt.5)


It looks awesome. Thank you so much for sharing! The glass stones and the flashlight really sell the arm piece.
ReplyDelete