The turned wooden bowl I posted last week was the first one I finished, but not the first one I started. I had originally started a much more elaborate design for my first piece, but I got impatient waiting for it to glue up, so I started turning #2 first. As it turned out, #1 was a little too ambitious, and suffered from a lack of planning.
I literally just started cutting up pieces into strips and gluing them together. I knew it would be made of layers of rings, and those rings would probably have something like 8 segments each, but that's about all the planning I had put into it. My first ring I made turned out way larger than I thought it would be and had to be cut down. Then I just started slapping things together.
Some of the rings were octagonal and some were square. Some were cheap reclaimed pine, and others were reclaimed oak. The sizes of the rings were haphazard, and at one point I had to make an extra ring as a transition because the sizes were too far apart. I planed to let the sizes of the rings dictate the shape of the bowl.
I figured out during glue up, that I had not planned on how to clamp an octagonal ring of wooden segments. I made due with electrical tape stretched around the rim.
Then, lots of sanding to even up the faces and hide the crimes. I had to add some super glue to some of the joints because I had gaps. I guess my chop saw is not calibrated very precisely, because the angles didn't quite meet up as the should have.
Then the rings were glued together into a cone type shape of sorts. It was around this time that I got impatient to get my bowl turning on, so I started turning the simpler blank (#2) that I started gluing up while I was struggling with the rings.
After attaching to a glue block for mounting onto the lathe, the turning began. Right away things were off to a rocky start, with the whole rig being unbalanced as hell. I worked quickly to turn the protruding corners off the rings just to get the table to stop shaking.
The rings were far too disproportional from one another. The transitions from one ring to the next were very hard to smooth out, and I had many instances of tare out, some very violent ones that sent large chunks of wood flying into me. The edges of the rings wanted to catch on my chisels, and I came much closer to being injured on this project than on any lathe project previous.
Just as I was getting the transitions under control, I had a blow out. I stopped the lathe to check my progress, as I often do, and noticed that one of the segments had been cut all the way through in spots. FAIL. I unmounted the piece and tossed it in the scrap bin.
But wait! I think we've established what a cheap bastard I am, and how I can't let anything remotely usable go to waste. So I rescued the failed piece from the scrap bin and decided that since only the top ring was ruined, I could probably cut off that ring and replace it with a new top ring. So I re-mounted the piece to the face plate, and started parting off the ruined top ring.
Then, once the top ring was off, I decided that I was too lazy and impatient to make a new top ring. I would just try to turn what was left into a bowl. Even without the top ring, it was almost as tall as the bowl I just finished yesterday.
The turning was problematic, I'll tell you that much. I had a lot of bad catches- a lot of gouging and chip out. And the transitions from ring to ring were tough to smooth out. This bowl would have benefited from some better planning, that's for sure. And sharper tools (I'm bad at sharpening, and sharp tools are the key to good wood turning). And I burned my fingers pretty good being impatient with the sand paper. You see, I'm to lazy and impatient to change the pulleys to adjust the speed of the lathe, so I sand at the same speed I turn, which is much too fast. This whole project had me impatient and frustrated, and I kind of rushed through it. Maybe that's why it encountered so many problems.
Anyway, the final product turned out to be acceptable- nice even. I think my next bowl will be a little less ambitious and better planned out. I obviously need more practice with bowl turning before I start doing anything fancy.
Wednesday, November 16, 2016
Wednesday, November 9, 2016
Turned Segmented Bowl v2.0
On the heels of my return to the lathe, following my successful attempt at creating turned wooden pendulums, I thought I would try my hand at turning something other than a spindle shape. The easiest thing to start with was a bowl.
I like using reclaimed wood for projects. Probably because I'm a cheap bastard who doesn't like paying a lot for supplies. But also because I can't stand to see anything useful get thrown out and wasted. This bowl was a test project, so I was definitely not going to use good wood for it. I found this wood in the garbage. The thick lighter pieces were from a reclaimed cheap bed frame (probably pine or fir), and the thinner darker strip in the middle was straight out of my scrap bin.
I sanded the faces as flat as I could get them, without a planer or jointer or drum sander, so that they would glue up without any gaps. Then I sandwiched them together with wood glue and clamped them for a couple of hours.
Using another piece of scrap wood, I made a sacrificial glue block and attached it to a face plate, which will screw onto the head stock of my lathe.
Then I trimmed the corners off of the blank with the band saw, just to make getting it round a little easier.
I attached the glue block with some super glue, which will be challenging but not impossible to remove from the base once it is finished.
Then, start rounding it out and shaping the exterior.
The center layer of wood was not a solid block, but a square ring of smaller pieces, so once I broke through the top layer of the block, there was a void beneath it.
After shaping, came sanding. Sanding always takes longer than I think it will. Maybe because my turning technique is weak (and my tools are not as sharp as the should be). I start with 80 grit sand paper and then go through 120, 320, 500 and 1000. I can still do a little shaping with everything through 500. The 1000 grit is basically just polishing.
After sanding comes finish. I like to apply my finish right on the lathe whenever possible. For this, I used a friction polish that some call O.B.'s Shine Juice. It is 1 part boiled linseed oil, 1 part shellac, and 1 part denatured alcohol. It is applied with a paper towel in thin coats, with the lath turning , and buffed immediately between coats with a dry paper towel. The heat from the buffing dries the finish in seconds and it is ready for another coat. I usually apply 5 or 6 coats.
The last step was to part the bowl from the glue block. I started by separating it near the joint with a parting tool, then when the connection was small and weak, I was able to pop the rest of the superglue loose by hand. Then I sanded the bottom of the bowl smooth and applied a couple coats of Shine Juice (off the lathe) and buffed with a paper towel.
The picture below makes the bowl look more yellow than it really is. I think the blue rag messed with the camera's color balance. Although, the Shine Juice will impart a very slight yellow to the wood from the shellac and BLO.
This is a much more accurate depiction of the color.
Wood turning is fun, but it does make a hell of a mess!
Labels:
bowls,
Tutorial,
Wood,
Wood Turning,
Wood Working
Monday, October 31, 2016
Acorn Pendulums v1.0
Well, I don't know about you, but I think it's about time that some actual craft items were posted on this blog. So, what do you say we do that.
Here we have three turned wood pendulums, just finished, in the shape of acorns. Shortly, they will be hung from a nice chain and sold in my shop. If you are unfamiliar with pendulums, they are a tool for divination, much like tarot cards or runes, but simpler. They are great for finding lost items, finding locations (used over a map), and answering yes/no questions. They are a popular tool for determining the sex of an unborn child.
There's nothing in the photo for scale, but they are about an inch and a quarter, maybe a little less, in diameter, and about two to three inches long. They are a lot larger than the pendulums I usually sell, but the smaller a turned piece is, the more delicate it is, and the harder it is to make. I will dial the size down a bit once I get back into practice on the lathe.
The one on the left is made from poplar wood, the two on the right are from reclaimed wood, probably douglas fir. The two on the left are natural color and have a CA finish. The one on the right was stained with light mahogany stain and given a light coat of water based polyurethane. I don't like the sheen of the one on the right, so I'll probably give it another coat of poly, with a glossier finish.
I went back the next day and made a fourth one. The one on the right in the picture above is made from a small birch log that someone gave me. It is my favorite so far. Birch is a dream to turn and the finished wood is beautiful.
After they were finished, I took them into my shop and fitted them with chains and pentagram charms. The charms are pewter and about an inch in diameter.
And here they are on display in the shop. The dark stained one got a second coat of finish and is still drying. The bowl sitting next to the pendulums was another project that I just finished, my first turned bowl. I'll have a post on its construction in a few days.
These pendulums are fun and quick to make. I was starting to get burnt out on making wands, so I was staying away from the lathe. I'm hoping that a change of pace will get me back to it.
So, you may be asking, why did you not make any out of oak? They are acorns after all. Well, because I kind of don't like working with oak. It is hard and splintery, and gives me problems with tare out. The grain is very porous, and I don't like the smell of oak sawdust. To me, it smells like cow poop.
Alright, alright, I'll make some out of oak. Sheesh...
Labels:
Pagan,
Wood,
Wood Turning
Thursday, October 27, 2016
Shop Cart Air Cleaner
When doing woodworking, air purification becomes a big deal. Go on YouTube and look at any of the woodworking vlogs and you will see that even hobbyist woodworkers go to great lengths to control the dust in their shops. Here are some examples.
April Wilkerson
Jay Bates
DIY Tyler
Matthias Wandel
I have barely done any woodworking as of yet and already the dust levels in my dad's workshop are becoming intolerable. Unfortunately, most dust collection and air purification solutions are rather costly, so you see a lot of people going the DIY rout.
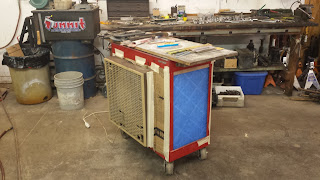
I tried using the 20x20x1 furnace air filter taped to the back of a box fan scenario, and while it did capture some dust, it was just too inefficient. I have seen several variations on this theme that claim to improve efficiency by creating more filter surface area, and thus more air flow. So I thought I would give that a try. But I didn't want to make a large box that would take up valuable floor space. I thought about hanging it from the ceiling, but that seemed like a lot of effort. So I decided to build a box out of the wheeled parts cart that we already have in the shop. We never use the lower level anyway, so I could just box in the lower level with air filters and a box fan and create a movable air cleaner cart that doesn't take up any more room than was already being used.
First I had to measure the cart to see what sized air filters I would need. I concluded that things would fit just about perfectly if I used a 25x25x2 inch filter on the front, a 16x25x2 inch filter with a 16x25x1 in pre-filter on the one side and a16x25x1 inch filter with a 16x16x1 inch pre-filter on the other side. I would have liked to use two inch thick main filters with one inch thick pre-filters all the way around, but the math didn't work out that way.
When I say pre-filter, I mean those really cheap blue fiberglass air filters that are not pleated. They don't catch much (something like 50%) but they don't impede air flow much either. I am hoping that they will catch the big particles before they get to the good filters, hopefully making the good filters last longer. And by good filters, I mean the $3 economy brand pleated filters. I'm not paying $10+ for a HEPA filter. I'm far too cheap for that.
The filters fit like a glove. I just needed a small wooden spacer at the bottom to hold them up, because they were just about an inch short, but I'm working with standard sized filters, so I had to take the closest thing I could get. I sealed the edges with some masking tape, which will cut down on air leakage, and help to keep everything in place.
The filters went in very quick and easy. The fan was going to be a little tougher. I'm using a super old box fan. It's probably from around the late 1960's. I took off the covers and gave it a rudimentary cleaning as it was already covered with filth. I also took this opportunity to re-rout the cord to come out the front grill instead of the back.
I attached two strips of scrap wood to the bottom of the fan, with a gap that would fit over the lip of the bottom shelf of the parts cart. This would help keep the fan stationary. I attached these with some 2P-10 CA glue. It doesn't need to be terribly secure. Who knows if this thing will even work. Until I assess its effectiveness, I'm not too concerned about making this thing a permanent fixture.
I used the same CA glue to add a strip of wood along the top of the fan. This would fill the gap and jam the fan under the top tray fairly snugly. I added two tabs to keep it from pushing in too far.
This left me with just a small gap on one side of the fan that I filled with a piece of cardboard and some masking tape.
I couldn't find a 25x25x1 inch pre-filter for the front, so I bought a roll of the fiberglass filter material and cut off a piece. I attached it to the front of the cart with masking tape around the edges.
All the parts were already in the shop except the air filters, which cost me about $20 total. The whole project took about an hour and a half to build. I turned it on and it seems to work. It will take me a little while to assess its effectiveness at cleaning the air, especially since I don't have an air quality meter. I will just have to use it a while and see how I feel about it. At least it doesn't take up any additional space in the shop!
UPDATE:
After about a week of use, I'd say it seems to be working pretty well. I've vacuumed off a good amount of dust from the outside of the pre-filters, maybe three times so far. I haven't taken the pre-filters off to look at the main filters yet, but I suspect they are still pretty clean. I've been doing a lot of turning and sanding this past week, and I leave the cart running while I am in the shop. There is still quite a lot of dust that settles over everything in the shop, but I do feel that the air in the shop seems a little cleaner.
Labels:
Dust Collection,
Mods,
Tools,
Tutorial,
Wood Working
Subscribe to:
Posts (Atom)