Wednesday, March 31, 2010

The Money Shot (part 4)

Here is installment #4 of the Shadowmanor Order: (click through for larger images)


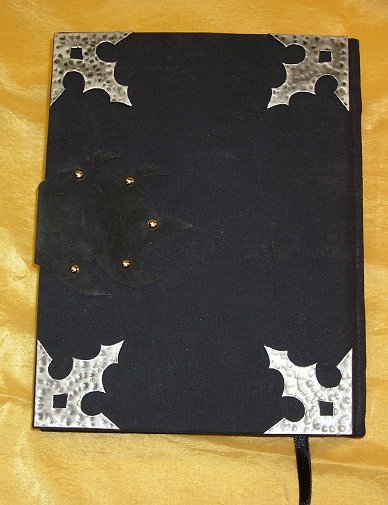
This blank journal is approximately 8.75in. x 11.25in. with 120 blank unlined pages. It was covered with black cotton fabric.

The corner bosses on the front and back are hand cast of polyurethane resin, finished with silver acrylic paint and Rub-N-Buff. They mimic medieval iron work bindings. The centerpiece is an inverted double cross in an ornate Gothic style. It was hand cast from polyurethane resin and has a cold cast nickle-silver finish that was antiqued with acrylic paint.

The book is held closed by a hand made black suede leather wrap around flap with a metal reinforced slot that accommodates a solid metal antiqued silver-tone hasp. It is held fast by a solid brass padlock. The leather is glued and riveted to the rear cover.

The book is finished with a black satin ribbon bookmark and a framed dedication space on the inside front cover (not pictured).


This item, and others, are currently for sale on the Shadowmanor.com website (tell them Rev. Marx sent you!). To see other items from this collection visit:
The Money Shot (part 1)
The Money Shot (part 2)
The Money Shot (part 3)
The Money Shot (part 5)
The Money Shot (part 6)

Saturday, March 27, 2010

The Money Shot (part 3)

This is the third installment of the Shadowmanor Order: (click through for larger images)

This blank journal is approximately 8.75in. x 11.25in. with 120 blank unlined pages. It was covered with wrinkled kraft paper. The paper covering was painted with a mottled deep purple and lavender acrylic paint over a black background, and the interesting veining created by the wrinkled paper is highlighted with gold acrylic paint.

The corner bosses on the front and back are hand cast of polyurethane resin, finished with gold acrylic paint and Rub-N-Buff. They mimic medieval iron work bindings, with one corner replaced by malevolent writhing tentacles. The centerpiece is an inverted pentacle with alchemical symbols and TETRAGRAMATON engraved around the border. It was hand cast from polyurethane resin and distressed to simulate an ancient decrepit relic. It has an antiqued gold/bronze finish that matches the bosses that was created with acrylic paint and Rub-n-Buff.

The book is held closed by a heavy solid brass chain and a small brass padlock. The hardware is very heavy and formidable.

The book is finished with a black satin ribbon bookmark and a framed dedication space on the inside front cover (not pictured).

This item, and others, are currently for sale on the Shadowmanor.com website (tell them Rev. Marx sent you!). To see other items from this collection visit:
The Money Shot (part 1)
The Money Shot (part 2)
The Money Shot (part 4)
The Money Shot (part 5)
The Money Shot (part 6)

Tuesday, March 23, 2010

The Money Shot (part 2)


Here is installment #2 of the Shadowmanor Order. Click through for larger images.

This blank journal is approximately 8.75in. x 11.25in. with 120 blank unlined pages. It has a raised border around the front and back covers and was covered with wrinkled kraft paper. The paper covering was painted a mottled deep blue acrylic paint over a black background, and the interesting veining created by the wrinkled paper is highlighted with silver acrylic paint.

The corner bosses on the front and back are hand cast writhing tentacles of polyurethane resin, finished with silver acrylic paint and Rub-N-Buff. The centerpiece is an inverted pentacle with alchemical symbols and TETRAGRAMATON engraved around the border. It was hand cast from polyurethane resin with a cold cast nickle-silver finish, polished with steel wool and antiqued with black acrylic paint.

The book is closed with a 3/8 inch wide hand made leather strap and antiqued silver tone metal buckle. The leather pieces are accented with nickle plated metal hobnails.

The book is finished with a black cloth ribbon bookmark and a framed dedication space on the inside front cover (not pictured).


This item, and others, are currently for sale on the Shadowmanor.com website (tell them Rev. Marx sent you!). To see other items from this collection visit:
The Money Shot (part 1)
The Money Shot (part 3)
The Money Shot (part 4)
The Money Shot (part 5)
The Money Shot (part 6)

Sunday, March 21, 2010

The Money Shot (part 1)

Over the new year, I was working hard on a special order for Shadowmanor.com. They had seen my re-covered prop books for sale on Etsy.com, and commissioned me to make them some blank journals in the same style. I've always said I don't like to do commission work, because I don't do well with deadlines, or projects that I'm not inspired to do. Fortunately they caught me in the right mood. I was already in a book making mode, and I really needed the money :)

In all, I made eight custom blank books for them and six custom quill pens with skulls. This is the first time I had worked on this many books at one time. I usually have 5-20 projects in production at any given time, but I really only actually work on two or three of them at once. I work until I get bored with them, and I set them aside and either continue work on something from off the back burner, or start something new. This time, I had to work on all eight books, and the pens, to completion and all at once. The project took me about two months to complete.

The items were completed and shipped some time ago, but I waited to blog about them until Shadowmanor had a chance to post the items on their site and make them available for sale, so that hopefully any visitors on this blog who were interested could visit their on-line shop.

So without further ado, here are some glamor shots of the first installment of the Shadowmanor Order... (click through for larger images)


This blank journal is approximately 8.75in. x 11.25in. with 120 blank unlined pages. It was covered with a black cotton fabric and circumscribed by a black leather strap with a hand made black leather belt closure. The metal rivets and buckle are an antiqued silver-tone. The bosses are hand cast resin tentacles writhing and stretching out from the corners. They are finished with an antiqued silver color created with acrylic paint and silver Rub-n-Buff. The centerpiece is a hand cast resin baphomet head pentagram with a cold cast nickle-silver finish, polished with steel wool and antiqued with acrylic paint. The book features a black cloth ribbon bookmark and a framed dedication space on the inside front cover (not pictured).

This book is very similar in style to the Black Book of Evil, which was featured on the Shadowmanor site blog and is the item that attracted the owners to my work in the first place.

My recent financial issues, and the success of this project has lead me to rethink my "no commissions" policy. I have since taken on two new commissions. One was for three movie props, which was recently finished and about which I will be posting shortly. The other is for the repair and recovering of an RPG rulebook for an old friend from high school, which I am currently working on. Hopefully, the future will bring me some more commission work, as I would like to start turning my hobby into a career. I think my work in this field is starting to progress to the point that I could start considering doing it for a living. Of course, I've still got a lot of learning and growing to do, but I've seen real progress in these past few projects.

This item, and others, are currently for sale on the Shadowmanor.com website (tell them Rev. Marx sent you!). To see other items from this collection, visit:
The Money Shot (part 2)
The Money Shot (part 3)
The Money Shot (part 4)
The Money Shot (part 5)
The Money Shot (part 6)

Friday, March 5, 2010

Extream Book Makeover

I love books. I treat them with great care and reverence. I have a library at home, and most of the books in it you can barely tell they have ever been opened. In contrast, my sales clerk, Toni, is rough on books. She writes in the margins, dog-ears pages, underlines with pen and marks up the text with highlighters. Every time I see her bend back a cover, something inside me screams. She'll deny it, and say that she is good to her books, but I've seen it. I know that she loves books, and she has a very impressive collection, but some of them get a lot of use, and abuse.

Recently I posted about her copy of "Masterpieces of Terror and the Supernatural", that was broken into three pieces and had the cover almost completely off. Like most people get when they see an injured bird, or a starving puppy, just seeing it like that made me well up with pity and want to fix it. I did, and recovered it with a nice bomber-jacket brown leather. Unfortunately I didn't think to take any pictures of the process at the time.

Well, it has happened again. Another of her poor pitiful abused books has tugged at my heart strings and moved me to give it some TLC and a new leather cover. This one was her working copy of "Cunningham's Encyclopedia of Magickal Herbs". She keeps it behind the counter at the shop and uses it as a reference book for customers who want advice on herbs. It gets a lot of use. Like the other one I had already fixed, this book had a broken spine and was in two pieces. The paperback covers were about 20% missing and the remainder was so warn and tattered you could hardly say it had any covers at all. Again, I didn't think to take a "before" picture, but I did think to grab the camera fairly early on in the makeover process. The process was basically the same as the other project, but in case you like that sort of thing, here's the play by play.

The first step was to tear off the rotting paper covers, and clean up the spine down to the glue. Then I re-married the two pieces of the text block by running a thin strip of dry roll-on adhesive along the spine edge of the page at the break, lining them up and and sticking them back together. I could have left it at that and the repair probably would have lasted for the rest of the book's expected life, but it doesn't take much effort to make the spine super strong, so I went the extra few steps.

I put the text block into a makeshift press to keep the spine tight. Using a min-hacksaw from the craft store, I cut four shallow grooves across the spine on a slight diagonal. Two slanting one way, and two slanting the other way. I cut all the way through the glue and slightly into the back of the pages. Then I filled the grooves with PVA (Aleene's Tacky Glue). I took thin hemp cord (the kind hippies use for macrame bracelets) and worked it down into the grooves. Then I worked the glue into the groove with my finger to make sure the cord was well saturated with it. After the glue was dry, I used nail clippers to trim the ends of the cord off flush with the edge of the spine.

Since this was a paperback book to begin with, I had to create book boards from scratch. I'm too cheap to buy the proper materials (known as Bookbinder's Board or Davey Board), plus there's no local supplier for binder's board in Canton, so I used chip board. I measured the original book, and added 5mm to the top, bottom and fore edge. I also added 4 mm to the width of the spine to compensate for the thickness of the new boards. I glued these three pieces to a strip of card stock, leaving a 1cm gap for the French groove (the hinge). I used to glue these all on the same side of the card stock, and I had problems with my hinge. A few months ago I watched some videos on YouTube to brush up on my technique and found out to glue the spine on the opposite side of the card than the covers and crease around the edge of the spine with a bone folder. I'm still not sure why this works better, but I have tried it and my problem with the hinge seemed to go away. I glued the spine down first, and then after flipping it over and creasing around the spine with the bone folder, I used scrap 1cm strips of chip board as spacers (another tip I picked up from YouTube) and glued down the front and back covers.

Next I got out the leather. I used a nice buttery soft chrome tanned 2oz. garment leather in a dark mottled green. I cut the leather to size, leaving 2in. on each side to turn over. I probably don't need this much of a margin, but I prefer to have too much than not enough. I glued the boards down to the leather with a watered down pva. You're supposed to use wheat paste for this, but I've never liked it as well. It dries slow and is too wet. It tends to warp my boards. Plus, I'd have to mix the wheat paste, and I'm very lazy. Once the glue was down and the boards in place, I put it under weight to dry. I also stuck the spacer strips back into the French groove to shape the leather while it dried.

While the cover was drying, I trimmed off the ends of the cords near the spine and added new end papers. I used a heavier weight gray paper that I got in reams of 11x17 for cheap at a discount store. I love discount stores :) I folded it in half and lined up the crease along the spine. I glued it in place along the crease with more of that dry roll-on permanent adhesive. Then I trimmed the edges to match the edges of the text block. I used a snap-off razor blade, the kind with the long blade that clicks as it extends. I extended it out a good ways and used the side of the blade as a guide. The flat of the blade rides along the edge of the text block as I cut, ensuring that the cut is straight and that I don't gouge into the text block.

After the glue on the leather was dry, I trimmed the corners in preparation for "turning in". I cut them off at a 45 degree angle to the corners of the boards, leaving a gap between the corner and the cut that is twice the thickness of the board. I'm not sure where I read that measurement, but it seems to work well. Then I turned in the top and bottom edges and glued them with more watered down pva. I put this under more weight to dry.

Again after the glue was dry, I turned in the two remaining edges. Before turning these in, you have to pinch the corners in a little. It's hard to explain with out a picture of someone doing it. After applying your glue to the flap to be turned in, just hold the board vertically, facing you. With your index fingers, pinch down that little doubled over flap at the corners (where the cut meets the corner) towards the edge of the board. this wraps the leather around the corner of the board so you have a nice clean corner. The glue should hold it down for a second or two. While it is down, fold over the main flap of leather and glue it down. If the glue doesn't grab well, sometimes I will use some strips of masking tape to hold down the flaps and keep them tight while the glue is drying, and of course, put it under weight while it dries.

Once the edges are all turned in, you are ready to "case in" (put the text block into the new cover). The first step is to attach a "mull" to the spine of the text block. I use a combination of cheesecloth and kraft paper. Cut your brown paper and cheesecloth a little shorter than the length of the spine, and wide enough to cover the spine and extend an inch or two farther on either side. Then apply a think coat of glue to one side of the kraft paper.

Another couple of tricks I picked up from watching YouTube videos, is to use a small foam roller to apply your glue. It makes for a nice thin even coat. Also, I now use a "gluing block" this is just a stack of scrap paper that you lay your work piece on while you apply glue, allowing you to glue right off the edges without worry. Then you discard the top sheet so that you have a clean surface for the next time you glue. This helps prevent getting glue in the wrong places on your work due to having glue on your table. I'm too cheap to use a ream of new 11x17 paper as my glue block (as was suggested in the video) so instead I use an old phone book. Glue away, then turn the page and glue some more. When you're done, tear the used pages off. Just make sure that when you turn the page, it hangs off the edge of the table, and doesn't glue itself to the table top!

Once you have a think coat of glue on the kraft paper, lay down your cheese cloth right on top of it, and glue it down some more. While it is still wet, you're going to apply it to the spine of your text block. But first, prop up your text block so that the spine is facing up. I wedge it between some books. Then apply some glue to the spine and work it in with your finger. The working it in part is more important when you are dealing with dry (previously unglued) signatures, but since this was a paperback that doesn't even have signatures, there's isn't a lot of working to be done. Just make sure it's evenly coated. Lay the mull, cheese cloth and glue side down, on the spine. You should have a small gap at the top and bottom, and the sides should extend past the edges of the spine. If you were applying a headband (which I didn't) it would be glued on to the spine at the top and bottom before applying the mull (though I usually apply it after, since it is just decorative anyway). With clean hands or your bone folder, work the mull onto the spine. Rub along the spine to make sure it gets good contact. Then, smooth out the overhang down along the sides. This will glue the overhanging mull to the outside of the folded end paper. This part will end up glued to the boards soon. At this point, I like to put a few pieces of scrap paper inside the fold of the end paper, and on the outside where we just glued the mull down, to absorb any excess moisture and let it dry under weight.

When using thick covering material, like leather, the edge can bee seen pretty clearly under the end paper when it is glued down. I like to soften this transition, by first gluing down a piece of card stock that overlaps the edge of the leather, but is smaller than the end paper, so that it will be completely covered by it. Again, let it dry under weight. At this same time I glued in silk ribbon bookmark to the inside of the spine. That piece of masking tape is just there to hold it in place while the glue dries. but hey, it will be hidden, so I'll just leave it on there.

Finally, we're on the last step. Joining the text block to the case. Test fit the text block in the case. Get your spacing right along each edge. Then, lay the book down flat on the table. Make sure the text block is snugged up against the back of the case spine as tight as it will go. Open the front cover, without disturbing the rest of the book. Tuck two sheets of scrap paper under the top leaf of the end paper (in the fold). Roller a thin layer of glue onto the outer leaf of the end paper (the part where you can see the mull attached). Slide out the top layer of scrap paper, the one that now probably has a little glue on it. Leave the sheet under it to protect the rest of the text block. Close the front cover, again making sure that the spine is snugged up. Press down the cover to get good contact. After a few seconds, carefully lift the cover and smooth the end paper with your clean hand, especially around the edges to make sure you get good contact. Close it again. Flip the book over and repeat for the other side.

Once the end papers are glued down, stick a few more sheets of scrap paper under the covers to absorb any excess moisture. this will help prevent warping of the boards, and wrinkling of the end papers (which I still have problems with). Pu the closed book under weight and allow to dry. At this point, I also use some masking tape to attach bamboo skewers along the French groove on either side. The extra pressure helps to define the groove while it is under weight.

That's it. Once it's dry, you're done. Unless you want to do some fancy lettering or otherwise decorate the cover (which in this case, I didn't). I'm sure Toni will enjoy her newly re-covered book. I know it will get plenty of use, and it will be a good way for customers to see my work, and possibly earn me some commissions :)

Thursday, February 25, 2010

Think Ink

This past summer I had a brain fart that led to my purchasing several hundred antique quill pen nibs (points), several hundred 1oz. bottles, and a quantity of fountain pen ink. I'm sure it's happened to everyone at some point.

Immediately after purchasing the nibs, I began designing and producing some quill pens to sell in my shop and on my etsy and ebay pages. To augment the sale of the pens, I purchased Black India Ink and glass bottles to go with them. Not content to offer only one type of ink to go with the myriad of colorful designs I was coming up with for pens, I looked into some other kinds of ink I could produce with minimal cost. The two I came up with were Black Walnut Ink and Pokeweed Berry Ink. Both can be produced at home with minimal start-up costs and produce a very nice quality ink.

Black Walnut Ink is a deep brown almost sepia tone water based ink made from the rotted hulls (the green fleshy casing around the nut) of black walnuts. There are plenty of web sites out there that talk about how to make Black Walnut Ink. And most of them do it slightly differently. Most advocated collecting black walnuts (still in the hull) off the ground and allowing them to rot and soak for several weeks. While I do have black walnut trees in my area, I did not want to wait several weeks, endure the smell of rotting hulls, or ruin a large pot to have them soak in (it is recommended that you not cook in a pot after using it for this as it is poisonous to humans). It just so happened that I had recently purchased some dried and powdered black walnut hulls from my herb supplier. I don't even know why I had ordered them. Call it kismet.

I soaked a quantity on the powdered hulls in some water in a quart saucepan that I normally only use for melting wax for making candles. I let it steep for a little while to let the juglone, plumbagin and tannin leech into the water. I used a single burner electric hot plate (that I also use for melting wax) and let it simmer for an hour or two. I had read on several websites that the addition of red iron oxide (rust) reacts chemically with the juglone and makes the ink darker in color. I didn't have a supply of red iron oxide sitting around (though I am getting some), so I found a rusted metal coffee can and scrapped what I could into the pan. I figured it couldn't hurt.

After simmering for a while, I used a coffee filter over a quart mason jar to strain the liquid from the solids. In hindsight, I should have used a more progressive series of sieves and filters, so as not to clog up the filters almost immediately. It took forever for the liquid to drain off, and a lot was wasted. Once filtered, I checked the color with a pen. It was OK, but I would have liked it to be a little darker. I have read that black walnut ink darkens with age, but I am impatient. I could have reduced the ink on the hotplate, but again- impatient, so instead I used some commercially produced Black Walnut Ink Crystals to shore up the color. Walnut ink crystals are basically the instant coffee version of what I was making. They are very nice to have, but a little expensive. Too expensive to use by itself to produce ink in quantity for sale, but OK for deepening the color of my much cheaper home brewed ink.

Pokeweed is common in my area. It can be found growing in vacant lots all over the place. In the fall, it produces dark purple/black berries that grow on a bright purple/pink stem cluster, like a bunch of grapes. Birds love them. My daily walk takes me through a park that has lots of pokeweed growing in it and my sales clerk, Toni, has a large bush of it growing beside her house. It was very easy to take a plastic bag and load up on berries.

I gathered about two Wal-Mart bags full of fresh berries and mashed them up in a couple of quart mason jars. Pokeweed berries were used extensively back in the late 1800's because you can use them without any processing. Just mash up some berries and dip your pen in the goop. It makes for a very un-manly bright pink/purple/magenta color. I thinks it's quite pretty actually. Unfortunately, this color will fade over time. It will eventually become a pale brown color. You've probably seen pictures of the Declaration of Independance, especially if you've seen National Treasure. Well, try to imagine it as it was originally written -in hot pink! How long it takes for the color to fade varies depending on several factors, a significant one being exposure to UV.

One of the problems that I had read about when using pokeweed berries for ink, it that it has a limited shelf life. It molds and it spoils. One website reported to have solved the spoilage problem be fermenting the berries during production. This would remove a lot of the natural sugar and introduce alcohol which would act as a preservative. I also planed to add some denatured alcohol to the final ink to help with preservation. I took a packet of fast acting yeast and disolved it in a cup of water I then added the solution to each of my jars of mashed berries. I covered the tops of the jars with a cloth to prevent unwanted airborne spores from getting into the mixture, and to allow CO2 to escape as the yeast fermented the berries. I left the little buggers to do their magic for several days, stirring occasionally. If you do this, remember to only fill your jars about 1/3 of the way with berries, because the yeast is going to make it foam up and you will have overflow if you overfill.

When the mash was finished fermenting, I consolidated it into a few jars, and cleaned out the now empty ones ( I think I used like 5 jars for fermenting). Then I strained the mash through wire strainers and into the clean jars. The mash is way too thick to use coffee filters, so I started out with a coarse mesh wire strainer, and then a finer one (the success of this method is what gave me the idea that I should have done this with the walnut ink as well). I added a little at a time with a spoon, and pressed it down to squeeze out the juice. when the small batch in the strainer was done, I put into a cup for later. After going through two levels of strainers, it seemed clear enough of particles that I didn't think it needed a coffee filter. There was still a lot of liquid trapped in the pulp even after being squeezed by the spoon in the strainer, so I took the wet pulp and put it in a piece of doubled up cheesecloth. I closed up the cheesecloth into a bundle, making sure there were no holes for the pulp to escape, and squeezed the crap out of it with my hands. This gave me some of the richest darkest colored juice of all.

Now, as I was squeezing, I was wearing rubber gloves because a) I didn't want my hands turning bright purple, and b) Pokeweed berries are POISONOUS. Unfortunately, squeezing the cheesecloth sac with my hands made them slippery with juice, even though I was wearing the rubber gloves, and I dropped the mason jar filled with the good concentrated juice as I was taking it to add to the rest of the jars. It slipped from my hands, fell onto my lap, spilled, splashed everywhere, got all over the vinyl floor, soaked through my pants, and stained a large area of my inner thigh bright purple. Aside from being wet, and pissed off, I was also a little scared. I dropped everything and immediately went home to clean up. I was alarmed at how much of it got through to my skin. This prompted me to make the only call to The Poison Controle Center that I have ever made in my life. I knew pokeweed berries were poisonous to EAT, but I had no idea how poisonous they would be to absorb through your skin, especially this much of it. I needed to know if I should go to the hospital. The lady I talked to was very nice and said that they get calls like this all the time, mostly about little kids who found a bush of the stuff, started playing with the pretty colored berries and came home purple. She also assured me that the berries are a GI irritant and are not dangerous to absorb through the skin. What a relief! Luckily, most of the stain on my leg came off with soap and water, and the remainder faded within a few days. Cleaning up the workshop was not so easy. Some of my tax papers still have splotches of bright purple on them.

I added some denatured alcohol to the strained mason jars and called it finished. I wanted to avoid using salt or vinegar as a preservative, because these would case corrosion in the metal pen nibs. I bottled only a dozen or so at a tome, and left the rest in the mason jars and keep it in the refrigerator. It has been several months, and it still seems fine. Next year, since pokeweed berries are seasonal, I think I will gather up a bunch of them and put them in the freezer and only take them out when I want to make up a batch, instead of making a large batch and keeping it in the fridge.

Wednesday, February 10, 2010

For a Friend

The past several weeks have been spent making a special order for ShadowManor.com (which is finally finished and will be shipped this week, with a blog post to follow). So obviously, I haven't been doing much posting recently. However, during that time, I did manage to sneak in a few side projects.

My sales clerk, Toni, brought a collection of short stories to the shop with her. She said it was one of her favorite books. When I first saw it the cover was almost completely off the text block, the spine was broken causing the text block to be split into four sections, and there was some damage to a few of the pages. It was old, and it was poorly made. The paper is cheap and acidic, the signatures were not sewn but pierced with large gashes and glued, and the glue was brittle. I needed a little side project as a distraction from my main project (I have a short attention span), so I decided I would repair and recover it for her.

I tore off the old cover and cleaned up the old glue from the spine of the book block. Then I used some rice starch glue and tissue paper to repair some pages that had tares in them near the spine. Then I glued the separate sections of the text block (fyi: book block and text block means the same thing) back together by running a thin stripe of a roll-on dry adhesive along the fold edge. Then I put the text block in a make shift press and sawed four shallow diagonal cuts across the spine with a mini-hacksaw. I filled the grooves made by the hacksaw with PVA glue and a piece of hemp cord (the kind hippies use to make macrame bracelets). This would give the spine strength and keep it from cracking again. Then I added new end papers and glued a cheesecloth and kraft paper mull to the spine. I used the old hardback book boards and re-covered them with a nice bomber-jacket brown leather. Then I paseted in the text block with the new end papers and mull. The last step was to add a black satin ribbon bookmark and apply some stick-on gold lettering I picked up from the craft store. I have never used these letters before, and I am anxious to see how they hold up to use.

Toni is ecstatic about her newly re-covered book. She kept it in the store for several days and showed it to everyone who came in. I must say it turned out rather well. I'm very confident that the new spine work and cover will outlast the acidic pages. The only thing I would change is, I would have given a little extra room for the French groove. It disappeared due to the fact that the new leather covering is much thicker than the old cloth and paper and needed more of a gap between the boards and spine to compensate. Oh, and I would have taken some "before" and "during" pics too. Sorry about that.

Friday, February 5, 2010

Dulcet Tones

Up until now, this blog has focused almost exclusively on my work in physical media. But long before I started creating blasphemous tomes, steampunk ray guns and other assorted physical prop designs, I was an artist of an entirely different type. Using the term very loosely, I was a musician.

Recently, I got a side job doing a little voice-over work recording the vocal track for a series of eLearning courses. You know, those really boring powerpoint presentations that your boss makes you watch to better improve your management skills, or whatever? And there's that guy's voice that reads along with you and paraphrases the slides in what has to be the most unnatural overly expressive tone of voice you have ever heard? That's me. (sorry)

I do this job from home. My boss emails me scripts, and I record them and post them to a website for her to download. In doing so, I have had to drag out all my old recording equipment. I used to have a DIY home studio set up in my basement. I have about $10,000 worth of what is now completely obsolete audio gear that I have been collecting since the mid 80's. The studio has been mothballed for the last 15 years, and could (and should) now easily be completely replaced with about $1000 worth of computer equipment, but I won't part with any of it. Digging it out to do these voice-over recordings has brought back some old memories that I thought I would share. (lucky you)

Back in the day (when dinosaurs roamed the earth), I used to have a band called Pyrotechnics. There was a revolving roster of studio musicians (friends of mine) who assisted on various recordings, but the core of the band was just me and my best friend at the time, Rich Stevens. Since we were basically a two man band, we each played several instruments. Primarily, Rich played drums while I played guitar and did lead vocals. We each did a little keyboards and bass, and whatever else was needed.

Since it's hard to play more than one instrument at a time, we mostly were a recording band. We only ever played one live show. That was at Malone College, back in 1992. We played the men's dorm commons room, along with two other bands, for a crowd of about two dozen people. Our original material was written for 4-5 instruments, so we mostly played Ramones and Sex Pistols tunes that we thought we could power cord our way through with just a guitar and drum. (the White Stripes, we were not)

We did manage to release two self produced full length cassette tapes. Those were little plastic boxes filled with spools of ribbon-like magnetic tape on which music was recorded, for those of you born after 1990. And we even managed to get played on the radio a couple of times. It was a small show called "Cool Tunes" that played "alternative" music on the local rock station at 1am on Sunday mornings. They had a segment each week that played local bands for a half hour at the end of the show.

Here is a clip from the show. This was our first radio shot. It aired at 2:10am on March 2nd, 1992.


Yes, we really sucked that hard. If you'll remember, I used the term "musician" very loosely. I hardly ever listen to my old recordings anymore. When I do, it makes me cringe. But we had a lot of fun with the band and when I was 16, it was a real hoot hearing myself on the radio, no matter how bad it was.

Sadly, those halcyon days are over. Rich and I parted ways back in 1992, for reasons I still don't understand. I have not spoken to him in 18 years. I hope he is doing well, whatever he is up to these days. I never did amount to much as a musician, songwriter, or audio engineer (I produced both our tapes myself), but I really enjoyed all of those things. I used to have some of the band's recordings up on the internet, years ago (back when mp3.com was worth a damn). Maybe someday I'll post them again.

UPDATE: Well, it looks like the company where that clip was hosted (divshare.com) went under about four years ago and I never noticed. Oddly, this post has been my #1 most viewed post by more than double its 2nd place competitor. I'm going to see if I can upload the clip to YouTube so that it is playable again.