
The process of creating the page begins with drawing the artwork. For the pieces that I create myself, I begin by hand drawing the design on blank copy paper. I use black gel pens because they write very smooth, cover very well, don't bleed, and create a uniform color even when filling in larger areas. I used to use Sharpie pens, but I found that over time, the ink from a sharpie will leach out into the paper, giving it a yellowish halo. Then I scan the artwork into the computer and do any necessary touch-up with Paint Shop Pro. I also glean public domain images off of the web, and I have permission to use certain images by ZARONO, which he sent me on a disk. After making any alterations to the images in Paint Shop Pro, I lay out the page using Corel Draw. This allows me to size and position text and images any way I want. Finally, I save the page as a PDF (for transportability), and print out a copy on my printer's highest quality setting. That becomes my copy master. Then it's off to a high quality photocopier for mass production.

Once I have a stack of copies, I clamp them together and rough up the edges with a Dremel tool and a router bit. Here I have the pages clamped to the edge of my railing surrounding the basement trapdoor. I used piece of 1x2 and a couple of C clamps. The edge of the paper sticks up above the railing about 1/2 of an inch. Then I just go to town carving up the edge with the router bit. I hate this part of the process because it covers me and everything in the room with a fine white powder of sawdust. I have tried several techniques for clamping the pages together while Dremeling them. This one worked pretty well. Once all four sides are carved up, It's off to the staining bath.

Here is my worktable where I stain the pages. I hate this part too, because it's messy, and it stinks. It wouldn't have to stink, but I'm too cheap to make fresh coffee each time. I recycle it. Some times I use it over and over, just adding to it as needed. It gets pretty rancid after six months or so. I use a combination of stains, including black tea, instant coffee, and this time around I added a little RIT brown fabric dye. I have mixed feelings about the fabric dye. It turned this batch a reddish brown color. I'm used to a nice tan brown from the coffee-tea mix. Some of the pages that got less of the dye only turned reddish on the edges and look quite striking, but some came out too red all the way through and I'm not sure I like them as well. All in all, far from my worst batch. I leave the pages to soak in the bath for about 15 minutes. I also use hot water as much as possible, to ensure the fibers of the paper blow open and take up the stain. The quality of the paper has a great impact on this part of the process, and varies widely from one brand of paper to the next. The brightness, weight, and the amount of sizing on the paper all dictate how well it will take up the stain, and how long it will need to be left in the bath.
After the pages come out of the bath, I drain off the excess water, and stack them in another bath tray. Then I tilt up the tray and let the whole stack drain some more, until most of the excess water is out of it. Then I split the stack into manageable chunks, being very careful because the wet pages are very delicate.In the summer months, I like to take them outside and lay them in the yard to dry in the sun. This dries them very quickly, but created other problems. First, they tend to blow away in the wind once they dry. Second, because I use tea in my stain mixture, the tanic acid reacts with UV light. Any pages that have exposure to direct sunlight will get very dark. This can be good, as I sometimes like the pages to be a little darker, especially if they didn't take up enough stain. However, You have to watch them very carefully as the reaction happens kind of fast and without warning. You also have to make sure each page gets direct sunlight, as only the top page (getting direct sunlight) will darken. It also only darkens on the exposed side, so you have to flip them for even coverage.

In the winter, I clip them to a hanging rack with clothes pins, keeping them in bunches of 8-10 pages. Then I sit the rack over the heat vent, or in front of a space heater with a fan. This method takes much longer than drying in the sun, so I usually do it overnight.

After they are dry, they get put into a box with granulated myrrh. Then I shake them vigorously, over and over again, for several days, for up to a week. This pulls more moisture out and gets rid of the rancid coffee smell.

Then I randomly burn some of the edges. I don't burn every page I just grab a hand full at random, and I do it in smallish stacks, so they are not all burned in the same place. About half of them get burns. I try to keep the burning to just the edges, so as not to obscure the text and images too much. I have burnt myself more than once trying to put them out.

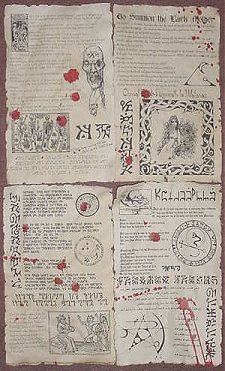
The last step in production is the application of blood stains. I use Dragon's blood ink, sometimes mixed with a little sepia ink to darken it, and a small disposable eye-dropper. The eye-dropper gives me realistic drips and arterial spurts. Sometimes I drip the ink on, and then tilt the page and let it run, giving me a nice dripping effect. Then they have to dry.

The last step is sorting. I have to sort out all the pages by design, then group them into the bundles for sale. This takes a little time, and a lot of floor space. That's it. They are ready to go!


Those look very interesting! You can also get the burnt edge look using lemon juice and a heat gun.
ReplyDeletenice
ReplyDeleteBrilliant! Thank you for sharing. I dry my pages in a fan assisted oven, gives them a nice crispy sound too :0)
ReplyDelete