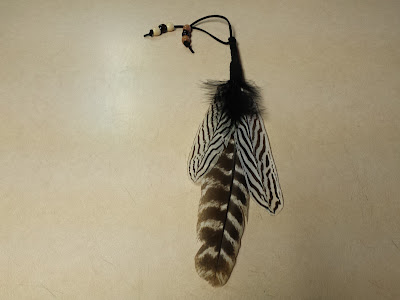
To date, one of the most popular posts on this blog (and certainly on Pinterest) is my first attempt at making a smudging fan. And as I have previously stated, I hated that project. I only made that version of fan one time, and only made four of those fans total. Then I tried a new design, which was much simpler and I liked the finished product much better. I have made several dozen of the second iteration of smudging fan, and still use that design when making new fans. However, today I worked on a new design, or rather a variation of the second design, and it turned out fairly well.
This fan came about as a way to salvage a damaged feather, because I was too cheap to just throw it away. I prepared a batch of wild turkey feathers to be made into v2.0 fans, by trimming the tips and inserting a bamboo skewer into the quill to give it strength. I then cut the skewer to the desired length of my handle. This makes it possible to get a decent handle of a consistent length, even if the quill is damaged, weak or short.
Normally, I would then just wrap the handle with suede leather lace, and add a few beads to the ends of the lace and call it done, but this time I decided to apply a new technique I had read about, wherein one uses a hot iron to flatten and straighten the feather. Here is where things went wrong. I set my iron too hot and it melted the vane on one side. It only melted part of it, and only about half-way up, but it made the feather pretty ugly and unusable. I was just about to throw it away when I got the idea to see if I could convincingly cover up the damaged part with another smaller feather.
I selected a couple of smaller wild turkey feathers to overlap the main feather on either side (thus covering up the damaged part of the vane). I held the shafts of the smaller feathers in place with a wooden clothes pin and used thick CA glue and spray activator to glue the shafts together. I didn't like the way the junction where the three feathers came together looked, so I covered it up with a small black marabou feather, also attached with CA glue.
I then began wrapping the handle with suede leather lace, making sure to cover over the joint where the shafts came together. I put a few dabs of CA glue under the leather in a few spots to make sure the wrapping didn't shift or come loose.
In the picture just above, you can see the damaged part of the main feather along the right side.
As I did with v2.0, I added some accent beads to the ends of the leather wrapping, and that was it. Not terribly complicated, or significantly more difficult to make, but a little fancier than v2.0. I might make a couple more of these and sell them at a premium (compared to the simpler v2.0), but it is unlikely they will replace v2.0 completely.
The Red Book
-
MilleCuirs returns to our pages with another fantastic project- the Red Tome.
This time it's hand-tooled red leather on a multi-layered geometric design,...
20 hours ago


