Friday, April 15, 2011

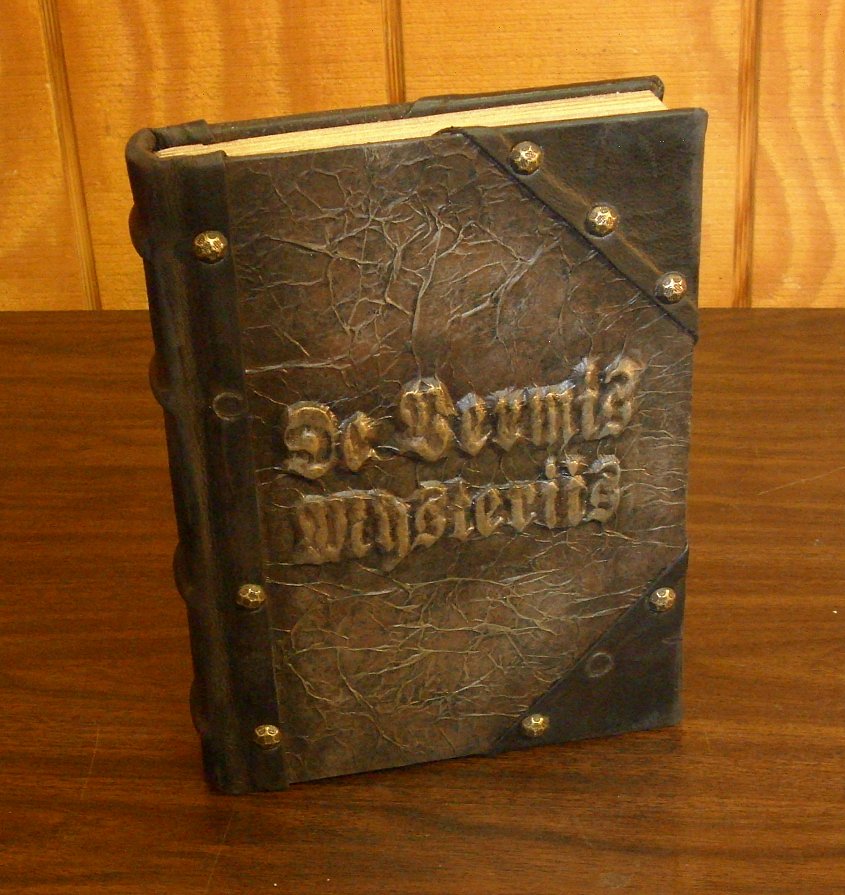
Doctor Glamour - De Vermis Mysteriis

About two months ago, I received an email from someone who saw the tome I made for "The Black Duke" film project and was interested in having me make something for him. Later he told me it was for a film project of his own, and he wanted me to create two prop tomes; a "De Vermis Mysteriis" and a "Necronomicon". Filming was to begin in mid April, so he needed an answer right away. I received this request with the usual reluctance, but I needed the money, so I agreed.

The upcoming film is called "Doctor Glamour". It's kind of a campy lovecraftian themed oddity set in a steampunk alternate Arkham. Oh, and did I mention, it's a musical! The client, independent film director Andrew Jones, didn't give me much in the way of requirements or specific direction. In fact, about the only specific direction he gave me was to avoid the color green, as the film was going to be shot in front of a green-screen. But he did send me links to his production blog and to the film script. There was enough detail there for me to get a good idea what he was looking for.

As with most commission jobs, time was short, and as usual, I spent too much of it wrapping my head around the project, waiting for design ideas to "click". Once they did, I had to put in some very long nights to make the deadline.

The first tome I worked on was the De Vermis Mysteriis. The first step, after doing a bit of brainstorming, was to select a base book of the appropriate size. I had intended on using a larger book than I ended up using, but because I wanted there to be a significant size difference between the two tomes and I was having trouble finding a base book for the Necronomicon that was as big as I wanted, I settled on an average sized "New Standard Encyclopedia" (volume "B"). I removed the text block from the case and cleaned up the glue in the usual way. Then I sanded the boards a bit so that the new covering material would adhere better.


I knew that I wanted to have the tile in raised letters on the cover for this one, but I wasn't sure exactly how I was going to accomplish that. I had thought I would cut the design out of chipboard and glue it to the cover and then use my crumpled paper technique over it. But even after selecting a font with minimal serif, cutting it out of chipboard was going to be far too difficult. I decided to try an experiment. I printed the title out to full scale and laid it over a rolled out piece of Sculpy.


At first I started cutting through the paper and Sculpy with an Xacto knife, but that was still too difficult, especially around the tight corners. So I lifted a technique from Michelangelo, and poked tiny holes through the paper with a straight pin, following along the edges of the design. The holes created dimples in the Sculpy that were visible enough to follow after the paper was removed. I then followed the outline of holes and cut out the letters with the Xacto knife, very carefully.


This technique worked better than I had anticipated. Cutting the letters out of Sculpy was far faster and easier than I thought it would be, and WAY easier than cutting them from chipboard would have been. I also got a much cleaner edge. I had been smart enough to lay the sheet of Sculpy on a thin metal sheet that I could put directly in the oven without having to move the letters.


After the letters were baked,  I glued them to a piece of hardboard and gave them a coat of sealer. The I created an RTV silicone rubber mold of them. I could have used the Sculpy originals on the tome, but I was afraid I might screw something up, and have to cut them out all over again. This way I could make a resin copy of the letters and re-cast them as many times as I needed. The resin casting actually came out very nice and in one piece, with a very very thin membrane of plastic holding all the letters together. This would normally be considered "flash" and be trimmed off, but in this case it was actually helpful in keeping the letters aligned.


I glued the resin title to the front cover board, flash and all, and used the crumpled kraft paper over it and also the back cover board. Then the paper was given a base coat of black acrylic paint, which was followed up with a sponged on stippling of dark brown, and finally dry brushed with a light golden brown acrylic paint. I had never used brown paint for this technique before, and I have to say the resemblance to leather was uncanny.


After turning in the edges, I stuck the book-block back in for a test fit to make sure everything was hunky-dory. Also, this gave me an opportunity to set the groove with my bone folder.


I added a strip of chipboard to the spine to strengthen and stiffen it. I also glued on pieces of cut heavy cord to simulate raised cords on the finished spine, which would soon be covered in soft black leather.


I got the leather that I used for the spine and corners from cutting up an old leather jacket that I bought from a thrift store.


The last step before antiquing was to add brass upholstery tacks along the edges of the leather. I actually liked the look of the book so much at this point that I considered not doing any more antiquing to it. I think I may make some more books in this same design.


But the antiquing must go on, so I pulled out a couple of the upholstery tacks and painted around the edges of some of them (including the empty spaces where tacks were removed) with some green faux patina paint. I also used a dry brush with brown and black around the edges and on the leather itself for some aging and grime. I made a few small slits in the leather with an Xacto knife and lightly sanded it in places. Then I took a mini butane torch to some areas, especially the slits, which the heat opened up wider and made look older and more natural.


The final step in preparing the cover, was to apply some gold Rub-N-Buff to the raised letters on the cover.


All that was left to do was to deal with the text block. I hadn't originally planned to, but I ended up giving the page edges a light shot of gold paint to simulate old worn gilding. The tome was going to be open on screen, so it needed to have some custom interior pages. The client only wanted two custom pages, but I ended up giving him four, so that he had the option of turning a page on camera. The custom pages feature a few of my pieces of line art that I  made for my Necronomicon Pages. The text is actually spells taken from our public book of shadows here at the shop and laid out in a nice Old German font similar to the title. I aged and trimmed these pages and tipped them in to the center of the text block.


The last step, of course, was to case in the text block.
And here it is. De Vermis Mysteriis, all ready for its big screen debut!


... Tune in next time for pictures from the making of the Necronomicon.

See Also:

Doctor Glamour - The Necronomicon (pt. 1)
Doctor Glamour - The Necronomicon (pt. 2) 
Doctor Glamour - The Necronomicon (pt. 3)  
Doctor Glamour (fini)

Sunday, April 10, 2011

Adam Freaking Savage

Last week I sold a set of Necronomicon pages on my Etsy site, which in and of itself isn't too unusual. But the thing that made this particular sale stand out was the name on the paypal receipt. Adam Freaking Savage!

Not to gush like a fanboy, but I'm a big admirer of his work, both on and off the show. He's where I wish I could be. Not the blowing shit up thing (though I may, or may not, have done a fair bit of that in the past, but without the cameras, or witnesses), but the professional prop maker thing. His attention to detail (obsession, really) is amazing. Just the idea that he would find something of mine worth buying, even as a passing novelty, is pretty ego boosting. Plus,..

Adam Freaking Savage!

Thursday, March 17, 2011

Necronomicon Pages set #8 & #9

I have finally finished work on sets #8 and #9 of my Necronomicon Pages series. This brings the total to 36 pages (and one more that was created for another project and is not included in any set). All nine sets are currently available on my Etsy and ebay pages.


Like the previous sets in this series, they include cryptic text, macabre artwork and unique detailing (there are no burnt edges or blood spatters on the ones pictured but there are on the finished product).  the artwork, as before is a mixture of mideval woodcuts and original artwork by artists such as myself, Zarono and Darren Campbell.

Those who purchase the entire set as a whole get a small discount on the overall price, and I also try to stuff in a couple of bonus items for those customers too. The first print run of the new series was only 10 copies and three of those have already sold on eBay. This is not a limited series, but if you want to be the first kid on your block to complete your set, you better get them fast before this printing sells out or you may face delays while I work on another batch.

Friday, March 11, 2011

Matched Set

My shop has been closed for the winter, due to high heating costs, and I haven't been in the workshop as much as I should have in the past few months. But I did manage to get down there for a few days to complete work on a commission that I got just before the shop closed for the season.


A regular customer of mine had previously spoken to my clerk about the book repair and recovering that I do. He managed to get in touch with me just in time to commission me to repair and recover two very large and heavy hardback books from his collection. Not that either of them were all that old, or even poorly made. In fact one of them had nothing wrong with it at all, but the other had seen quite a bit of use and the covering was starting to come off of the spine. He wanted me to repair it and recover both so that they would look like a matched set.


The books in question are both from author Judika Illes. The Element Encyclopedia of 5000 Spells, and The Element Encyclopedia of Witchcraft. Both of with are very good books that I recommend. They can be a little hard to find in bookshops, no only because they are metaphysical books, but as the publisher, Element (a division of Harper Collins), does not seem to have a distributor in the U.S. I eventually got a few copies for the shop by ordering from a distributor that is based in Canada. Ms. Illes and I actually exchanged a few very nice emails over the subject a little while back.


The customer requested the painted kraft paper covering with a large raised pentagram in the center. He wanted both books to match except for their color. He wanted one to be green and the other to be red. Laying out a pentagram seems like it would be easy, but it's not. In order to get it just right you need a good protractor and the ability to do some calculations, or a very good background in geometry. The geometric construction of a regular pentagram is one of the more complicated ones I have ever seen for a simple geometric figure. In this case I went with the protractor. You actually have to draw the pentagram three times. Once to get it right (which becomes the center line) and then again shifting the lines a few millimeteres to the left and then to the right, so that you have lines you can actually cut on.


Most of the books I recover have flat spines, but these were rounded spines due to the thickness of the books. I was a little concerned about this, but it turned out to be no problem for me at all. I reused the existing front and back book boards and added some material to stiffen and strengthen the hinges and the spine. The paper covering was done in the usual manner, with the pentagram underneath. I designed some decorations to add to the corners on the front and back, because the pentagram alone seemed a little too plain.


I decided to change from my usual method when it came to pasting down the end papers. I usually mask off the area and use a spray adhesive, which works well at first and dries instantly with no moisture, but I have been having some concerns about this method. Some of the books I have used it on have, over time, developed wrinkles and puckers in the end papers that I can't explain. Also, the spray glue seems to weaken over time. So instead I decided to use white glue. I used a foam roller to apply it very sparingly and let it sit a moment before pasting the papers down and smoothing it out. It seemed to work out well, and I intend to continue using this method for a while to see if it makes for a nicer finish in the long run.


At the last minute, I decided to add some stick-on lettering to the spine to denote the titles of each book. Getting the spacing and alignment right was a big pain, but I think they came out well. I had intended to put the author's last name as well, but to tell the truth, it slipped my mind until after they were picked up by the customer.


I have another movie prop commission coming up, so I'll be back in the workshop now for a while. I also have a bunch of steampunk props I am making for a larp for this year's Origins. Those will keep me very busy. I'll be sure to post lots of pics.

Saturday, February 26, 2011

Get It For Less

I am currently in the process of posting all of the recent Rose Quill Pens into my ETSY.com shop (http://www.etsy.com/shop/roguecthulhu).
As an added bonus, I am extending a 5% discount to all readers of this blog. This applies not only to the pens, but to all the items in my etsy shop. Just input the discount code: DISCOUNT5ARXT at checkout and you will automatically get a 5% discount off of the listed price of all items (not including shipping charges).

All the new pens are already listed on my eBay store as well (http://www.witchcrafters.com). I don't know of any coupon feature available in eBay, but if I find one, I'll make a coupon for that too and post the code here.

Monday, January 31, 2011

A Rose By Any Other Name

It's been a log time coming, but I have finally put the finishing touches on my latest project, and just in time for Valentine's Day. Silk rose quill pens!


This past Christmas season, I had a part time job working at my favorite craft store. As I was working the register, a customer came through with some silk flowers (they sell a lot of silk flowers there). Only, for some reason, these particular flowers struck me as the perfect size and shape to be used as finials on top of a quill pen. I don't know what it was about them, but seeing them just made it click in my head. And so I thought to myself, I don't think I've ever seen a flower used on a quill pen before. Lots of feathers, yes, but never a flower. So I bought one to try it out. First I bought a black rose bud that was left over from the Halloween stock. You know, for the goth girls.


That seemed to work out pretty well, so I went back and bought a couple more. Then I thought, why just make pens for the goth girls? Regular girls can write bad poetry too. Why not make flower pens that appeal to everyone? So I went back and raided the silk flower isle looking for anything that I thought would look good as a pen. Admittedly, I kept my eye mostly on the roses. But I did buy one other kind of flower.


I had a girlfriend back in the day who loved calla lilies. When I saw this one, I immediately thought of her (not that I needed an excuse). It was the right size and shape, so I tried it. I think it turned out rather well. I have considered sending it to her as a gift but, after all these years, that might just create more unease than happiness, and that's not what I want.

While I was shopping for flowers, I sauntered down the wedding supplies isle and found some cute charms that I could add to the pens. I knew that I would probably be wrapping the joint where the stem meets the pen shaft with some kind of ribbon or something, and I thought a little charm hanging from the ribbon would be a nice accent piece.


As for the grip, some of those I wrapped with ribbon,

 and some of them I wrapped with metal wire.


I haven't yet used any of the metal tubes that I plated with copper using my galvanic plating/etching rig, but some of these are made with the same metal tubing that has been lacquered. In general, the long ones with lots of stem and leaves, like this one...


...are the ones that have the metal tubing for shafts. They average about 13 inches in length and some of the original artificial flower stem has been preserved, making them look pretty much just like flowers when they are in their bud vase holders.


Which brings me to the bud vase holders. I can't believe I hadn't thought of using a bud vase as a pen holder sooner than I did. I actually spent several days trying to think of something to use as a holder so that I could package them as sets. When it finally dawned on me I felt really stupid for not thinking of it immediately. I went to several different stores and picked out quite a few different designs and sizes of vase to try out. I have managed to make use of most of them. I'm glad I didn't just get one kind of vase for all of them. Some of them really work better with one style vase or another. As the project went on, I started doing a little bit of decorating of the vases too. As you can see, silver hearts were not the only little metal charms that I bought for decorations.


The shorter pens (averaging about 9.5" in overall length), like the one above, have wooden shafts. The wooden shafts have two advantages. One, is that they are cheap. I can get 24 pen shafts out of a $1 pack of a dozen 12" hardwood dowels. Compare that to the 11 slightly shorter shafts I can get out of one 60" metal tube, that costs about $7. The other advantage to the wooden shafts is that they can easily be drilled. I have to drill two small pilot holes into the shaft when I do the wire wrapping, so that I can tuck in and hide the ends of the wire. I can not easily do that with the metal shafts (if at all).


The metal shafts (like the one pictured above) have one big advantage. They paint very quickly and easily. All I have to do is cut them, quickly buff them with fine sand paper, string them on a bamboo skewer for painting, do a quick light spray from the paint can to prime them, let it dry just a few seconds, then give it a heavy covering coat and once that is dry it's ready for clear top coat sealer. The prep and painting  process probably takes no more than two or three minutes per pen. I get a really nice even finish with basically one coat of paint. If you scratch them, however, the paint will chip off easier than with the wooden shafts. I usually give them a double coat of clear acrylic sealer to help prevent them from getting scratched by the metal charms or the rim of the vase. I may look for a metal primer to use on them before painting to see if that helps too.


In contrast, the wooden shafts (like the one pictured above) take a lot of work to prep and paint. First, I have to sand them with medium sand paper, then fine sand paper. Then, in order to eliminate tiny crevices caused from the wood grain, I have to rub them down with a piece of air-dry clay to fill all the tiny cracks and imperfections that will show up when it is painted. I used air-dry clay because I didn't have any wood filler putty at the time I implemented this step to solve the tiny crevice problem. Later I get some wood filler, but I honestly like the air-dry clay better. Then after the clay is dry, I have to sand it again with medium, then fine sand paper. Then I have to cut them to length and drill tiny pilot holes and insert T pins in the ends to hold them while they are painted and drying. Then a coat of primer. Then another sanding. Then paint. Then wet sanding. Then more paint. Then more wet sanding. Then more paint. I have to sand and paint at least three times to get a nice finish. After I do the wire wrap, I usually have to mask them off and give them one more quick touch up coat, because I can hardly do the wrapping without marring the finish a little. Then, finally, clear acrylic sealer. With drying time, this process takes about two to three days.


I think the wire wrapping around the grip looks and feels better than the satin ribbon. But it is much more work and I can only do three or four of them a day because it makes my hands hurt. First you have to drill a tiny hold in the shaft on the back side at the tip. Then you stick the end of the wire in the hole and start wrapping. You have to keep the wire very taught and wrap very carefully in order to get a nice kink and gap free wrap. Then, while keeping the wire taught, because at this point it is like a spring, you have to drill another tiny hole at the top of the wrapping on the back of the shaft, making sure to get it as close to the top winding as possible, and without marring either the top winding or the shaft. It needs to be very discreet. Then, still keeping tension on the wire windings so they don't go SPROING and unwind, you have to cut the wire in just the right spot, and bend a 90 degree tab in just the right spot, so that you can fit the tab into the hole to anchor it. This hides the end of the wire, and prevents future sproing. You have to use needle nose pliers to get the tab into the hole and you have to do it without marring either the wire or the shaft with the pliers, and while holding the tension on the wire. You only have one shot to get it perfect. Multiple attempts invariably led to imperfections. In short, it sucks. But I love the way it looks when it comes out right.


For my first batch of flower pens I made 19 different sets, each with its own bud vase holder. I did, red roses, black roses, white roses, light pink roses, a yellow rose, and one calla lily. These pics are obviously not all of them, but this post is already getting kind of long and these pictures are HUGE, so I think I'll hold off on posting the rest until I trim them down a bit. I have all 19 currently up for sale on my ebay store, with lots more pics of each one. You can view them here. They would make a great Valentine's Day present for a loved one, especially one that likes to write poetry (like most girls do) or who likes quill pens. They range from $25 to $35 for each set, which I think is a fair price, given all the labor that went into them and given that ostrich feather and macaw feather pens are selling on ebay anywere from $20 to $100 each. The heavy glass bud vases do make them a little expensive to ship, but I will ship them all Express Mail to ensure you get them by Valentine's Day.

Monday, January 10, 2011

Galvanic Copper Plating

Hello again; long time no blog. I'm back in the workshop again, finally, and very excited about my current project. It's more quill pens, but they are very nice and different from what I had been making. I'm experimenting with some new materials, including shafts made of metal tubing. Some of which are being painted, and some I am going to try copper plating. This post is less about the pens (more on them later) and more about the copper plating process.

Some of you may remember my first attempt at using electrolytic (galvanic) etching. If not please check it out. Also it is worth checking out the reference sites I linked to in that post, especially of you are planing on doing any etching or plating yourself. Last time I was focused on etching. This time I am more interested in plating. The process is exactly the same, but with the polarity reversed.

I'm going to start with the raw metal tubing. What I'm using is 1/4 inch galvanized automotive break line. You can get it at any automotive parts store. I got a 60" long line for about $7. Both ends are flared, so if you don't want that, you will have to cut the flare off. I did. Then I cut a section to the desired length (5.25") with a tubing cutter. Tubing cutters can also be found in an automotive or hardware store. Mine cost less than $10. They are used for cutting any kind of metal tubing, but especially copper plumbing pipe.

Speaking of copper plumbing pipe, that's what I'm going to be using for both my anode and my vessel. I took a short piece of used copper pipe, I think it was 3/4" pipe that happened to be about 9" long, and cleaned it out real well with some muriatic acid (HCL). I was more interested in cleaning the interior than the exterior since that is the side that will be reacting during the plating process. I then stoppered up one end with a cork. This pipe will be filled with my electrolytic solution (copper sulfate) and will, again, serve as both the reaction vessel and the anode (I'm pretty sure I'm using the word anode correctly in this context, but please don't beat me up if I am not). Another advantage to using a copper pipe like this, is that all the surfaces to be plated are roughly equidistant from the anode and copper source material, which should ensure an even plating. If I were to use a copper plate anode on one side of a tank and the tube to be plated on the other, such as with my rig from my previous experiment, the copper would tend to deposit mainly on the side facing the anode.

I want to make sure that the piece of tubing is coated evenly and with no blemishes, so I will solder on a small metal tab for the alligator clip to attach. In my first attempt I used a 1" steel brad, but in this pic, I am using a "T" pin. I placed the end of the pin inside the tubing along with a small piece of solder (after coating the pin with flux). I used a neodymium magnet along the outside of the tubing to help hold them in place while I heated the pin with a small butane torch to melt the solder. I also ran some 1000 grit sand paper over the outer surface of the tubing to make sure it was nice and smooth for plating, though that probably wasn't strictly necessary.

I wanted to make sure that the copper pipe stayed perfectly upright during the process, so I used some newspaper as wadding and wedged it into the mouth of a glass jar I had handy. The jar will also serve to catch any leaks in case my corked end is not perfectly sealed (it isn't). I wrapped some thin galvanized jewelry wire around the outside of the pipe just to give me a convenient place to attach the alligator clip.

The metal tube I am plating will sit nested inside the copper pipe. In case you were wondering from the previous picture, that is a bamboo skewer stuck in the end of the tubing, so that it sits at the right height in the pipe. It is important that the tubing not be allowed to touch the side walls of the pipe, or it will complete the electrical circuit and nothing will happen.
Then the pipe is filled with the electrolytic solution, which in this case is copper sulfate. As in my previous experiment, I used a commercial septic cleaner called "Root Gone", which comes in a crystal form, that I added to water to the saturation point. I made sure that the water level was above the top of the tubing. As the cork leaks a bit, I will have to top it off periodically.

Using test leads with alligator clips on the ends, I attached the positive terminal of a generic 9V battery to the copper pipe, and the negative terminal to the metal tube (actually, to the T pin). In my previous experiments, using 12V at high amperage for short times was way too much current. It ate the anode very quickly and although it did deposit material on the cathode, that material did not bond and was easily wiped off. My previous experiments of using 1.5V at low amperage worked better, but very slowly. I did, however, leave it on for too long (14 hours) and it, again, ate through my anode. I was looking for some middle ground. I didn't have a 6V battery, so I thought I would try a used 9V that was still good, but kind of weak. I wanted the process to go fast enough that it didn't take all night, but slow enough that the copper being deposited would bond properly to the metal tubing.

I left it set up for about an hour and then checked it. SUCCESS! I had a nice even (if not a little thin) copper coating that was well bonded to the tubing. I wanted a little thicker coating, so I wiped it down and put it back in for another hour. Something worth noting, is that the finished product does not come out the nice warm orange-copper color we are used to seeing on pipes and wiring. It comes out a very bright garish, almost pinkish copper color, like a mint fresh penny. I'm sure a few days in the open air will tone it down and warm up the color (I hope).

On a side note, my used 9V battery was good for about two and a half plating sessions (total of 5 hours) before it had to be replaced. One problem I keep having is, I can never seem to remember which way to connect the battery. I have to keep looking it up. So this time I wrote myself a little note to keep with my gear. Material is REMOVED FROM THE POSITIVE terminal, and DEPOSITED ON THE NEGATIVE terminal. Write that down, kids.

UPDATE: Although the first two tubes I plated with this rig went off without a hitch, good coverage, no  problems. The third and fourth tubes were both problematic. The third one was the one where I switched batteries between the first and second hours, and its finish came out dark in some areas. It plated evenly, but it didn't look nice. The fourth was just a mess.The copper only stuck in patches, and covered less than half of the tube. I tried all sorts of alterations to the power supply to solve the problem. I switched out the battery again; I tried using a "wall wart" transformer (5V 2A and another that was 12V 800mA); I tried using a C cell battery. I got plenty of copper built up, but nothing would stick, and I even noticed some degradation of the tube wall thickness on just one end that sort of puzzles me. And I think I burnt out both of the wall warts I used. I guess my apparatus still needs some work. I will have to go online and see if I can find out what the optimal voltage and amperage would be. If anyone else has any idea what went wrong, please leave a comment.