I've seen bottle grippers (and she has a few) that could help with opening and closing them, but they have their problems too. Depending on the design, they might also require some grip strength, and regardless of design, they would require her to dig out a tool whenever she wanted to open or close the bottle. People are lazy. They would rather just buy cans.
The other day, we were having this discussion for about the umpteen-millionth time, and it dawned on me that what she really needed was a better cap for the bottle. One that would be easy for her to open and close.
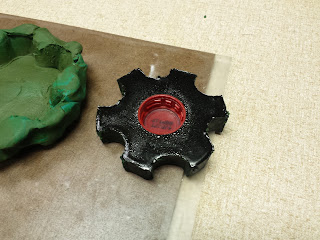
I took the cap from an empty 2-liter bottle of soda and embedded it in an "ergonomically" shaped chunk of polyurethane plastic. Now, she can just remove the original cap when she opens a new bottle, and replace it with this "grip cap" and leave it on there until the bottle is empty. Give the cap a rinse when the bottle is empty, and it's ready for use on the next bottle.
The initial prototype took me about 20 minutes to make. I didn't document its creation, because it was just a proof of concept prototype, but you can see it above. It is an organic shape with knobbly edges about three inches in diameter. It was made with a very quickly hand sculpted mold made from sulfur-free modeling clay, into which I poured polyurethane resin.
After the prototype was finished, I decided to refine the shape a bit, and so I made a wooden puck by drilling out six holes in a circle in a piece of 1-by lumber and then cutting out the circle with a jigsaw. I gave the puck a coat of gloss spray paint to help it not stick to the clay when making the mold.
I then flattened out some sulfur-free modeling clay (sulfur can inhibit the curing process of silicone rubber, so I only buy sulfur free plasticine-type modeling clay; hear after referred to as "clay"). Then I mold the clay around the puck, after spraying it with some silicone mold release spray. I put the clay just around the bottom and sides. The top face is left open. Then I pull the puck out the the clay, leaving the shape intact.
To prevent resin from dripping into the cap, I mask off the underside of a used 2-liter bottle cap from my plastic parts bin. Then I stick it, bottom side up, in the center of the clay mold. Make sure you do NOT spray mold release on the cap. You want the resin to bond with the plastic cap, just not to the clay mold.
I mix up some polyurethane resin. Here, I'm using Smooth-On's Smooth-Cast Onyx, because it's what I had on hand. It's a 1 to 1 by volume mix ration of part A and part B. When it cures, it comes out glossy black. Sometimes I add a little talc powder to the mix as a filler. This resin has about a two minute work time, and can be demolded after about fifteen minutes.
I pour the resin around the cap, up to the rim. I want the finished piece to be big and chunky, and easy to manipulate with fiddly fingers- like a baby toy.
I made a total of three of these, the prototype and these two from the wooden puck. That should be plenty for now. I still need to see if the resin will bond well to the plastic cap. Some plastics don't want to stick to anything. But so far they seem fine. Mom seems to like them. She says she doesn't have any problem gripping them or twisting them, and she even thinks they look cool on the soda bottle. :)


No comments:
Post a Comment