
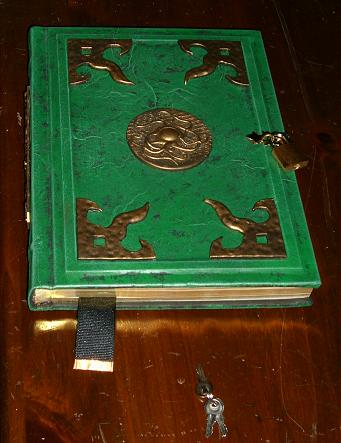
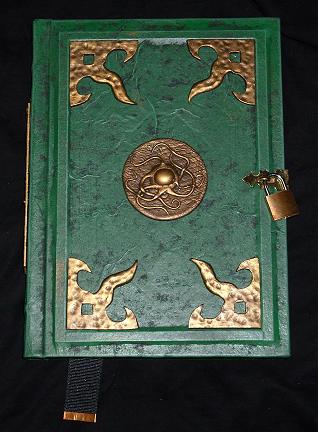
At the moment, I have about 14 projects in various states of completion on my workbench. This one was just completed a day or so ago. I call it "The Rites of Azathoth", mostly for the front cover centerpiece (which I call the Eye of Azathoth), and because it felt like it needed a name when I posted it on eBay. It combines the "exterior only book prop" of the Baphomet Tomes I made a couple of years ago, with the new paper decoupage covering technique I used recently for the Faux Leather Pentagram Book, and the Singers of Strange Songs Recover. I took a few pics during the construction process.

This book started out as Volume 20 (U-V) of the World Book Encyclopedia set. I got this set for a pittance at a garage sale last summer. I like their size and weight, and especially the gilded edging. I plan to turn all of them into prop books over the next year or so. The first thing I did was to rough up the cover with some 150 grit sand paper. Then I cut strips of chipboard and glued them to the front and back covers to create a frame. This would add character and detail to the covers. The frame would show up under the decoupage cover to create an embossed effect. I used the crumpled kraft paper and glue technique like I did in the Faux Leather Pentagram Book, and the Singers of Strange Songs Recover. The whole thing got a base coat of black tempura paint. Then dark green acrylic paint was stippled on with a sea sponge, leaving a little bit of the black to show through for depth. Highlights were dry brushed on with light green and silver acrylic paint.


For this book, I decided to install a black cloth ribbon bookmark. Normally one sees bookmarks glued into the spine, but since the text block was already attached, I decided to glue the bookmark to the back cover, under the end paper. This has the advantage of the bookmark laying nice and flat when it is in place, rather than having that twist at the top of the book like ti does when it comes out of the spine. I was originally going to cut the end of the bookmark in a V shape and sew metallic gold thread along the cut edge, but I couldn't find metallic gold thread (at 4am), and my attempts at sewing the edge proved pitiable. I decided to cut the V off and bind the end with an adhesive backed copper foil, used for soldering stained glass. I think it looks a whole lot better than my sewing attempt.

For the end papers, I used a light gray speckled paper that I found on sale at Marc's (a local discount store). The original end papers were gray, so I thought it a good choice. The book is designed to remain closed anyway, so it really wouldn't matter if I didn't put end papers in at all, but I thought it would be much nicer to finish off the rough edges from the recovering. This way, it will look much nicer if someone should decide to open it, even though the interior will still be an encyclopedia. I like to think of it as an eldritch tome of all occult and forbidden knowledge,.. that begins with the letter "U".
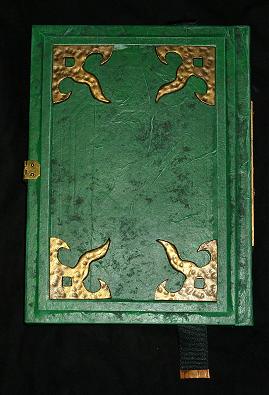
To adorn the front and rear covers I chose to add corner pieces that I cast in polyurethane resin from an original piece I sculpted out of clay. I used these same corner pieces on the second Baphomet Tome. Of course, I painted them with my ubiquitous bronze finish. One of these days, I'm really going to have to learn something else. Here are a few pics of the casting and painting of the corner pieces.


I applied the corner pieces on the inside edge of the frame border I created with the strips of chipboard. Normally, I would put them all the way out to the corners, but I've been trying to shake things up and try different styles and designs. I have a tendency to get into a rut when I find something I like. For the center piece, I used a small piece, due to the cramped space. I tried several different pieces for their aesthetic and geometric fit, and decided on one I call "The Eye of Azethoth". Actually, that's what I call any design I create that has an eyeball with radiating tentacles, and I have several. This is a resin casting of an original I made out of sculpy several years ago. The original had a blue glass stone in the center and the whole thing was painted a garish orange and purple. I think it looks much better in bronze.
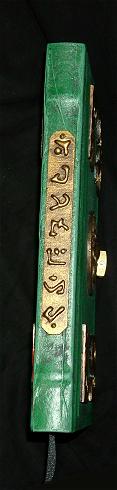
Because the corner pieces do not go out all the way to the edges, the book looked unbalanced to my eye. Too much bronze bunched up in the center of the cover, and not enough towards the edge. To correct for this, I decided to make a bronze colored title plate for the spine. That would add just the right amount of color to bring it back into balance. The plate was made from chipboard, that was given a heavy coat pf enamel primer to seal it. The lettering was created with a hot glue gun and a very careful hand. I had seen hot glue used for these kinds of design elements by other people, but I didn't have any experience using it. I was fairly pleased with the results. I used glyphs from the Lovecraft's Diary font. It doesn't say anything in particular. I just used ones I thought looked goo together. The plate was given the usual bronze finish, and topped off with a little gold Rub-n-Buff to brighten it up a bit (which meant I had to do the same to the other pieces so they would match).


The book is held closed by a brass hasp. This had to be custom fitted and married to a brass hinge via a piece of black leather and a few brass brads (and glue). The raised border did make fitting the hasp a little harder than usual, it not too bad. The has is finished off with a small brass padlock, which I coated in a translucent glaze to darken it. One small personal confession: I have a padlock fetish. I love tiny padlocks. I've bought dozens of them over the years, though I hardly ever have anything to use them for. A year or so ago, I found them on sale at Marc's (my favorite place to shop), so I bought a bunch. And by "a bunch", I mean around 200 of them. What can I say, they were 3 for a dollar!


where did u get the brass hasp and hinge with keys from? how did u attach the brass hasp and hinge to book?
ReplyDeleteThe hinge and hasp were purchased at the hardware. You can sometimes find them in a craft store also. They are attached via glue and brass brads. I glue the face of the plate being attached to the board, and I pre-drill the brad holes. I also put glue in the brad holes, then the brads, and finally I cut off the brads flush on the back side with a dremel disk.
ReplyDelete