Monday, November 30, 2009

The Black Book of Evil

Here is the fifth book in the encyclopedia re-cover series (aka Good Books Gone Bad). I call it "The Black Book of Evil." It is up for sale on eBay right now was sold on eBay. As always, click through for larger images.

I used a different encyclopedia set this time; Encyclopedia Britannica. I picked them up recently at a thrift store for $1 per volume. I don't remember which volume this one is, and it's not in front of me to check (like it matters). This set had silver gilding on the page edges (actually, just on the top edge. I had to paint the other two edges to match) so it seemed like I should decorate this tome with a silver finish rather than my ubiquitous bronze. These books are nice and big and heavy. The finished product weighs about 4.25lbs. and measures 11.25" x 9.25" x 2.5".

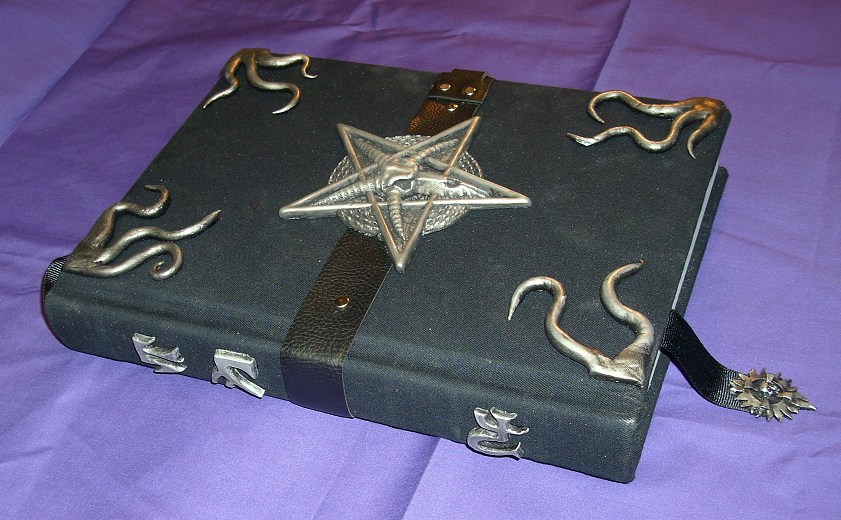
First I recovered the book's hard cover with a dark black cotton fabric. That part went quite fast, as it covered rather nicely. Well, actually, first I painted the two remaining raw edges, then I recovered it in black cloth. Next I picked out my decorative pieces. I had to do a special run of resin castings because all the ones I had pre-made already had a base coat of bronze on them, and I didn't want to repaint them. I decided on tentacles at the corners and the baphomet head, which I have used before, for the centerpiece. There were a couple of small details that were different about these pieces. The centerpiece was an experiment I had done with using powdered nickel-silver brushed into the mold before pouring the resin and later polished with steel wool, so actually this piece was not painted (except for a black acrylic wash to antique it), but is closer to a cold-cast metal (at least on the surface). The tentacles are a new set. A month or two back, I decided I needed some more variety in my tentacle corner pieces, so I sculpted five new originals out of sculpy and made new molds of them. This is the first finished product that incorporates the new tentacle designs.

Up to this point, everything was pretty straight forward. Things got a little more complicated when it came to the closure. I'm always looking for new closure designs. I get tired of the same old brass hasp and hinges set-up that I've used multiple times. This time I went with a black leather strap which encircled the girth of the book. I riveted it to the front and back covers and placed the centerpiece right on top of the strap. Then I sat and pondered how I was going to close/lock it for about an hour. I had an idea to use a silvered buckle instead of a hasp and lock, but my locking silver buckles were too big. They didn't look right. I had a much smaller regular buckle, but that would require making the strap thinner at the buckle. After some ruminating and hesitating. I decided to go ahead and make a secondary strap that would rivet onto and over the main strap, that was the appropriate size for the smaller buckle. I tucked the main strap's ends between the text bock and the cover boards, and wrapped the smaller strap around the edge to buckle in the back. This was a time consuming process, not only because I had never tried to make this design before, but because I was making it up as I went along , and I had to wait 15 minutes for the glue to dry at each stage of its construction. If I had the design planned out better from the start, I could have saved a considerable amount of time. C'est la guerre.

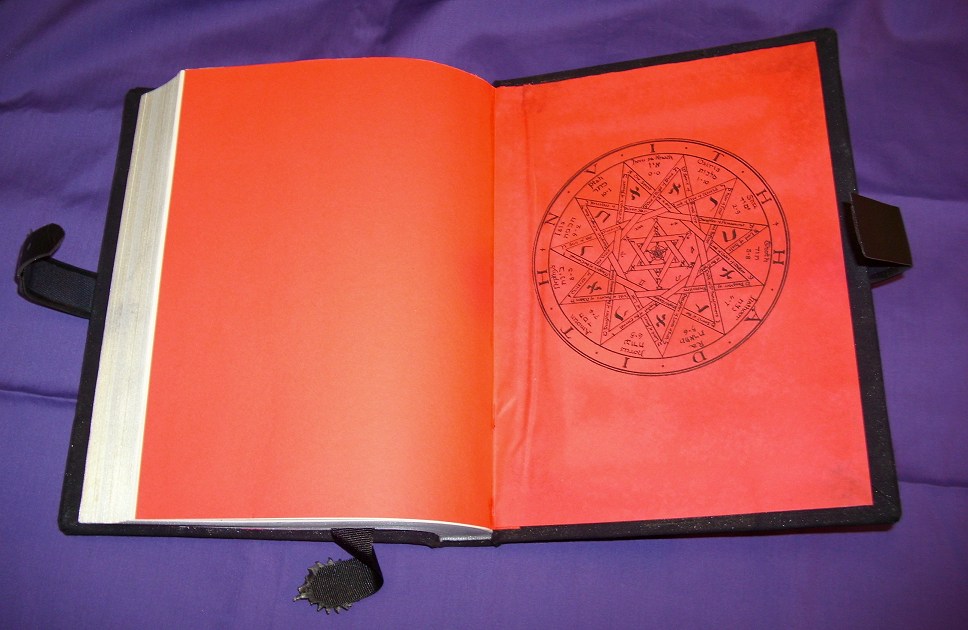
I installed red end papers on the front and back covers. Before pasting them in, I picked out a couple of nice geometric sigils from the public domain and ran them through the printer. In the spine, I attached a heavy black cloth ribbon bookmark. Due to its width, I wish I would have attached it to the back cover instead of the spine, but I had already glued in the end papers. To finish off the end of the bookmark, I decided to attach a small resin casting of a piece of jewelry I used to carry in my shop. The company that designed it is out of business, I believe. It is a blazing sun with a skull and an equal armed cross at its center. I finished it in the antiqued silver, like all the rest of the resin pieces on this book.

Along the spine I did something different. Instead of attaching a title plate made from chipboard and hot glue, like I did on my last two books, I created some heavy cast resin glyphs to fix to the spine. To make them, I started with a piece of oil based modeling clay rolled flat. Then I measured the spine to decide on the dimensions of the glyphs. Once the size was determined, I made a grid on the clay, and in each square I carved out a glyph by hand. Once I had about eight glyphs carved into the slab (some for now, some for later), I poured resin right onto it. Cleaning out the clay from all the crevices, and trimming the flash was a little tedious. I also rounded the edges of each cast piece with a dremel. Then I finished them with the antique silver paint job and glued them to the spine.

I'm actually quite pleased with this tome. I think the finished product looks pretty good. This project saw several new innovations. It used the new tentacle castings on the corners. The centerpiece featured a cold cast metal finish instead of paint. The end papers were printed. The leather belt and buckle arrangement was a new design. The bookmark fob was new, and the raised resin glyphs on the spine are a first for me. This is the first of the new encyclopedia set, and it is the first of the re-cover series to be finished in silver. I also normally like to make these static props locking, but this one just has a buckle. I hope you enjoy it (and especially whomever buys it). As always, I am open to your comments.


Saturday, November 21, 2009

Plastic Cthulhu

OK, now to get back to what you all came here for, some Cthulhu stuff. This past summer, Propnomicon posted about a new little trinket from Fantasy Flight Games, the Bag of Cthulhu. It is a package if small plastic Cthulhu miniatures, some about 3 inches tall (55mm), and some about 3/4" tall (20mm). They were designed to be used with a Cthulhu based card game, but even though I had no interest in the card game, I immediately I knew I had to have some of these miniatures.

They look cool as hell, and the detail on them is quite nice. My only criticism being that on some of the larger ones, the mold seam is a little too visible. Though this could probably be trimmed off with some diligence and a sharp x-acto knife. The color scheme is not that terrible, a dark oily looking grayish green, but they definitely look like plastic. I had read on someone's blog post somewhere that due to the type of plastic they are made from, they were very hard to paint, however, recently I decided to take a stab at it, and they didn't seem that bad.


Expecting to run into problems, I tried several brands of spray paint and primer, Rustolium Plastic Primer (white), Krylon Primer (white), Testers Primer (grey), Krylon Fusion (satin black), and cheap Wal-mart brand flat black, with varying results. All of them faired well enough to be usable, but the one that dried the fastest and seem to have the best adhesion was the cheap flat black from Wal-Mart. I did nothing to try to sand or de-gloss the figures before painting.


After a base cloat of flat black (over the primer where necessary), I gave them a light coat of Sophisticated Finishes metallic paint, which is my favorite for creating a metallic finish (especially my ubiquitous antique bronze). Then I gave it some highlights with gold Rub-n-Buff. This was my first attempt at refinishing these little plastic miniatures, and I am rather pleased with the results so far. I did notice that the seam line becomes even more pronounced with the new finish. Next time I will take the time to try and smooth it out before painting. I plan to incorporate some of these figures into some prop ideas I have. I also saved one of the refinished smaller miniatures to use as my token when my family plays Monopoly. :)


I was looking around my house for a good place to display one of these. I finally decided that I would replace the bronze finial on top of my desk clock in my Victorian styled computer room with the larger of the two small statues statue. I think he looks quite nice sitting up there. The muslin bag full of Miskatonic goodness from Propnomicon is not a product placement, or a stage setting, that's just where mine happened to be sitting when I took the photo.

Monday, November 16, 2009

Pen Madness (part 4)

OK, so I made it a month with no quill pen pics. Now it's time to get caught up to the present state of quill-mania.


They are just variations on themes that I have already posted about, so I won't go into any detail. Click on the images for close-ups.


Sales are slow, but they are happening. I'm actually selling more ink than pens. So far I think I have sold 3 or 4 pens, and about 6 or so bottles of ink. Still a ways to go to recover my expenses, but I'm not too disappointed in the sales numbers so far.


That's it. Now we are current. I still have four of the skull pens in production, but they are stalled. My attention has wandered to working on some web design.

Sunday, November 8, 2009

Smudge Fans v1.0

Smudging is a common practice amongst practitioners of the magickal arts. It stems from a native American ritual and consists of using the smoke of burning incense (usually sage brush) to fumigate a room in order to drive out evil spirits, or negative energy. The smoke is traditionally forced into all the nooks and crannies of a room by blowing it with a fan made of feathers.

We sell a lot of smudge sticks (bundles of sage used for smudging) at the shop. We have sold a few fans, but they were usually fairly elaborate affairs and pretty expensive. Most of the people who buy smudging supplies from us will only need to use them once or twice, so they are reluctant to buy a $35+ fancy hand made ritual fan. My own personal philosophy about the quality and expense of your magickal tools aside, they really only need something simple. So, I decided to try to whip up a simple smudge fan that I could sell cheaply. The project did turn out to be a little more labor intensive than I had originally hoped, but all in all, it wasn't too bad, and I have already sold two of the four fans from my first production run.

These first two pictures are of the finished fans. The other two finished fans are at the end of the post, but right now, let's have a look at the creation process for these little beauties.

My original intention was to be able to make a reasonable quality smudge fan cheaply enough that I could sell them at a low enough price to be able to sell one to every customer who came in to buy a smudge stick. That meant my process had to be fast and easy, and my materials cheap. My first order of business was to select feathers. I had recently bought two packs of very inexpensive medium sized craft feathers, one pack red and one pack white, from a wholesale club. I chose them primarily for the price, about $0.40 per pack. I made these four fans from about half of a pack. I'm not sure what kind of feathers they are, but judging from their price, size, shape and color, I'm assuming they are probably chicken wing feathers.

I carefully selected five feathers for each fan (I made four fans at once) that seemed to be of the proper size and that seemed to fit well together. That, in and of itself, was a little more challenging than I had expected. Even more challenging was figuring out a way to hold them in the proper position while I affixed them together at their bases. The spacing and alignment of each feather had to be perfect, or it would look bad. First I tried just holding them in one hand while trying to glue them together with 5 minute epoxy with the other hand. Not happening. Then I searched around for a while looking for a suitable holder. Floral foam might have been good, but repositioning them could have been a problem, and I didn't have any. After about an hour of brainstorming, I decided that a loosely wound ball of yarn might work, but I didn't have one. I experimented with using a knitted yarn bag (like a large knitted hacky-sack), stuffed with other similar bags, but the effect was less than perfect. Finally I decided on a ball of clay. I stuck the ends of the feathers into a ball of clay, positioned them perfectly, and then ran a heavy bead of hot glue along the bases to create a brace. After the hot glue was hard, I removed them as a single unit from the clay and epoxied just the tips together. Finally I removed the hot glue (which I probably could have left in place).

While the epoxy was setting, I started working on the handles. I used a hardwood dowel, about 3/4in. in diameter. I cut it into about 5 inch lengths and sanded it nice and smooth. I sawed a notch into one end, about an inch from the tip, and about half way through the diameter. Next, I tapered them at both ends, so that it looked more like a piece of hand finished wood, and less like a dowel.. Finally I stained them different colors, some lighter and some darker, and sealed them with a coat of clear polyurethane.

I didn't like the look of them so far. They seemed a little sparse and spartan. The base was especially a problem aesthetically, so I found some more fancier feathers (marabou, I think) and glued three of them on top to make the fan seem more "full". I had planned on covering the base, where the feathers meet the handle, with leather anyway, but I think adding the marabou feathers made them look much nicer, and it was a very easy addition.

Once the epoxy was set, and the stain and clear coat was dry (read as: the next day), I did a little trimming and used more epoxy to marry the two pieces together. I clamped them with clothes pins and hung them to dry.

Making the leather skirt to camouflage the joint where the feathers meet the handle was one of the hardest parts. I had to do a lot of experimenting with paper test pieces to come up with a suitable pattern. I don't like wasting leather. My final design, which I am only somewhat happy with, was a two piece affair. The underside piece went on first, and was then overlapped by the top piece. The two pieces were glued on with a craft glue designed for leather. I used garment weight (about 2-3oz.) upholstery leather with the suede side out. I didn't want to have to stitch any of the leather, as that would add considerable time and effort to a design that was intended to be fast and easy, so I spent care to glue the edges well, and make nice neat butt seams. I held the leather in place with tape while the glue dried.

Then came the final touches. I used epoxy to affix a colored glass bead to the end of the handle. I didn't originally plan to, but I decided to wrap a little suede leather lace around the base of the skirt, because I thought it needed something. While I was at it, I tied a piece of leather lace around the end of the handle to make some tassells, and strung them with pony beads. I still wasn't happy with the leather skirt, so I drew a quick symbol on it with the dreaded puffy-paint. Immediately I hated it. But it was too late to do anything about it. Also, I was beginning to loose my enthusiasm for the project, as it was now well into its third day. I was growing impatient for them to be completed, and I was too lazy (and cheap) to come up with something better, so it was puffy-paint all around! Next time I will try to use something else to decorate the skirt.

I had hoped to make these a one day project with minimal cost and effort, and be able to sell them for a very reasonable $6.99 each. I kept the costs down, but there was more labor involved than I had expected. I ended up selling them for $8.99 each. Still pretty reasonable, but I probably won't be selling one with every smudge stick. Overall, I like them, but I think next time the puffy-paint has got to go.


 UPDATE:  I don't like these fans. I didn't care much for them when I made them, and now, several years later, I like them even less. The construction was clunky, the final product was middling quality at best, and they were too complicated and time consuming to make to be able to sell them for the price point I was looking for. I have never made any more like these, beyond this first batch. But for some reason, this is one of most popular posts on this blog, and this is my most commonly linked to post through Pinterest.

 While the design is solid, and might be of use to someone who wants to make their own fan (they could follow the same design and make something much nicer), my purposes are much better served with my second design, which can be found here...
Smudge Fan v2.0

ANOTHER UPDATE:  I have made a third iteration of the smudging fan. Check it out HERE.


Friday, October 30, 2009

Miniature Wands

Just a quick post before bed.
At the shop, we sell a lot of kits that we put together from raw materials and odds and ends. One of the favorites is our mini-altar kits. Most of the time I will hand finish a box with that in mind. I will also pull together some miniature sized altar tools; a little athame, a mini-chalice, a small pentacle, a tiny bell, and a miniature wand. They are great for traveling, or for people with small apartments, or unsympathetic house-mates.

Here are a few of the mini-wands I made for travel altar kits. Each is only about six inches long. They are made from hardwood dowels, sanded and finished with stain. A glass sphere is epoxied to one end, and an amethyst point is epoxied to the other. Each is trimmed with copper foil tape, and one one of them I tried to solder over the foil, but I didn't like the way it turned out, so I didn't do it on all of them. The glass spheres had to be ground down with the dremel to make a flat spot, so it would sit nicely on the end of the shaft.

The shafts are each decorated differently. I use a combination of brads and wire, and whatever else I can find that would look decent. It's hard to keep coming up with different styles, so many of them look a lot alike.

Thursday, October 29, 2009

Large Wooden Box with Triquetra and Roses

This was a nice decent sized wooden box with antiqued brass hinges ad hasp. I say 'was', because I sold it last weekend at the annual Witches' Ball, where I was vending.

It was one of the larger wooden boxes I have ever re-finished (8.25in. x 10.75in. x 6in.). It was, of course, one of those pre-made craft store boxes, but an exceptionally nice one. I believe it was made of pine, as opposed to the usual bass wood or balsa.

After removing the hardware and sanding it real good, I stained it with a honey maple, a much lighter stain than I usually use. Then I laid out a design on the lid with pencil, using a rose stencil and a paper print out of a triquetra, which I traced with carbon paper. I had planned on creating a design on the sides as well, but never could decide on what to put there. A moot point now.

Once the design was penciled in, I went over it with the dremel, using a conical stone grinding bit. As I have mentioned before, this has the benefit of creating less 'burring' than would a regular wood carving bur bit. It sands the wood down rather than carving it up. This makes for a much cleaner line, in my opinion, and requires no further sanding.

Since I stained the wood prior to engraving it, the wood was lighter in the grooves than the surrounding flat areas. I left it this way, instead of my usual 'color in the grooves with a sharpie' or dark stain. I like staining the wood first, even when I do plan on darkening the grooves with a sharpie. It makes for a very nice contrast while you are engraving. It makes seeing your lines and judging your depth much easier.

This piece sat around the workbench in this state for several months while I ruminated over what to do with the sides. In the end, laziness won out. I decided to just top coat it and be done with it. I gave it two or three coats of clear polyurethane sealer, and then I lined the bottom and the underside of the lid with velvet.

I am still working on refining my technique when it comes to lining boxes like this. I cut a piece of cardboard, or chipboard to the size of the bottom and trim it a little. Then I glue bridal velvet to the cardboard with spray glue, wrapping the edges around. I never buy cheap crushed velvet. I get the good stuff. It costs me about $25-$30 a yard. Then I glue it down to the bottom of the box. I have made one or two boxes where the sides and bottom are lined, but this was hard. I'm not good enough at judging the fit. I have seen a lot of prop makers on the brassgoggles forum who do linings, and theirs look so much better and more complex. I would like to learn how to do more like they do.

Tuesday, October 13, 2009

The Shop: Book of Shadows

I have mentioned in several previous posts that I own a shop, specifically a metaphysical bookstore. It is called Book of Shadows. Although not a craft project in the strictest sense, it is one of my creations (at least as much as the garden was). And since I seem to mention it fairly frequently, I thought you, the reader, might like to see it. So here it is, inside and out.

This first pic is an older one. It features the original marquee sign. Below, are pics with the new marque sign (and when I say new, I mean about four years old). For some reason, I never seem to take pics of things until after they are old and faded. Both signs were hand lettered and painted by myself.

All these pictures are from our current location (1100 Clarendon SW Canton, OH), where we have been for the last 12 years. For two years before that, we were at two other locations elsewhere in town, but I have no pictures of those locations.

The pentagram on the side of the building was really beautiful when it was first put up (2003). It was back-lit with white christmas tree lights at night. The lights and ivy are all gone now. They got too old and tattered. This past summer I gave it a fresh coat of white paint, so now it doesn't have gold trim around the edges either. Maybe in the spring I will restore it to its former glory.

Interesting story; This is actually the second pentagram sign to be hung. The first one was only up about a month before someone decided to tear it down. They came in the night with a cordless drill, pulled out all 13 four inch long mounting screws to take it down, smashed it into three pieces, and threw the pieces through my front window. Wasn't that nice of them? Oh, yeah, they left a hate note in the mail box too.


And now we go inside.

The front counter.

The herb jars and knife case.

The candles.

The book shelves.

The view from the front door.

The public altar.

As I mentioned before, this is where I do most of my creating. Through that black curtain, to the right of the altar, is my workroom. Maybe I'll post some pics of it in the future, but right now it's really messy.

One last odd fact about my shop; it seems to have some kind of mystical cloaking field around it. Several times a week we get people complaining about how hard it is to find the store. Some of them call us from their cars asking for directions. Many tell us that they drove by it three or four times before they found it. I've always thought that was very odd. We are in a mostly residential neighborhood, with only on street parking, and the road we are on is not a main drag, but it gets a lot of traffic. We are on the corner. There is a stop light at our corner. The building is 60 feet long and bright yellow (on the side). We have a 4ft. high and 16ft. long sign on the marquee. There is a 4ft. diameter bright white pentagram on the side of the building. How is that hard to spot?