Friday, October 30, 2009

Miniature Wands

Just a quick post before bed.
At the shop, we sell a lot of kits that we put together from raw materials and odds and ends. One of the favorites is our mini-altar kits. Most of the time I will hand finish a box with that in mind. I will also pull together some miniature sized altar tools; a little athame, a mini-chalice, a small pentacle, a tiny bell, and a miniature wand. They are great for traveling, or for people with small apartments, or unsympathetic house-mates.

Here are a few of the mini-wands I made for travel altar kits. Each is only about six inches long. They are made from hardwood dowels, sanded and finished with stain. A glass sphere is epoxied to one end, and an amethyst point is epoxied to the other. Each is trimmed with copper foil tape, and one one of them I tried to solder over the foil, but I didn't like the way it turned out, so I didn't do it on all of them. The glass spheres had to be ground down with the dremel to make a flat spot, so it would sit nicely on the end of the shaft.

The shafts are each decorated differently. I use a combination of brads and wire, and whatever else I can find that would look decent. It's hard to keep coming up with different styles, so many of them look a lot alike.

Thursday, October 29, 2009

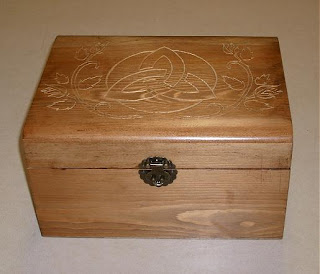
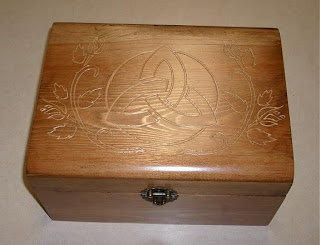
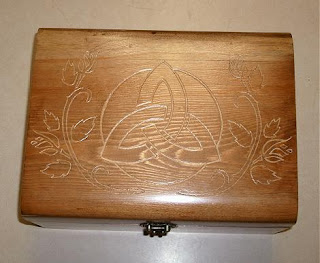
Large Wooden Box with Triquetra and Roses

This was a nice decent sized wooden box with antiqued brass hinges ad hasp. I say 'was', because I sold it last weekend at the annual Witches' Ball, where I was vending.

It was one of the larger wooden boxes I have ever re-finished (8.25in. x 10.75in. x 6in.). It was, of course, one of those pre-made craft store boxes, but an exceptionally nice one. I believe it was made of pine, as opposed to the usual bass wood or balsa.

After removing the hardware and sanding it real good, I stained it with a honey maple, a much lighter stain than I usually use. Then I laid out a design on the lid with pencil, using a rose stencil and a paper print out of a triquetra, which I traced with carbon paper. I had planned on creating a design on the sides as well, but never could decide on what to put there. A moot point now.

Once the design was penciled in, I went over it with the dremel, using a conical stone grinding bit. As I have mentioned before, this has the benefit of creating less 'burring' than would a regular wood carving bur bit. It sands the wood down rather than carving it up. This makes for a much cleaner line, in my opinion, and requires no further sanding.

Since I stained the wood prior to engraving it, the wood was lighter in the grooves than the surrounding flat areas. I left it this way, instead of my usual 'color in the grooves with a sharpie' or dark stain. I like staining the wood first, even when I do plan on darkening the grooves with a sharpie. It makes for a very nice contrast while you are engraving. It makes seeing your lines and judging your depth much easier.

This piece sat around the workbench in this state for several months while I ruminated over what to do with the sides. In the end, laziness won out. I decided to just top coat it and be done with it. I gave it two or three coats of clear polyurethane sealer, and then I lined the bottom and the underside of the lid with velvet.

I am still working on refining my technique when it comes to lining boxes like this. I cut a piece of cardboard, or chipboard to the size of the bottom and trim it a little. Then I glue bridal velvet to the cardboard with spray glue, wrapping the edges around. I never buy cheap crushed velvet. I get the good stuff. It costs me about $25-$30 a yard. Then I glue it down to the bottom of the box. I have made one or two boxes where the sides and bottom are lined, but this was hard. I'm not good enough at judging the fit. I have seen a lot of prop makers on the brassgoggles forum who do linings, and theirs look so much better and more complex. I would like to learn how to do more like they do.

Tuesday, October 13, 2009

The Shop: Book of Shadows

I have mentioned in several previous posts that I own a shop, specifically a metaphysical bookstore. It is called Book of Shadows. Although not a craft project in the strictest sense, it is one of my creations (at least as much as the garden was). And since I seem to mention it fairly frequently, I thought you, the reader, might like to see it. So here it is, inside and out.

This first pic is an older one. It features the original marquee sign. Below, are pics with the new marque sign (and when I say new, I mean about four years old). For some reason, I never seem to take pics of things until after they are old and faded. Both signs were hand lettered and painted by myself.

All these pictures are from our current location (1100 Clarendon SW Canton, OH), where we have been for the last 12 years. For two years before that, we were at two other locations elsewhere in town, but I have no pictures of those locations.

The pentagram on the side of the building was really beautiful when it was first put up (2003). It was back-lit with white christmas tree lights at night. The lights and ivy are all gone now. They got too old and tattered. This past summer I gave it a fresh coat of white paint, so now it doesn't have gold trim around the edges either. Maybe in the spring I will restore it to its former glory.

Interesting story; This is actually the second pentagram sign to be hung. The first one was only up about a month before someone decided to tear it down. They came in the night with a cordless drill, pulled out all 13 four inch long mounting screws to take it down, smashed it into three pieces, and threw the pieces through my front window. Wasn't that nice of them? Oh, yeah, they left a hate note in the mail box too.


And now we go inside.

The front counter.

The herb jars and knife case.

The candles.

The book shelves.

The view from the front door.

The public altar.

As I mentioned before, this is where I do most of my creating. Through that black curtain, to the right of the altar, is my workroom. Maybe I'll post some pics of it in the future, but right now it's really messy.

One last odd fact about my shop; it seems to have some kind of mystical cloaking field around it. Several times a week we get people complaining about how hard it is to find the store. Some of them call us from their cars asking for directions. Many tell us that they drove by it three or four times before they found it. I've always thought that was very odd. We are in a mostly residential neighborhood, with only on street parking, and the road we are on is not a main drag, but it gets a lot of traffic. We are on the corner. There is a stop light at our corner. The building is 60 feet long and bright yellow (on the side). We have a 4ft. high and 16ft. long sign on the marquee. There is a 4ft. diameter bright white pentagram on the side of the building. How is that hard to spot?

Monday, October 12, 2009

Enough with the Pens Already!

OK, this will be my last post of pens for a little bit, unless I come up with something truly unique. But I have been cranking them out at a pretty good pace. This first one is one of three I have in this line. It is unlike the others I have made so far. It was also much more difficult to make than the others. It has three coats of black lacquer on it, and the skull is cast resin. Wrapping the grip in wire was a little rough on the hand, and difficult to affix without messing up the lacquer.

These others are variations on a theme. Once I find a design that works well, I tend to run it into the ground. The first two are very similar to one posted previously, but have a satin cord wrapped grip.


OK, that should do me for a while. I'll be making some more, but I'll try to hold them for future posts. We need to pace ourselves. Don't want to OD on pens.

Tuesday, October 6, 2009

More Pen Madness

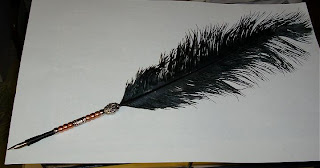
Yesterday, I spent another $70 at the craft store buying supplies to make more of these quill pens I've been working on. That brings the total investment into the pen and ink fiasco to something like $200. On the plus side, the creative juices are starting to flow, and I have been turning our some fairly decent items, IMHO. Here are four new pens that I finished last night.


I'm thinking of putting them up on Etsy.com for sale, but I'm not sure yet how I would ship them. So far, in my shop, I have sold two bottles of ink and one pen. Another 30 or so pieces, and I should break even.

Sunday, October 4, 2009

Not Quite Stained Glass

My shop (Book of Shadows: Supernatural Gifts, 1100 Clarendon SW Canton, OH 44710) is where I spend a lot of my time. It is where I create most of my art. I also use that creative skill, from time to time, to spruce up the place. I am by no means a great decorator. In fact, most of the best decorative ideas I have incorporated into the shop have been stolen from what I have seen other people do. I have no shame about this, as before I started checking out other people's design ideas and appropriating them, my shop looked like a metaphysical hardware store. Besides, someone once said, "Good artists borrow. Great artists steal."

Not that any of these design elements were either borrowed, or stolen. They are actually some of my few original ideas. The picture above is of my hand made "Open" sign. It was made with that paint that looks like stained glass when it dries. The face plate is a piece of Plexiglas that has been set into a wooden frame. I ran a router down the length of a piece of 1x2 to create a groove for the plexi to sit in. The back panel is a piece of white tile board that has been covered with aluminum foil to help reflect the maximum amount of light back towards the front panel for higher visibility during the day. Tucked away on the side edges, sandwiched between the front and back panels, are two small fluorescent lights that light it at night. The design was first drawn on paper in a 1:1 scale in pencil. Then the plexi was laid over top of it, and the paint was applied using the drawing as a template. The colors were much more vibrant of course. The sign is several years old now and has been exposed to a lot of UV rays. You can see where the red is starting to wash out in places.

Years ago, when the shop first opened, I did a similar sign for the front window. It was much larger and depicted the store's name and a large pentagram. It has not weathered time well. It is very badly faded, even after having been recolored at least once, and now has a large piece broken off in the corner. This pic was taken from inside looking out. It looks even crappier now. It has been out of service for years..

I've always loved the look of stained glass. These pictures are of the ceiling lights inside the shop. The store's interior was very bright, and the white light from the florescent light fixtures seemed harsh. I wanted to warm it up a bit with some color, so I decided to transform the lighting fixtures into stained glass "skylights".

These were actually very easy to make. I pulled down the clear plastic covers from the light fixtures. One side of these plastic lenses is bumpy, to refract the light, and the other side is smooth. I made sure that the smooth side was on the side facing the light bulbs. Then I laid out a pattern on the smooth side using black electrical tape. You have to make sure that you don't stretch the tape as you pull it off the roll, or it will shrink up on you over time and distort the design.

Then I took colored cellophane and cut it to size to fill in the panels. I secured these in place around the edges with clear cellophane tape. It's actually a rather rickety affair when you see it up close, but since you never see it up close on that side, unless you are changing the light bulbs, it doesn't matter. The effect is remarkable. Of course these lights are many years old now too, so there has been considerable fading. You can hardly tell that there were green and purple and yellow panels in them at one time. Some of them are really starting to show their age, and badly need redone. I'm just too lazy.